


Compact Disc (CD): History, Production Process, and Future Trends
Background
Since the phonograph’s debut in 1876, music has captivated home audiences. In recent decades, the compact disc has emerged as the preferred medium for recorded music.
A compact disc (CD) is an optical storage medium that encodes digital data—audio, video, or computer information—using a focused laser beam. This article focuses on audio CDs.
The CD’s roots trace back to the 1960s digital‑electronics era. Although early applications lay outside audio, the technology gradually migrated into sound reproduction.
During the same era, companies such as Sony and Philips pioneered optical storage and laser technology.
By the 1970s, digital and optical technologies converged to solve three core challenges in digital audio.
First, a viable method to digitize audio signals—pulse‑code modulation (PCM), based on Shannon’s 1948 theory—was established.
Second, the storage medium: optical discs compressed large data volumes into microscopic pits, allowing one million bits per second to fit under a pinhead‑sized area.
Third, rapid data retrieval demanded integrated‑circuit processing capable of executing millions of operations in microseconds.
By the late 1970s, Sony and Philips had standardized optical storage; in 1981 a consortium of 35 manufacturers adopted the standard, and by 1982 the first commercial CDs and CD players entered the market.
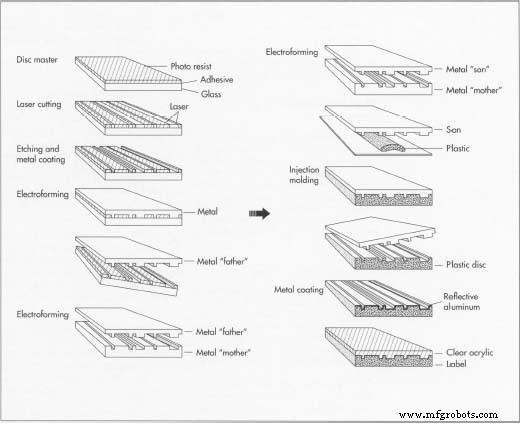 Making a compact disc begins with a glass “disc master.” The master is encoded with audio, then subjected to electroforming. Metal layers are deposited using electric currents. The finished master is transferred onto a plastic disc, finished with a reflective aluminum layer, protective acrylic, and a printed label.
Raw Materials
A CD comprises three layers: a polycarbonate base, a thin aluminum (or occasionally silver or gold) coating, and a clear acrylic protective layer.
Design
Adhering strictly to Sony‑Philips standards ensures universal compatibility. A CD measures 4.72 inches (120 mm) in diameter, 0.047 inches (1.2 mm) thick, with a 0.59‑inch (15 mm) central hole, weighing about 0.53 ounce (15 g).
Standard CDs hold up to 74 minutes of data, though most contain ~50 minutes of music on one side. The data is encoded as a continuous spiral of pits and lands. A laser reads these variations, converting them into electrical signals that reproduce the original audio.
Manufacturing Process
Compact discs must be produced in a clean‑room environment free of dust. Even the smallest particle can render a disc unreadable.
Preparing the disc master
- The original music is first recorded onto a digital audio tape. Next, the audio program is transferred to a 3/4‑inch (1.9 cm) video tape, and subcodes for indexing are added. The result is a pre‑master tape.
- The pre‑master tape is used to create the glass master—a polished disc coated with adhesive and photoresist. It measures ~240 mm in diameter and 6 mm thick. The disc is then cured in an oven.
- Both the pre‑master tape and glass master are fed into a laser‑cutting machine. The tape’s audio is played back; a CD encoder converts it to an electrical signal that powers a laser, which exposes grooves into the photoresist.
- The exposed grooves are etched away, forming the pits. A metal coating, typically silver, is applied, yielding a master that contains the exact pit‑and‑land track.
Electroforming
- After etching, the master undergoes electroforming. A metal layer—usually nickel—is deposited using an electric current in an electrolytic solution. The layer’s thickness is tightly controlled.
- The metal layer is then peeled off, leaving a negative impression of the track—this is the father.
- The father is electroformed again to produce one or more mothers, positive copies of the original track. Each mother then yields a son (stamper) with a negative impression. The son is used to produce the final CD.
- After separation from the mother, the son is rinsed, dried, polished, and cut to the correct center hole and outer diameter.
Replication
- The son is placed into a die in an injection‑molding machine. Molten polycarbonate is poured around it, forming a plastic disc that adopts the positive impression of the track.
- The center hole is punched out. The disc is then scanned for flaws such as bubbles, dust, or warps; any defect leads to disc rejection.
- If the disc passes inspection, a thin reflective aluminum layer is vacuum‑deposited onto it.
- A clear acrylic layer is applied, followed by label printing—typically via silk‑screening. The CD is then ready for packaging.
Quality Control
Because data pits are microscopic, the manufacturing process demands extreme precision. Quality control begins with a controlled clean‑room environment and extends to each production stage.
Key checkpoints include laser‑based inspection of the glass master’s smoothness, photoresist thickness, and after each coating step to detect warps, bubbles, dust, and encoding errors. Human inspectors use polarized light to spot defective pits.
Equipment such as the laser‑cutting machine must remain vibration‑free; otherwise, cutting accuracy suffers, increasing rejection rates.
The Future
Compact discs’ massive storage capacity, data accuracy, and durability keep them relevant for music and video. Emerging products like CD‑Interactive (CD‑I) combine audio with computer and television interactivity.
Manufacturing is increasingly automated, reducing facility size, human intervention, and rejection rates. In the first decade of CD production, quality control processes have become almost fully automated.
Manufacturing process
- Pulsed‑Light Sensor: Amplify LED Light Pulses into Audible Sound
- Build a Low‑Frequency Astable Multivibrator Audio Oscillator with Discrete Transistors
- Build a High‑Performance Class B Push‑Pull Audio Amplifier with TL082 Op‑Amp
- Compact Disc Player: Accurate, Wear‑Free Digital Audio Playback
- How Disc Couplings Reduce Downtime and Extend Machine Life
- ABB Introduces Compact, Lightweight IR 14050 Cobot – Flexible, Safe, Precision‑Driven
- Arduino Audio Frequency Detector – Measure Loudest Sound Peaks with High‑Sensitivity Module
- How to Play Audio with Arduino UNO and DFPlayer Mini – Step‑by‑Step Guide
- Compact Twin-Spindle Lathe – High-Performance Material Handling & Precision Turning
- Efficient Compact Robotics Solutions from RobotWorx