Build Your Own LUMAZOID: A DIY Arduino Music Visualizer
Components and supplies
Arduino Nano R3
×
1
Digilent WS2812 Addressable LED Strip
×
1
Pushbutton Switch, Momentary
×
2
Rotary potentiometer (generic)
×
2
5 mm LED: Red
×
1
Through Hole Resistor, 470 ohm
×
1
Necessary tools and machines
Soldering iron (generic)
Solder Wire, Lead Free
Apps and online services
Arduino IDE
About this project
Ready to turn your music into a mesmerizing light show? This guide walks you through creating a real‑time music visualizer that syncs stunning LED patterns to your audio. The original open‑source design, developed by Nootropic Design, is available as a ready‑made board, but building it yourself gives you deeper insight and full control over the hardware.
Our version runs on an Arduino Nano (or Uno) and supports any WS2812/WS2812B LED strip—whether you have 60, 120, or 180 LEDs. With eight distinct patterns, a random mode, and three color schemes, you can craft the perfect visual accompaniment to any track. Advanced controls let you adjust sensitivity, brightness, and the frequency bands you’d like to emphasize—whether you’re after a deep bass pulse or a full‑band spectrum.
Power is simple: 5 V / 2 A or higher will keep the strip and controller humming. All you need are a few components and the open‑source code, which you can download from GitHub.
Below is a concise parts list and step‑by‑step instructions to assemble, configure, and enjoy your own LUMAZOID visualizer.
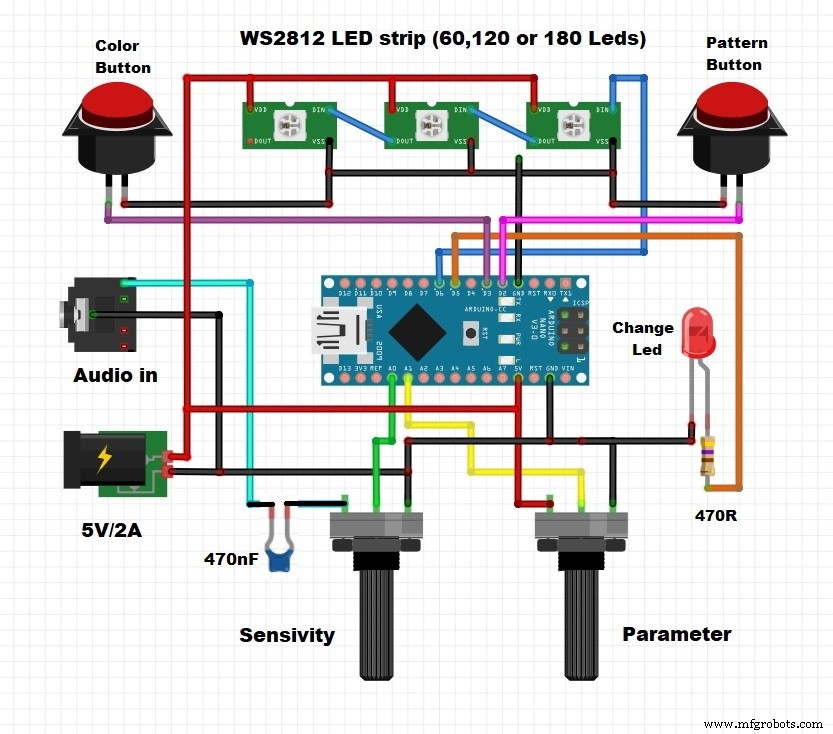
Key components include:
WS2812 LED strip (60–180 LEDs)
Arduino Nano microcontroller
Two rotary potentiometers for real‑time control
Two momentary pushbuttons for navigation
Standard 5 mm red LED for status indication
Configuration steps are straightforward:
Hold the color button while powering up to adjust brightness. The first eight LEDs will display a rainbow; turn the knob to set the desired brightness and press the button again to save.
Hold the pattern button during startup to set strip length. One, two, or three red LEDs will indicate 60, 120, or 180‑LED mode. Adjust the knob and press again to store the selection.
Press and hold both buttons to change the frequency response. The knob selects how many of the eight audio bands are visualized. For a bass‑centric look, pick the lower 2–3 bands; for a full spectrum, choose all eight.
Cycle through the eight visual patterns with the pattern button. A white LED marks the current pattern; a red LED indicates the random mode.
Switch color schemes with the color button. A blue LED at the strip’s start shows the chosen scheme.
Once configured, connect an audio source to the Arduino’s input and watch the LEDs dance in harmony with your music.
We housed the prototype in a repurposed enclosure for convenience, but feel free to mount the electronics in a compact case and run the LED strip via a dedicated cable.
Code
Source code and firmware
All code, libraries, and documentation are hosted on GitHub. The repository includes detailed setup instructions, pin mappings, and sample sketches.