


Build a Custom Arduino Joystick Steering Wheel for Gaming
Components and supplies
 |
| × | 1 | |||
 |
| × | 1 | |||
 |
| × | 1 |
Necessary tools and machines
 |
| |||
 |
| |||
 |
|
Apps and online services
|
|
About this project
Arduino Joystick + Flying Creation
In this article, we will realize a project with Arduino. Specifically, we will make a steering wheel that simulates a joystick.
It's like a controller that you can use on Steam (digital rights management, multi-player and communication mode). I thought to run this project is a passionate racing, always playing with the keyboard or with a joystick it was always the same as I went on amazon to compare a driving simulator but prices were a bit high. I've been a couple of days where I had fun. If you have any suggestions on how to improve this project, do not hesitate to contact me !!!
Are you coming to turn Arduino into a controller?The article plans to flash the Arduino communication chip to make it recognizable as a USB gamepad. The procedure is safe and reversible but I do not under any circumstances assume any responsibility in case of problems or malfunctions.
First download the latest version of UnoJoy, a library that thanks to a special firmware will turn into a device detectable as a USB joystick. To use UnoJoy you first need to install the appropriate drivers by running the InstallUnoJoyDrivers.bat file that you find in the folder you just downloaded.
We also need to install the ATmel FLIP tool that is used by our "UnoJoy" library in order to flash the firmware on the Arduino communication chip.
Are you going to load the firmware on Arduino?First, put Arduino in DFU (Device Firmware Update) mode by stepping between the two pins further ahead of the group of six protruding pins that are next to the USB socket (you can see the two pins in the picture) in this way we have flashed the firmware on Arduino. By making a contact between the two pins the various Arduino LEDs will light up briefly. Now you have to run the file of UnoJoy TurnIntoAJoystick.bat, and after disconnecting and reconnecting an Arduino computer, it will be detected as JoyStick instead of as Arduino. To get back to having a standard Arduino the procedure is identical but the file to run this time is TurnIntoAnArduino.bat.
Simple controller
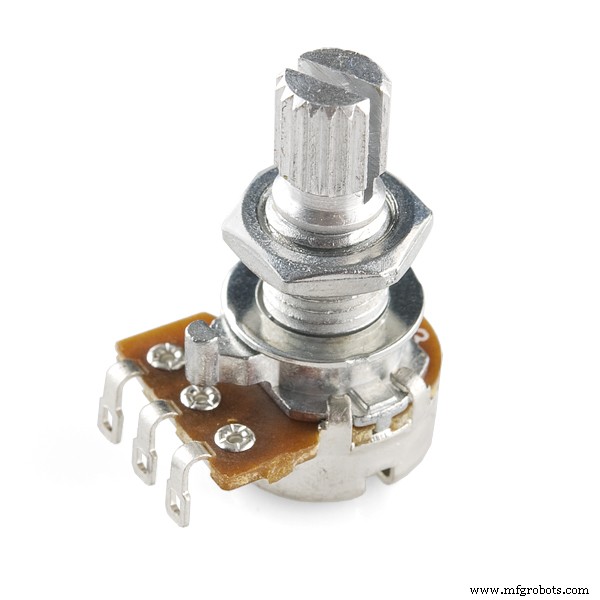
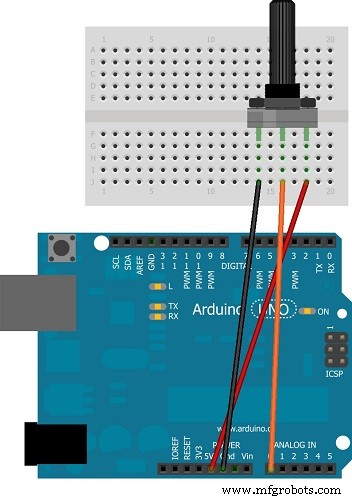
To build a controller, in our case and it is a construction a steering wheel, we will need a 10K ohm potentiometer connected on pin A0 (see figure below). Instead you get code forward to the UnoJoy library so you have to copy the file UnoJoy.h to the folder where you will save the sketch.
Play on SteamComplete Steam as a gamepad that of XBOX360, there is a program capable of mapping a USB controller on a gamepad for virtual XBOX360: x360ce. Download the 64-bit or 32-bit version depending on the game you want to play. Once extracted, copy the file x360ce.exe into the folder containing the executable of the game, start x360ce.exe that has just copied and this will be the presence of a USB JoyStick.
If you want to build a steering wheel too I made a video tutorial on my YouTube channel, there is the link below.
If you have any questions, from the advice you can contact me here or leave a comment under the Youtube video.
TO RETURN UPDATED ON THE FUTURE PROJECTS SUBSCRIBE TO THE CHANNEL CLICK "HERE" !!
Code
- Code
CodeC/C++
/* Arduino USB Joystick HID demo */

/* Author: Darran Hunt
  Released into the public domain.
  Update by RICLAMER in 25/03/2014 to use Analog ports and digital ports
  This code is to be used with Arduino UNO (6 axis and 13 Button )
  This code is compatible with Arduino Mega.
*/

/* INSTALATION
 Just install POT in each analog port. Using the _Grnd _Analog _5V Arduino.
 Like this image: http://arduino.cc/en/uploads/Tutorial/joy_sch_480.jpg
 To setup the buttons, just install you prefered button switch under GND and Port Digital 02~13.
 Use Flip to erease and burn this firmware DFU: https://github.com/harlequin-tech/arduino-usb/blob/master/firmwares/Arduino-big-joystick.hex
 I used Arduino R3 with Atmega 16U2.
*/

#undef DEBUG

#define NUM_BUTTONS  40             // you don't need to change this value
#define NUM_AXES  8        // 6 axes to UNO, and 8 to MEGA. If you are using UNO, don't need to change this value.

typedef struct joyReport_t {
 int16_t axis[NUM_AXES];
 uint8_t button[(NUM_BUTTONS + 7) / 8]; // 8 buttons per byte
} joyReport_t;

joyReport_t joyReport;

uint8_t btn[12];
int fulloff = 0;
void setup(void);
void loop(void);
void setButton(joyReport_t *joy, uint8_t button);
void clearButton(joyReport_t *joy, uint8_t button);
void sendJoyReport(joyReport_t *report);


void setup()
{
 //set pin to input Button
 for ( int portId = 02; portId < 13; portId ++ )
 {
   pinMode( portId, INPUT_PULLUP);
 }
 Serial.begin(115200);
 delay(200);


 for (uint8_t ind = 0; ind < 8; ind++) {
   joyReport.axis[ind] = ind * 1000;
 }
 for (uint8_t ind = 0; ind < sizeof(joyReport.button); ind++) {
   joyReport.button[ind] = 0;
 }
}

// Send an HID report to the USB interface
void sendJoyReport(struct joyReport_t *report)
{
#ifndef DEBUG
 Serial.write((uint8_t *)report, sizeof(joyReport_t));
#else
 // dump human readable output for debugging
 for (uint8_t ind = 0; ind < NUM_AXES; ind++) {
   Serial.print("axis[");
   Serial.print(ind);
   Serial.print("]= ");
   Serial.print(report->axis[ind]);
   Serial.print(" ");
 }
 Serial.println();
 for (uint8_t ind = 0; ind < NUM_BUTTONS / 8; ind++) {
   Serial.print("button[");
   Serial.print(ind);
   Serial.print("]= ");
   Serial.print(report->button[ind], HEX);
   Serial.print(" ");
 }
 Serial.println();
#endif
}

// turn a button on
void setButton(joyReport_t *joy, uint8_t button)
{
 uint8_t index = button / 8;
 uint8_t bit = button - 8 * index;

 joy->button[index] |= 1 << bit;
}

// turn a button off
void clearButton(joyReport_t *joy, uint8_t button)
{
 uint8_t index = button / 8;
 uint8_t bit = button - 8 * index;

 joy->button[index] &= ~(1 << bit);
}

/*
  Read Digital port for Button
  Read Analog port for axis
*/
void loop()
{

  // Create Matriz with value off switch button
 for (int bt = 1; bt < 13; bt ++)
 {
   btn[bt] = digitalRead(bt + 1);
 }

 // Power ON button if it is press. buton 17 at 28
 for (int on = 01; on < 13; on++)
 {
   if (btn[on] == LOW)
   {
     setButton(&joyReport, on + 16);
     //  Serial.println("botao ON");
     //  Serial.println(on+16);
     delay(1);
   }
   for (int on = 01; on < 13; on++)
   {
     if (btn[on] == HIGH)
     {
       clearButton(&joyReport, on + 16);
     }
     //  Serial.println("Every buttons is off");
   }
 }

 /* Move all of the Analogic axis */
 /* Arduino UNO have only 6 port. Will be necessary set to 0; the not used port */
 /* In this example, i will use just 3 axis. X, Y, Z */
 /* if you will use all 6 analog ports, set axis < 3, to axis < 5 */


 for (uint8_t axis = 0; axis < 2; axis++) // 1 - A0 == Wheel == X axis
 {
   joyReport.axis[axis] = map(analogRead(axis), 350, 700, -32768, 32767 );
 }


 //Set to 0; the not used analog port.
 //if you will use all 6 analog ports, exclude the lines, axis[3] at axis [5] */
 //Report.axis[3] = 0;

// You need to ground A1 pin, because its the Y axis and if you dont use it, need to ground.

  joyReport.axis[4] = A0;
 joyReport.axis[5] = A3;
 joyReport.axis[6] = A2;
 joyReport.axis[7] = 0;
 joyReport.axis[8] = 0;

 //Send Data to HID
 sendJoyReport(&joyReport);

 delay(35);
 fulloff = 0;
}
Custom parts and enclosures
volante_iDt4RqmPLZ.dwgvolante_idt4rqmplz_hakHRvVNYD.dxfSchematics
Manufacturing process
- Build an Arduino Iron Man: Components, Sensors, and Step‑by‑Step Guide
- Interactive Joystick Game with Arduino and LED Feedback
- Find Me: Smart Item Locator with Arduino and Bluetooth
- DIY Arduino Humidifier Controller with Relay – Safe High‑Voltage Setup
- Arduino 101: Build a Pedometer with DHT11 Sensor & LCD Display
- Build an Arduino RGB Color Mixer – Step‑by‑Step Tutorial
- PhoneLocator: Securely Locate Your Phone Anywhere
- Create a Web-Operated Joystick with Arduino UNO & WiFi Shield
- Arduino LED Bar Graph Controlled by Potentiometer
- Custom Arduino MIDI Arpeggiator – Modular Firmware & Euclidean Rhythms