


Enhancing IIoT Edge Development with WebSockets: Secure, Real‑Time Connectivity
 Editor's Note: The Industrial Internet of Things (IIoT) promises to provide deep insight into industrial operations and enhance efficiency of connected machines and systems. Large-scale IIoT applications rely on layered architectures to collect data from a broad range of sensors, move data reliably and securely to the cloud, and perform analysis required to deliver that insight and efficiency. In Industrial Internet Application Development, the authors provide a detailed examination of the IIoT architecture and discuss approaches for meeting the broad requirements associated with these systems.
Adapted from Industrial Internet Application Development, by Alena Traukina, Jayant Thomas, Prashant Tyagi, Kishore Reddipalli.
Chapter 3. IIoT Edge Development (Continued)
By Alena Traukina, Jayant Thomas, Prashant Tyagi, Kishore Reddipalli
Application-level protocols – WebSocket
In this section, we will try to build a simple IoT app for sending data from an XD-80 light sensor module to a receiver device, using a Raspberry Pi hub and the WebSocket protocol:
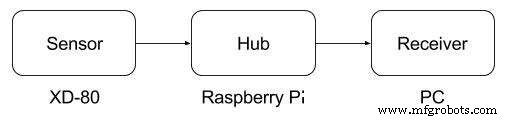
Data flow from an XD-80 sensor to a receiver device
WebSocket is most widely used in the case that one needs to enable fast transfer of real-time data. The protocol allows for two-way interaction between a client and a server, and for streaming multiple messages using the same TCP connection, which lowers the communications overhead.
In the following table, you can find a more detailed description of the protocol to understand whether it is suitable for your needs:
Key Value Open source Yes The OSI layer Application Data types String Limitations Not suitable for large amounts of binary data Possible operations Send/receive data Latency Very low Usage Real-time communication Security Yes Compression YesTable 3: WebSocket protocol specifications
For building the application, we will need the following.
Required software:
- Node.js 6+ (https://nodejs.org/en/download/ )
- RPIO (https://www.npmjs.com/package/rpio )
- WebSocket (https://www.npmjs.com/package/ws )
- Docker (https://docs.docker.com/engine/installation/ )
Required hardware:
- Raspberry Pi 3 (model B)
- A power adapter (2A/5V)
- A microSD card (8 GB+) and an SD adapter
- A XD-80 light sensor module
- A breadboard and a set of dupont cables
- An Ethernet cable for a wired network connection
Assembling a device
Before building an application, you need to connect an XD-80 sensor to a Raspberry Pi via a breadboard.
Preparing an SD card
To prepare an SD card, follow the sequence of actions as described:
- Download the latest Raspbian LITE image (available at https://raspberrypi.org/downloads/raspbian/ ).
- Connect your SD card to a computer and use Etcher (https://io/ ) to flash the Raspbian .img file to the SD card.
- Enable SSH using the following command:
cd /Volumes/boot
touch ssh
- To enable Wi-Fi, create conf with the following content:
network={
ssid=”YOUR_SSID”
psk=”YOUR_WIFI_PASSWORD”
}
 To create a file in a Linux console, you can use the GNU nano editor. It is pre-installed in most Linux distributives. All you need is to run the nano FILE_NAME command and follow the displayed instructions.
- Create the /home/pi/sensor
- Create the /home/pi/sensor/package.json file with the following content:
{
“name”: “sensor”,
“version”: “1.0.0”,
“description”: “”,
“main”: “index.js”,
“scripts”: {
“start”: “node index.js”,
“test”: “echo “Error: no test specified” && exit 1″
},
“author”: “”,
“license”: “ISC”,
“dependencies”: { “rpio”: “^0.9.16”,
“ws”: “^2.3.1”
}
}
- Create the /home/pi/sensor/index.js file with the following content, replacing REMOTE-SERVER-ADDRESS.com with a real value:
var WebSocket = require('ws');
var rpio = require('rpio');
var ws;
var receiver = 'ws://REMOTE-SERVER-ADDRESS.com:8080';
rpio.open(11, rpio.INPUT);
var establishConnection = function () {
ws = new WebSocket(receiver);
ws.on('close', establishConnection);
ws.on('error', establishConnection);
};
establishConnection();
var sendStatus = function () {
var status = rpio.read(11) === 0;
console.log('light status: ' + status);
var data = JSON.stringify({
device: 'raspberry',
timestamp: Date.now(),
light: status
});
try { ws.send(data); }
catch (e) {console.log('failed to send data to ' + receiver);}
setTimeout(sendStatus, 1000);
};
sendStatus();
- Create the /home/pi/sensor/Dockerfile file with the following content:
FROM hypriot/rpi-node:boron-onbuild
Internet of Things Technology
- DocBox CEO on Building Data‑Centric, Interoperable Healthcare IoT Solutions
- IoT Edge Computing: Bridging Devices and Cloud for Real‑Time Insights
- Prototyping IIoT Edge Devices: A Practical Guide
- Implementing HTTP Connectivity for IIoT Edge Devices: A Raspberry Pi DHT-12 Tutorial
- IIoT Edge Development with Modbus: Building a Secure Sensor Data Flow on Raspberry Pi
- Leveraging OPC UA for Robust IIoT Edge Development
- Step‑by‑Step Guide: Extracting PLC Data with IIoT for Real‑Time Insights
- Future Outlook: Advancing Industrial IoT for Production Excellence
- Revolutionizing MRO with Voice-Enabled IIoT
- Unlocking Actionable Edge Insights with AI & ML