


Mastering Stratasys Insight Control Center: Tips for Optimizing Model Placement and Build Efficiency
For many years, I simply accepted the default layout that Stratasys Insight places when building multiple models in Control Center. It wasn’t until recent training that I discovered how to tweak the Control Center options for real efficiency gains.
Reordering Instances
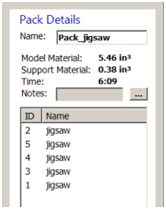
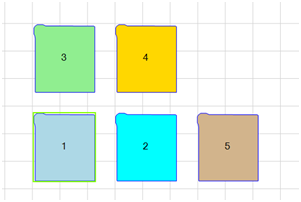
The first lesson was how to reorder the model instances to my liking. Like many users, I clicked “Repack” or tried dragging items around the grid in hopes of having the print head move in neat rows or columns instead of hopping all over the build plate. Below is an example of several copies of a single part on the grid, each tagged with a number that represents the exact sequence the print head will follow. The “Pack Details” panel shows the order from top to bottom.

My optimized print order started with #2, moved left to #5, then descended to build #4, #3, and finally #1. To achieve this, I left‑clicked the ID number in “Pack Details” and dragged it to the desired position. This action does not rearrange the grid layout, but the print head follows the new sequence, cutting build time.
First Instance Origin
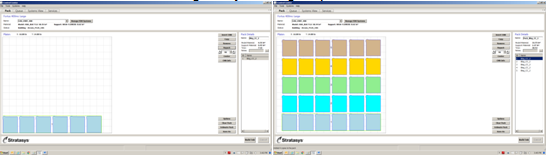
By default, the first instance and all copies are centered on the grid. To change this, uncheck “Repack models at platen center” in the Options menu, then click “Repack.” The instances will now start from the lower‑left corner.
Grid Fill
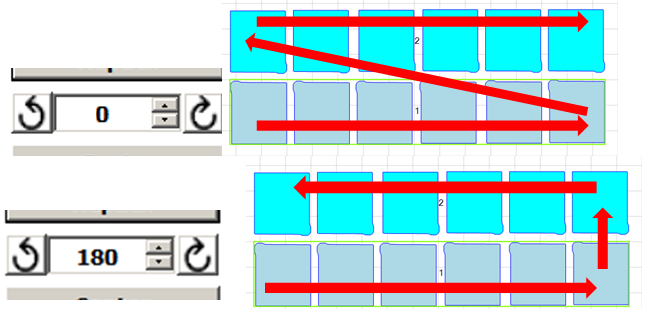
If you need to fill the grid without manually reordering dozens of instances, use the grid‑fill feature. In the example below, I copied a new instance, lined up several copies, saved the arrangement as a CMB file, cleared the pack, and then inserted the CMB group back into the build. The software remembers the original CMB order and applies it to subsequent groupings, but you can always override this by reordering individual instances.
The resulting print head path starts at #1, finishes that row, then resets to #2 and continues left to right. To eliminate the diagonal “air” move, set the rotation to 180°. Repeat this as needed to keep the print head motion efficient.
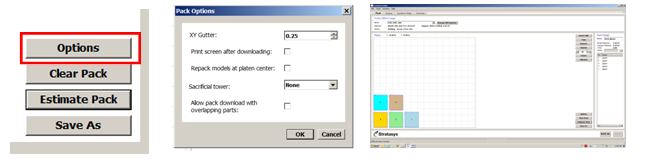
XY Gutter
The XY Gutter setting controls the spacing around each instance. The default is 0.25 inches, but you can increase or decrease it to accommodate tight packing or to add clearance for larger parts. I often tighten the gutter to squeeze an extra copy into the build.
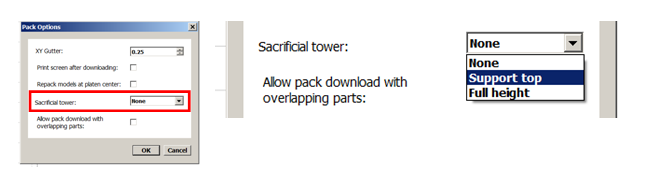
Sacrificial Tower
This option improves part quality by letting the print head deposit strands onto a temporary tower, producing a cleaner surface—especially important when printing Nylon 6. Three sub‑options exist: None (default), Support top (builds a tower up to the support foundation height), and Full height (builds a tower to the tallest model). I find “Full height” most effective when a sacrificial tower is needed.
Additional Options
Other editable settings in Control Center include “Print screen after downloading” and “Allow pack download with overlapping parts.” I rarely use these: I capture screenshots directly with the Print Screen key, and overlapping parts can introduce print failures. Leaving them unchecked is usually safest.
While Control Center offers many tweaks, the ability to reorder instances remains the most powerful tool for reducing build time and ensuring a predictable print head path. Stratasys may eventually add a dedicated row/column repacking feature, but until then, left‑click and drag in the Pack Details panel is the best approach.
Tags: Control Center, Insight Software, Pack Details, Stratasys
3D printing
- Robotics in the 21st Century: Distributed Systems, Telepresence, and Space Exploration
- Mastering SaaS: Strategies to Retain Control While Harnessing the Cloud
- Stratasys F123 Series – 3D Printing Made Simple for Every Professional
- Markforged 3D Print Farm: 25 Machines Delivering 10,500 Parts Monthly with 92% Yield
- Arduino Power Control Center: N-FET, P-FET, Relay & RTC Kit
- How Human-Machine Interfaces Empower Energy Management
- Printing with Multiple Infill Patterns & Densities: A Step-by-Step Guide
- Effortless Guide to Removing 3D Print Supports from the Bed
- CNC Turning Center vs. CNC Lathe: Key Differences Explained
- Unlocking CNC Efficiency: Embrace Connected Control