


Advanced Fiber Routing Techniques for Markforged 3D Printing: Boost Strength & Performance
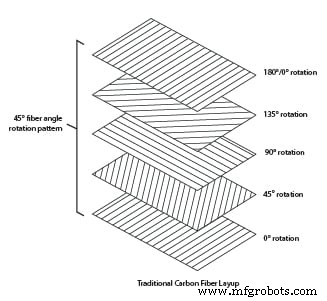
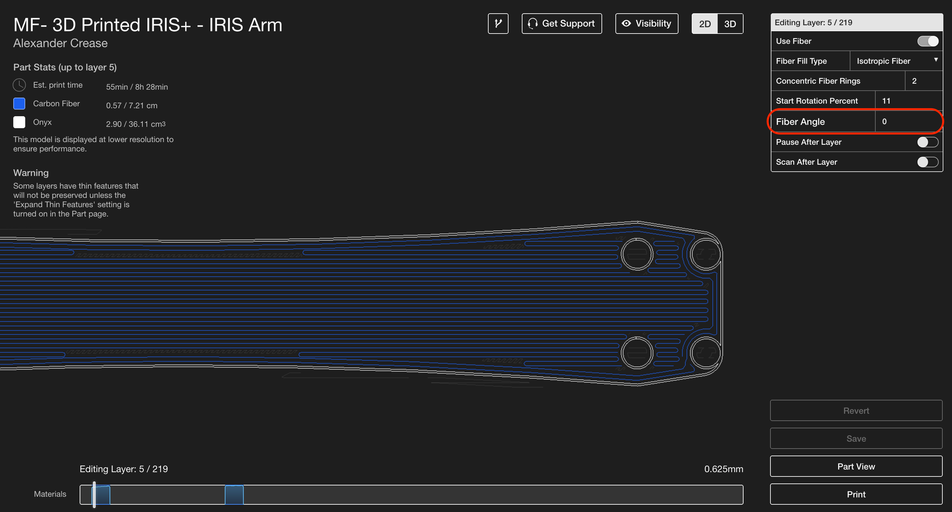
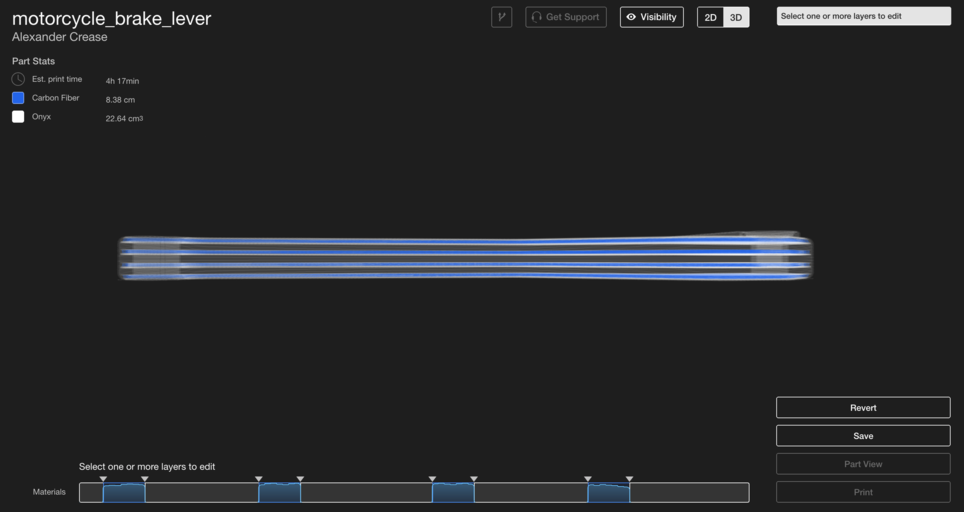
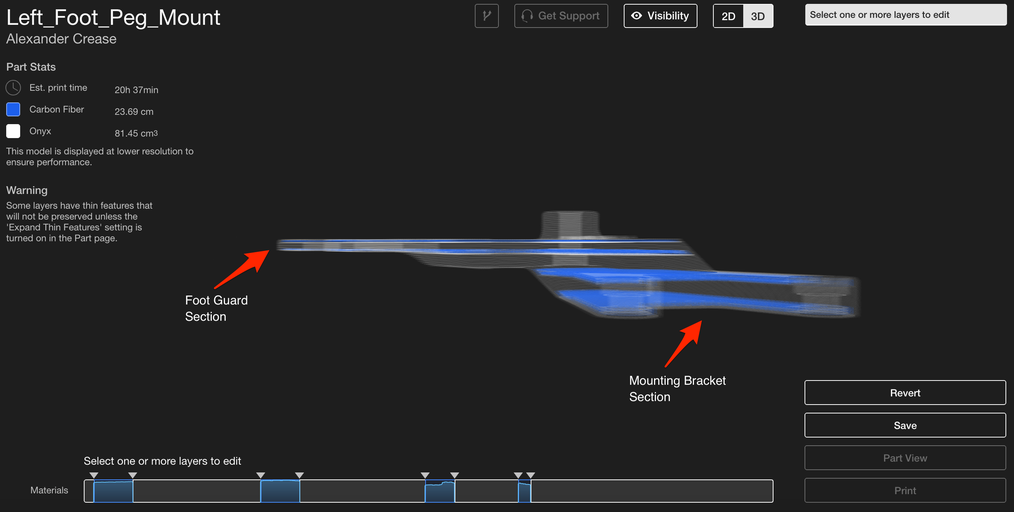
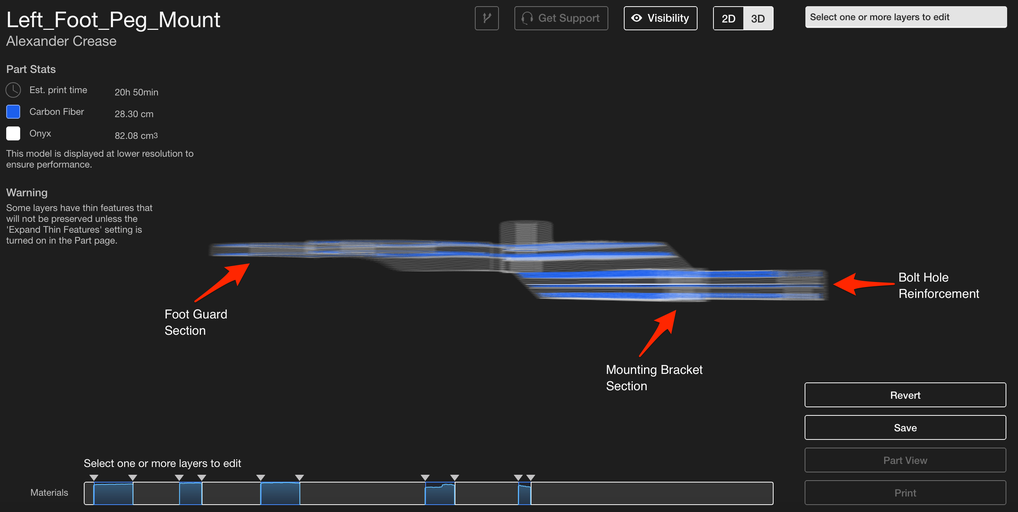
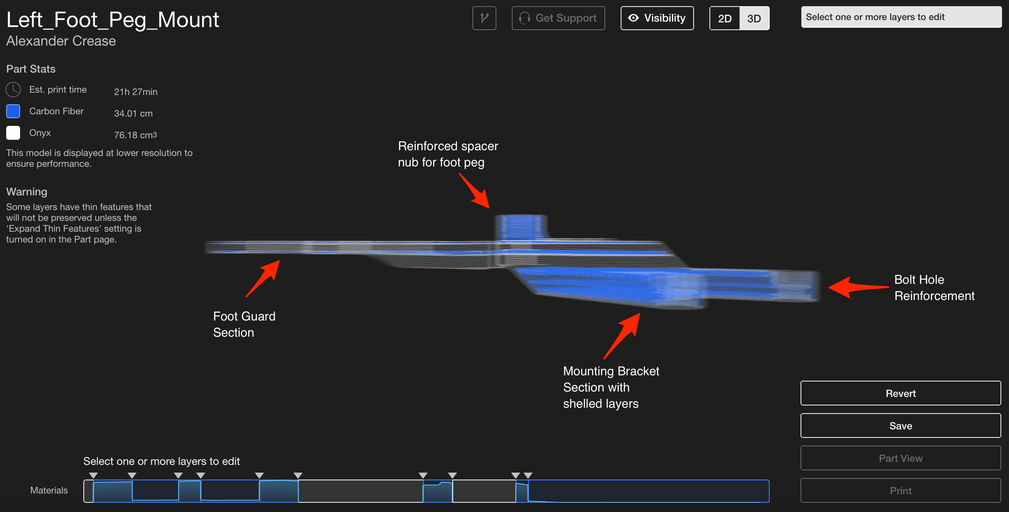
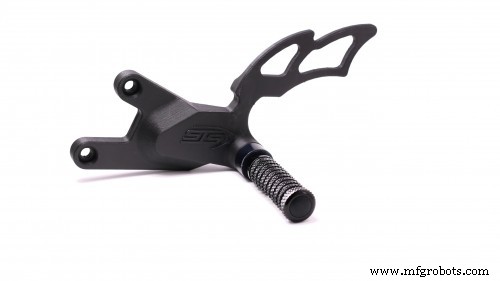
Editor’s Note: This is Part Two of our comprehensive series on efficient fiber routing for the Markforged 3D printer. If you’re new to the printer, contact us here. For a quick refresher, read Part One here. Designing for 3D printing demands the same rigor as any other manufacturing process—especially when working with Markforged’s high‑strength system. Certain geometries and strategies excel with specific processes, and choosing the right fiber routing can dramatically increase part strength while keeping print time and material usage optimal. Last week we explored basic reinforcement methods—sandwich paneling, perimeter reinforcement, and shelling—and how to apply them effectively. In this post, we’ll dive deeper into advanced strategies that let you target load paths, layer‑by‑layer, to create parts that perform under real‑world conditions. Concentric reinforcement distributes fibers around a part’s perimeter, which is ideal for general strength. However, many functional parts experience loading in a particular direction—such as bending along a drone arm or torque in a mechanical linkage. Aligning fibers with the dominant load direction can increase stiffness and reduce material waste. In traditional composite manufacturing, each ply is laid at a specific fiber angle. By rotating successive layers, manufacturers achieve a quasi‑isotropic lay‑up that balances strength in all directions. With Markforged’s “fiber angles” option, you can lock all reinforced layers to a single angle, or alternate between a small set of angles, to create a highly directional reinforcement. For example, a drone arm typically requires reinforcement along its length to prevent flex. By setting every reinforced layer’s fiber angle to 0°, you maximize stiffness along the arm while minimizing excess material. If two load directions are critical, alternate between the two angles to reinforce both axes. Fiber striping uses multiple stacked sandwich panels to reinforce bending in the XY plane. For parts with a consistent cross‑section and a substantial thickness, striping delivers uniform fiber reinforcement and significantly enhances torsional strength. When a part’s load profile varies across its geometry—such as a motorcycle foot‑peg mount—uniform reinforcement can be inefficient or even detrimental. Selective reinforcement targets high‑stress regions while keeping the rest of the part lightweight. Consider the rear foot‑peg mount from customer STS Turbo. The top “wing” protects the rider’s foot, while the mounting section carries bolt loads. A standard sandwich panel would add fiber to the outermost layers, creating an uneven structure that can fail under load. By defining two separate sandwich sections—one for the foot guard and one for the mounting bracket—we achieve even panels around each critical area. This selective approach preserves structural integrity where it matters most. Further reinforcement around the bolt holes—by adding a thin layer of fiber centered on the counterbored region—boosts local compressive strength and prevents tearing when the foot peg is bolted in place. Markforged’s Eiger software gives you layer‑level control, enabling you to blend multiple reinforcement strategies. For example, shelling the lower portion of a part can strengthen it against Z‑axis bending, while concentric fibers at the top enhance compressive and torsional performance. Using the foot‑peg mount again, we apply selective reinforcement for the load‑bearing sections, shell the lower region for Z‑axis bending, and add concentric fibers at the mounting nub. The result is a part that resists in‑plane bending, compressive bolt loads, and torsional forces—all while minimizing material use. Ready to elevate your part designs? If you have questions or need guidance, contact us. We’re eager to help you master fiber routing and unlock the full potential of Markforged printing. If you don’t own a Markforged printer yet, request a demo to see the Eiger software in action.Advanced Fiber Routing Techniques
Optimizing for a Specific Direction of Strength

Fiber Striping
Selective Reinforcement

Combinations
3D printing
- Cadillac CT5‑V Blackwing 2022: New Carbon Fiber Packages Boost Performance & Luxury
- Upgrading the 3DR Iris+ with 3D‑Printed Carbon Fiber Parts – Part 2: Electrical Modifications
- Carbon‑Fiber Hacksaw: A Lightweight Tool Printed on the Markforged Mark Two
- Optimizing 3D Printed Part Strength with Efficient Fiber Routing – Part 1
- Designing with Markforged Composite Filaments: Minimum Feature Sizes for Optimal Reinforcement
- Introducing the Composite Cable Clamp by MechEngineerMike: A Durable, Kevlar‑Reinforced Solution
- Markforged Elevates Drone Performance with Carbon‑Fiber 3D Printed Parts – Part 1
- Energy‑Efficient Lighting: Benefits, Technologies, and Implementation Strategies
- Top 3 PCB Routing Techniques for High-Speed Signal Integrity
- Optimize Injection-Molded Parts: Professional Finishing Options for Superior Performance