


Carl Calabria’s Expert Guide to Installing Inserts on the Mark One 3D Printer
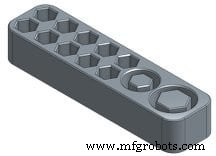
Carl Calabria’s meticulous approach to organization extends beyond a tidy workspace—he engineered a custom tool caddy that keeps every bit and socket used for maintaining the Mark One 3D printer perfectly in place. The result? A boost in productivity and a culture of precision that speaks to his deep expertise in additive manufacturing.
What the Caddy Includes
The Mark One Maintenance Toolset Caddy holds all the essential tools and two specially designed inserts. Each insert is fitted with 12 magnets that lock the bits securely, and the caddy’s design prevents the magnets from shifting during operation.
Step‑by‑Step: Adding Inserts During Print
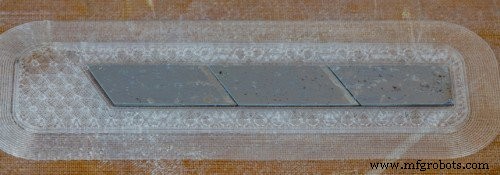
1. Design the caddy in OnShape. Carve out cavities for the razor blade and the 12‑magnet insert. The cavities run continuously so no separate nylon spacer is required.
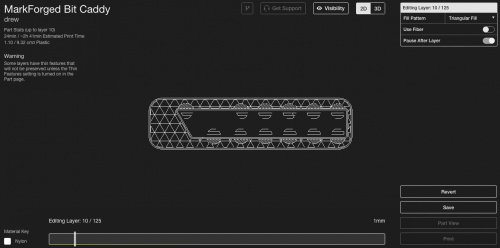
2. Export as STL. Once the geometry is finalized, export the model from OnShape.
3. Import into MarkForged Eiger. Open the STL in Eiger, click Part View, then 2D View.
4. Set pause points. Add a pause at Layer 10 for the razor blade and another at Layer 40 for the magnets.
5. Print the build. When the first pause occurs, place the razor blade into its cavity, applying a thin layer of glue stick on top.
6. Resume printing. Continue with the build. At Layer 40, insert the magnet array, coat with a light adhesive, and resume again.
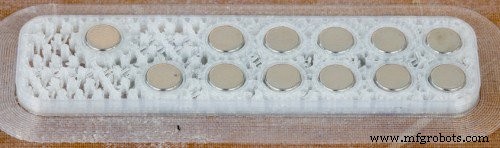
7. Finish. The remaining layers will print over the magnets, completing a robust, fully integrated caddy.
Important Tips
- The cavity height must match the insert’s size—over‑height risks printing in the air, under‑height can cause collision.
- Apply glue to the inserted hardware to ensure the subsequent layer bonds correctly.
- Download the STL file here.
- Download the MFP file here.
3D printing
- Mark Two Unveiled at SolidWorks World 2016 – Faster, Stronger, Smarter 3D Printing
- Mark X 3D Printer – Superior Strength, Precision, and Insightful Build
- Carl Calabria’s Magnetic Featherboard: A 3D‑Printed Innovation for Woodworking Precision
- Carl Calabria’s Carbon‑Fiber Jig for Precise Composite Spool Tensioner Alignment
- How to Properly Apply Glue Stick on Your Mark One Print Bed
- Five Essential Commandments for Flawless 3D Printing on the Markforged Mark One
- Why Glue Is Essential for the MarkOne Print Bed: 3 Key Benefits
- Mastering 3D Printed Top Layers: Proven Techniques for a Flawless Finish
- Prevent First-Layer Curling: A Comprehensive 3D Printing Guide
- Mastering the PYNQ Board: A Comprehensive Guide for Programmable Projects