


Measuring Current with an Ammeter: A Practical Guide
Parts & Materials
- 6‑volt battery
- 6‑volt incandescent lamp
Basic circuit construction components—breadboard, terminal strip, jumper wires—are assumed to be available. Only the items above are unique to this experiment.
Further Reading
Lessons In Electric Circuits, Volume 1, Chapter 1: “Basic Concepts of Electricity”
Lessons In Electric Circuits, Volume 1, Chapter 8: “DC Metering Circuits”
Ammeter Usage Learning Objectives
- Measure current with a multimeter
- Check a multimeter’s internal fuse
- Select the proper meter range
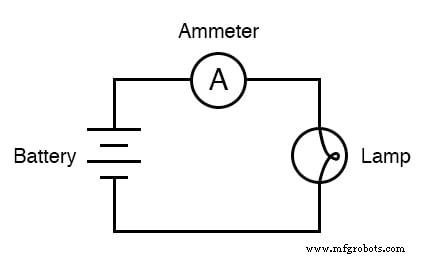
Ammeter Schematic Diagram
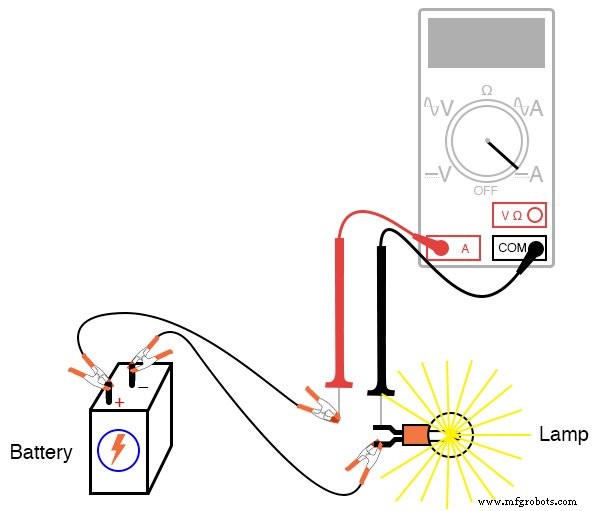
Ammeter Illustration
Experiment Instructions
Current is the rate of electron flow in a circuit, measured in amperes (A). The most reliable method is to insert the ammeter in series, so all current must pass through the meter.
Digital meters often have a dedicated jack for the red test lead when measuring current, whereas analog meters share jacks for voltage, resistance, and current. Refer to your meter’s manual for the correct procedure.
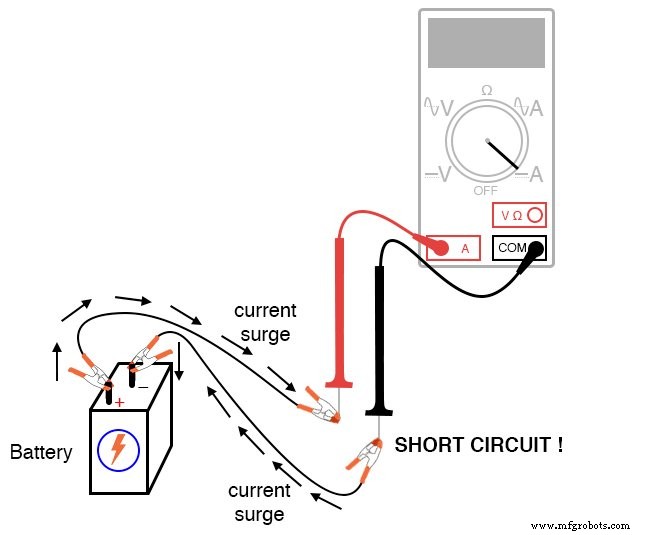
An ideal ammeter presents negligible resistance; it should not drop voltage when in series. If placed in parallel across a voltage source, it behaves as a short and can blow its internal fuse.
Fuse Protection
Ammeters contain a small fuse to protect against excessive current. A sudden surge—such as connecting the meter across a high‑voltage source—blows the fuse, rendering the meter inoperative until the fuse is replaced.
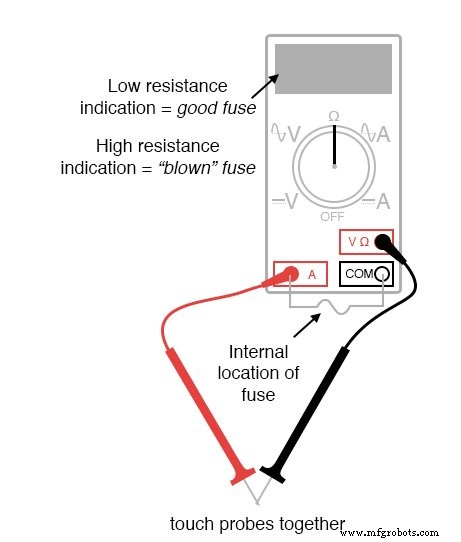
To test the fuse, switch the meter to resistance mode and touch the two probes together. On meters with a single set of jacks, keep the plugs in place and short the leads. On meters with separate jacks, insert the leads as shown:
Build a simple one‑battery, one‑lamp circuit with jumper wires. Verify the lamp lights before inserting the ammeter in series. Break the circuit at any point, connect the meter’s probes to the break, and select the highest current range first. Then dial down until the display shows the strongest reading without over‑range. If the reading is negative or the needle moves left, reverse the probe connections.
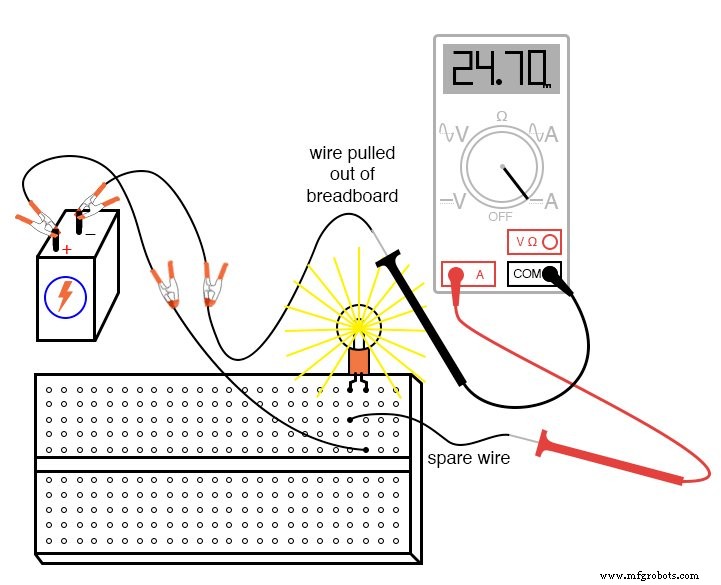
For a 6‑volt battery powering a small lamp, expect a current in the milliamps range (e.g., 24.70 mA). Digital meters often display a small “m” on the right to denote milliamps.
Try inserting the meter at different points in the circuit and observe how the measured current changes. The results should be consistent with Ohm’s law: higher resistance paths yield lower current.
Reconstruct the circuit on a breadboard as illustrated:
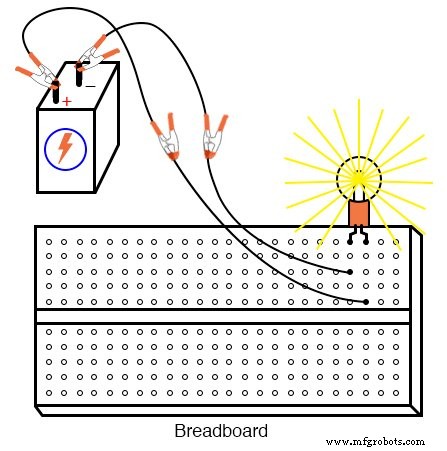
Connecting an Ammeter to a Breadboard Circuit
Students frequently wonder how to place an ammeter on a breadboard without creating a short. Follow this straightforward method:
- Identify the wire or terminal whose current you want to measure.
- Pull that wire out of its breadboard hole, leaving it hanging.
- Insert a spare wire into the same hole, leaving its other end hanging.
- Connect the ammeter between the two hanging ends.
Repeat this for different wires to confirm that current measurements match those taken in a free‑form circuit.
Experiment Results
Using a terminal strip yields similar readings:
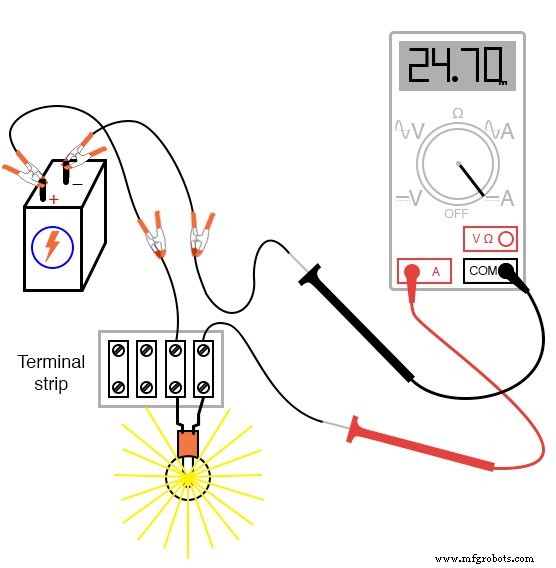
The example shows 24.70 mA—a realistic value for a small incandescent lamp. If your measured current differs, it’s acceptable as long as the lamp remains lit when the meter is connected.
Problems to watch for:
- If the lamp won’t light and the meter reads a large value, a short circuit may exist through the meter.
- If the lamp stays dark and the meter reads zero, the internal fuse is likely blown.
Use the fuse‑checking procedure described earlier to restore functionality.
Related Worksheets
- Basic Ammeter Use
- Ammeter Design
Industrial Technology
- Understanding Meter Design: From Classic Galvanometers to Modern Digital Displays
- Ammeter Design: Shunt Resistor Techniques for Accurate Current Measurement
- How Ammeter Resistance Affects Circuit Measurements: Insights & Solutions
- Mastering Clamp Meter Measurements: Current, Voltage, and Diagnostics
- Measuring Solder Mask Thickness: A Practical Guide
- Accurate Battery Testing: How to Use a Test Meter Effectively
- Precise Power Measurement Using Digital and Analog Multimeters
- Measuring AC and DC Current with Digital and Analog Multimeters: A Practical Guide
- Mastering Lot Tracking: A Key Strategy for Manufacturing Excellence
- What Is a Current Meter? A Guide to Measuring Electrical Current