


Smart Zoned Climate Control Using MediaTek LinkIt™ Smart 7688
Components and supplies
 |
| × | 1 | |||
 |
| × | 1 | |||
 |
| × | 1 | |||
 |
| × | 1 | |||
| × | 1 |
Apps and online services
 |
|
About this project
Winter is comingWhen my wife and I had our first child last winter, we got an electric space heater to keep the area immediately around our baby girl nice and warm. As we moved from room to room, we brought the heater with us, all the while thinking we were being super efficient having point-of-use climate control. A month later we get an electricity bill twice our normal amount and realize it would have been cheaper to just heat the whole house with the gas furnace around the clock.
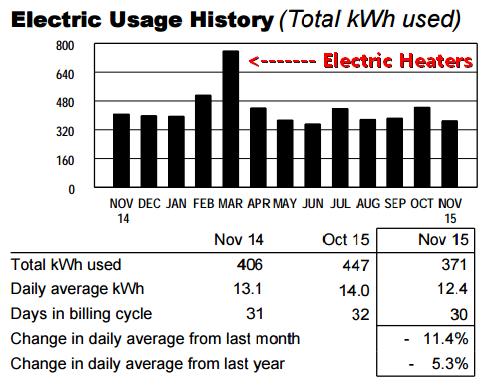
Winter is upon us again, so this time I upgraded to a WiFi thermostat so I can turn on the heater while I'm downstairs or warmly tucked under the covers. This is much more convenient, but we're still heating the whole house even though most of the time we're all in one part of the house.
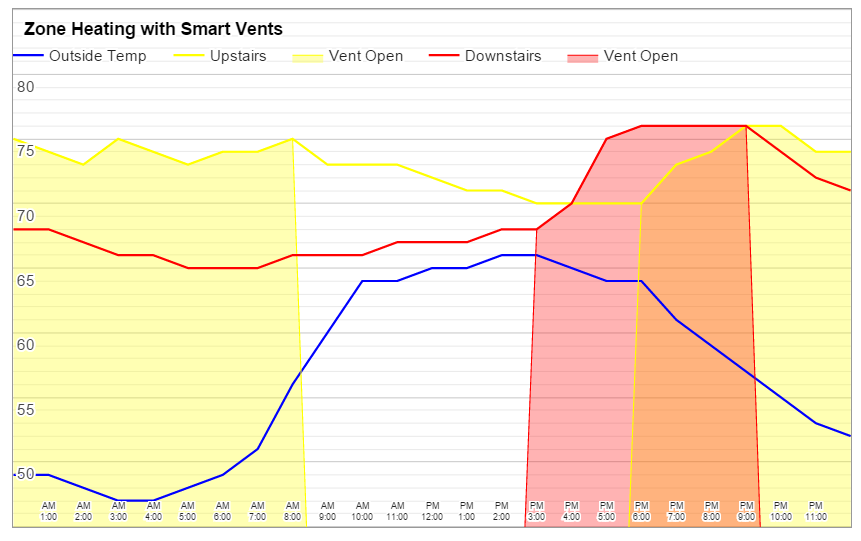
Work SmarterLooking at our motion sensor logs that control our lighting, it's pretty obvious that we spend 4-5 hours downstairs as a family after work, and then go upstairs to our bedrooms around 9pm where we sleep until we leave the next morning for work. Weekends are a little different, but Monday through Friday works like clockwork (especially with a 10 month old on a strict sleep schedule).

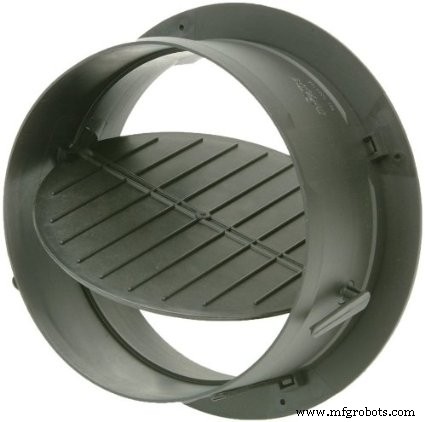
I've looked at HVAC systems that have multi zone temperature monitoring and wirelessly controllable duct baffles, but the hardware is very expensive and all the software looks like it was an afterthought (with little support or updates as technology gets better). I already have some WiFi enabled temperature sensors in my house for point of use AC unit controllers and have been itching for a reason to use some small servos in a project. All I need are WiFi connected servos that can open/close duct vents in my HVAC system...should be easy enough.
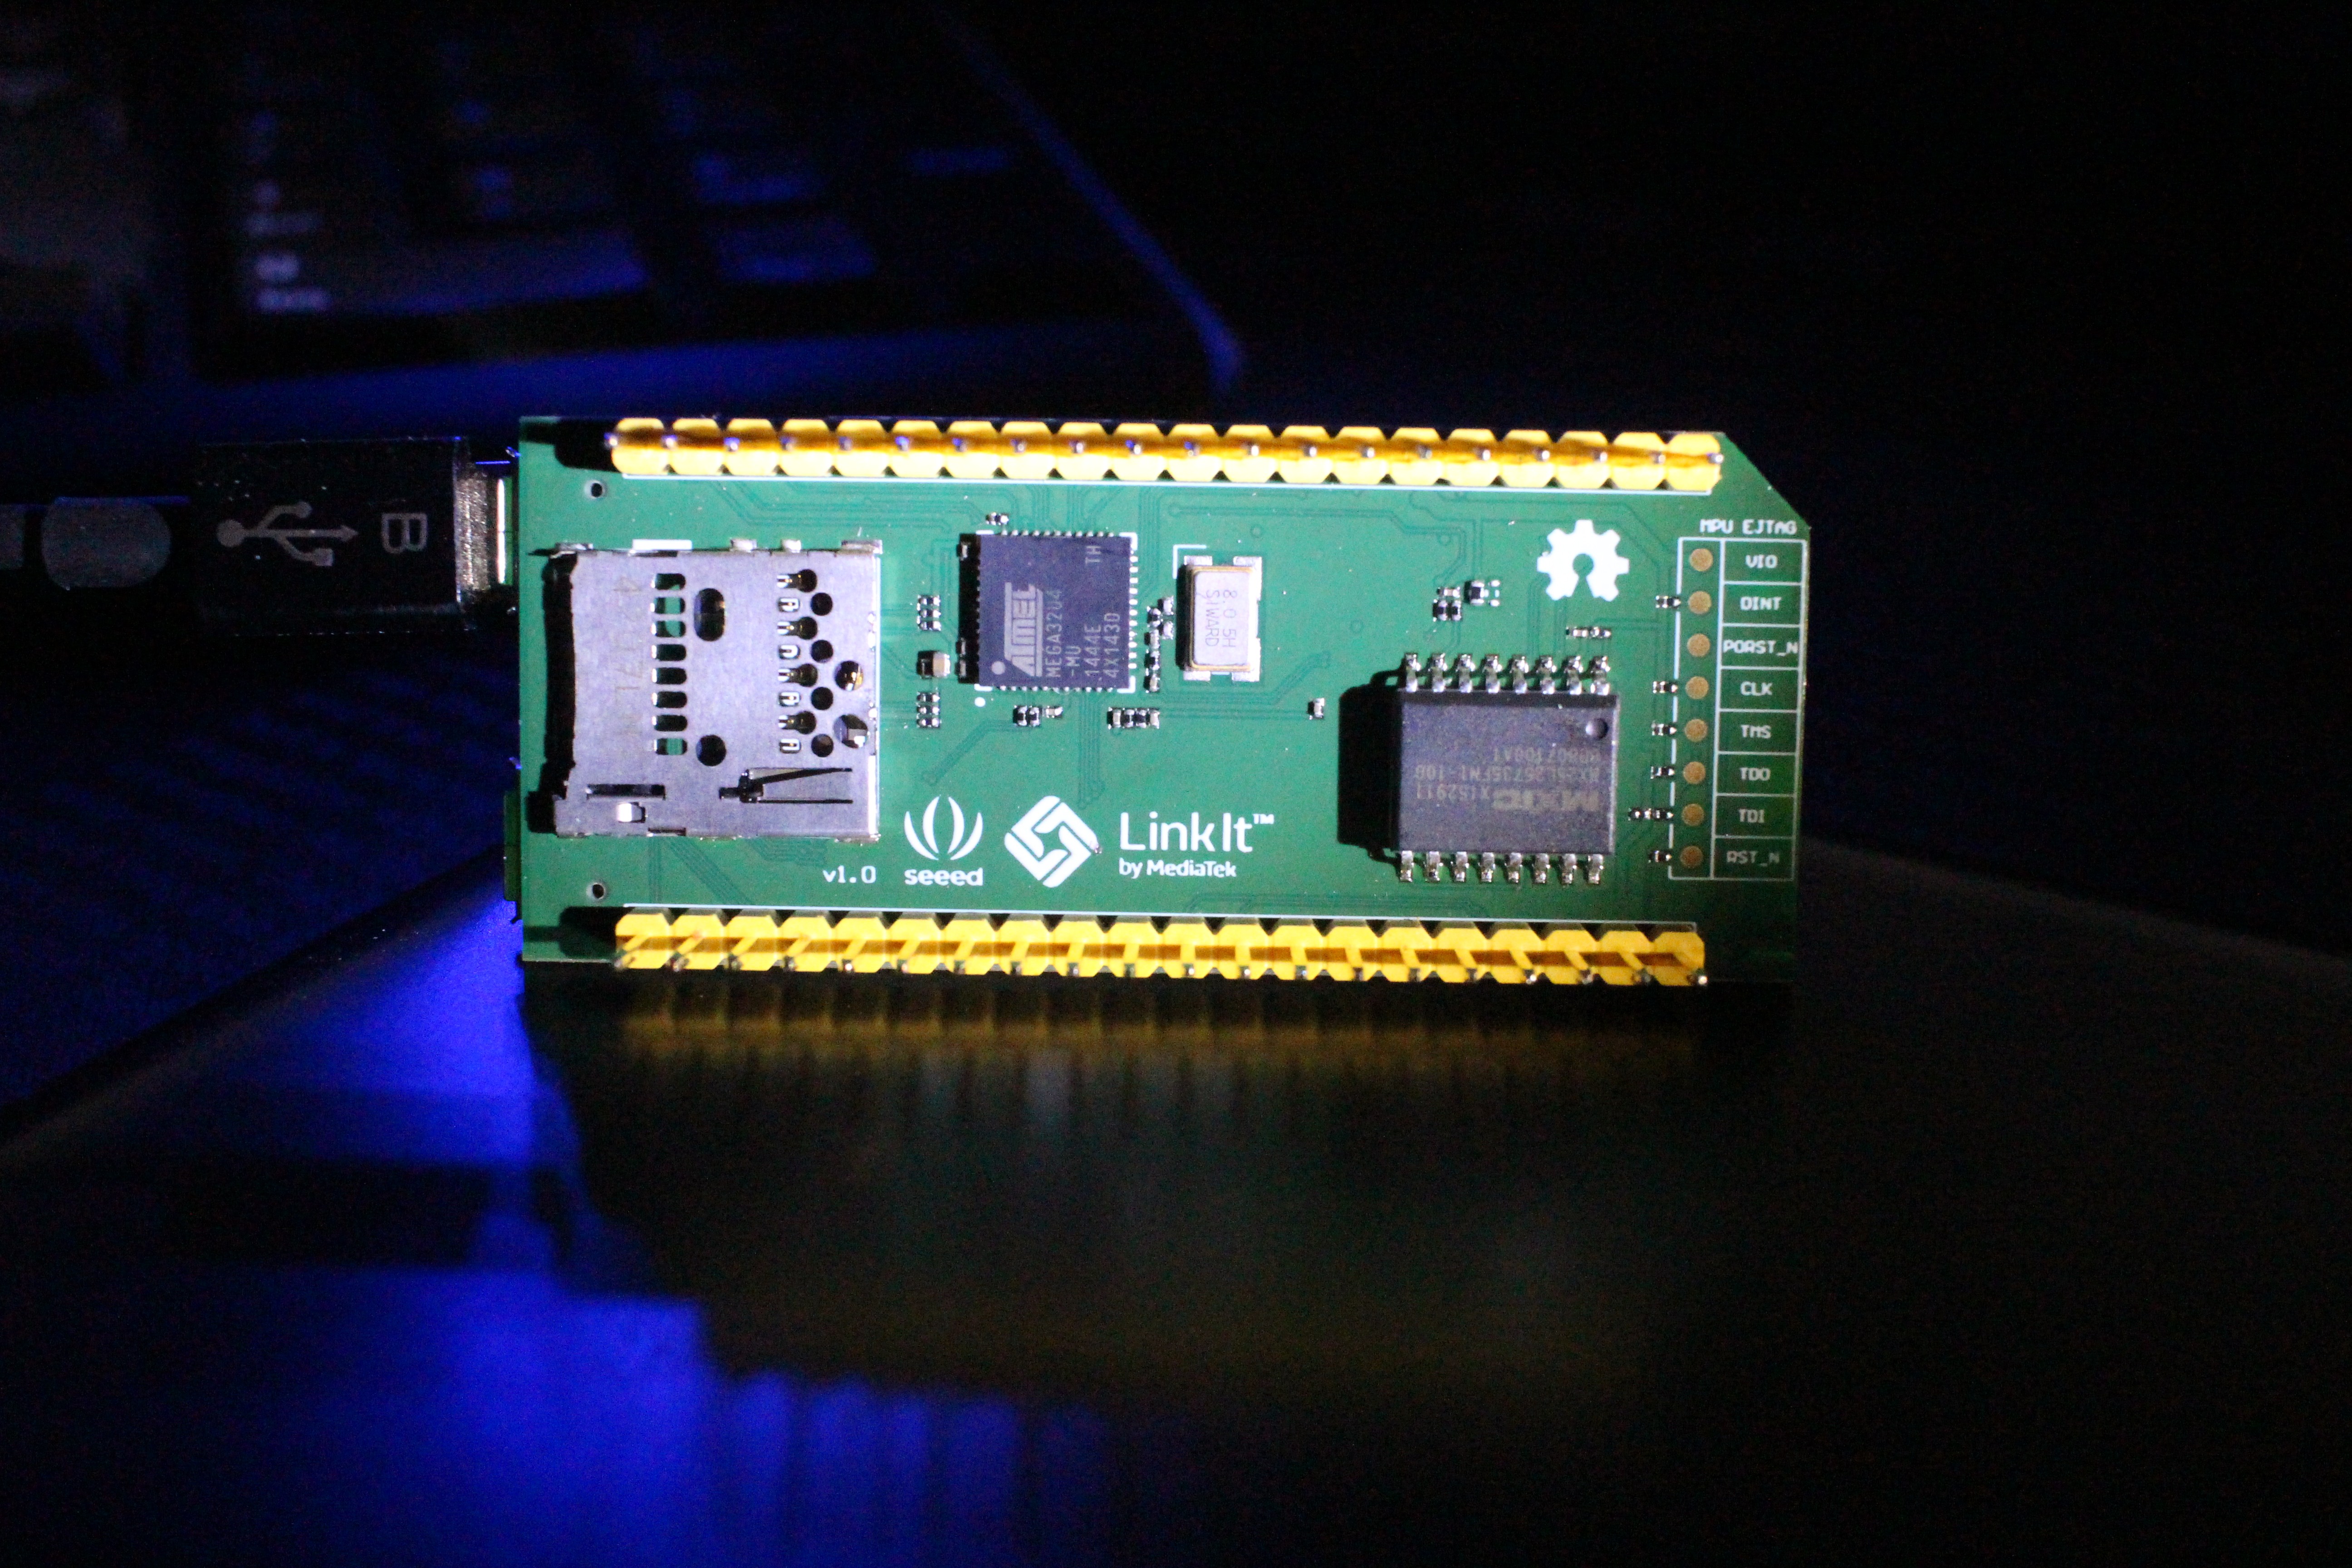
MediaTek's new LinkIt Smart 7688 Duo HDK is a WiFi connected microprocessor running OpenWRT with an onboard arduino-compatible microcontroller. It's perfect for this project since it has all the I/O pins needed for multiple sensors and servo motors plus WiFi capability to communicate with my existing temperature sensors. Also, since it already has OpenWRT installed with uHTTPd, I can run the WebApp directly on the LinkIt Smart 7688 HDK for a completely self contained package.

This is my first time using a board that has built in WiFi, so I was preparing for a steep learning curve. Fortunately, setup is literally 3 steps:
- Power up the Linkit Smart 7688 and connect to its WiFi access point from your computer
- Log in to the web interface and enter the settings for your WiFi access point
- Add the "LinkIt Smart 7688 Duo" board in the Arduino IDE
That's it! When you select the "LinkIt Smart 7688 Duo" board in the Arduino IDE you can either push your sketch via serial like every other board, or you can upload over WiFi (this will come in very handy later). The Linkit Smart 7688 getting started guide and developers guide may be helpful for you as well.

If you want to allow the microcontroller to use the WiFi directly in your arduino sketch (which we will be doing), you just ssh into the HDK and flip a bit to enable the Arduino Yun library compatibility.
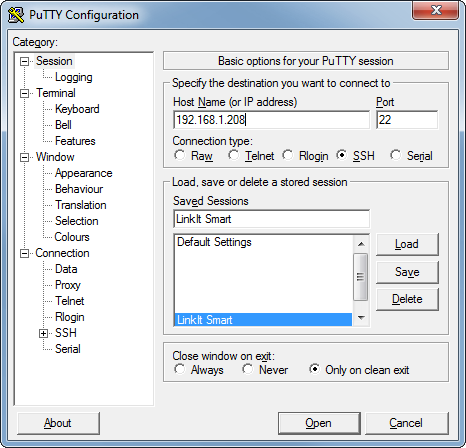
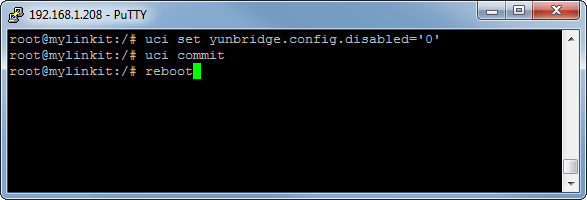
You can just copy/paste the lines from here:
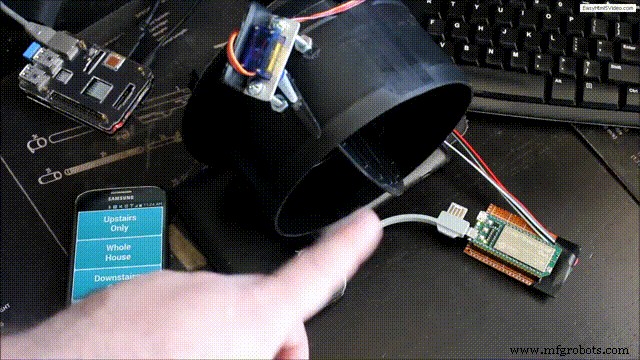
WiFi Client and Servo ControllerSince this has built in compatibility with the Yun bridge library and uses the Arduino IDE, it's really easy to adapt existing code. Using the bridge library, I can have the HDK poll the onboard web server for the vent configuration (either upstairs, downstairs, or whole house) and then adjust the two servos accordingly. In the below video I had this running on a Raspberry Pi 2, but I was able to port the WebApp over to the LinkIt Smart 7688 to make it even more efficient (code included at the end).
My WebApp runs on php, so I just used opkg package manager to get it installed since it's included in OpenWRT on the LinkIt Smart 7688:
I then updated the /etc/config/uhttpd file to interpret php by adding this line:
and restarted uHTTPd
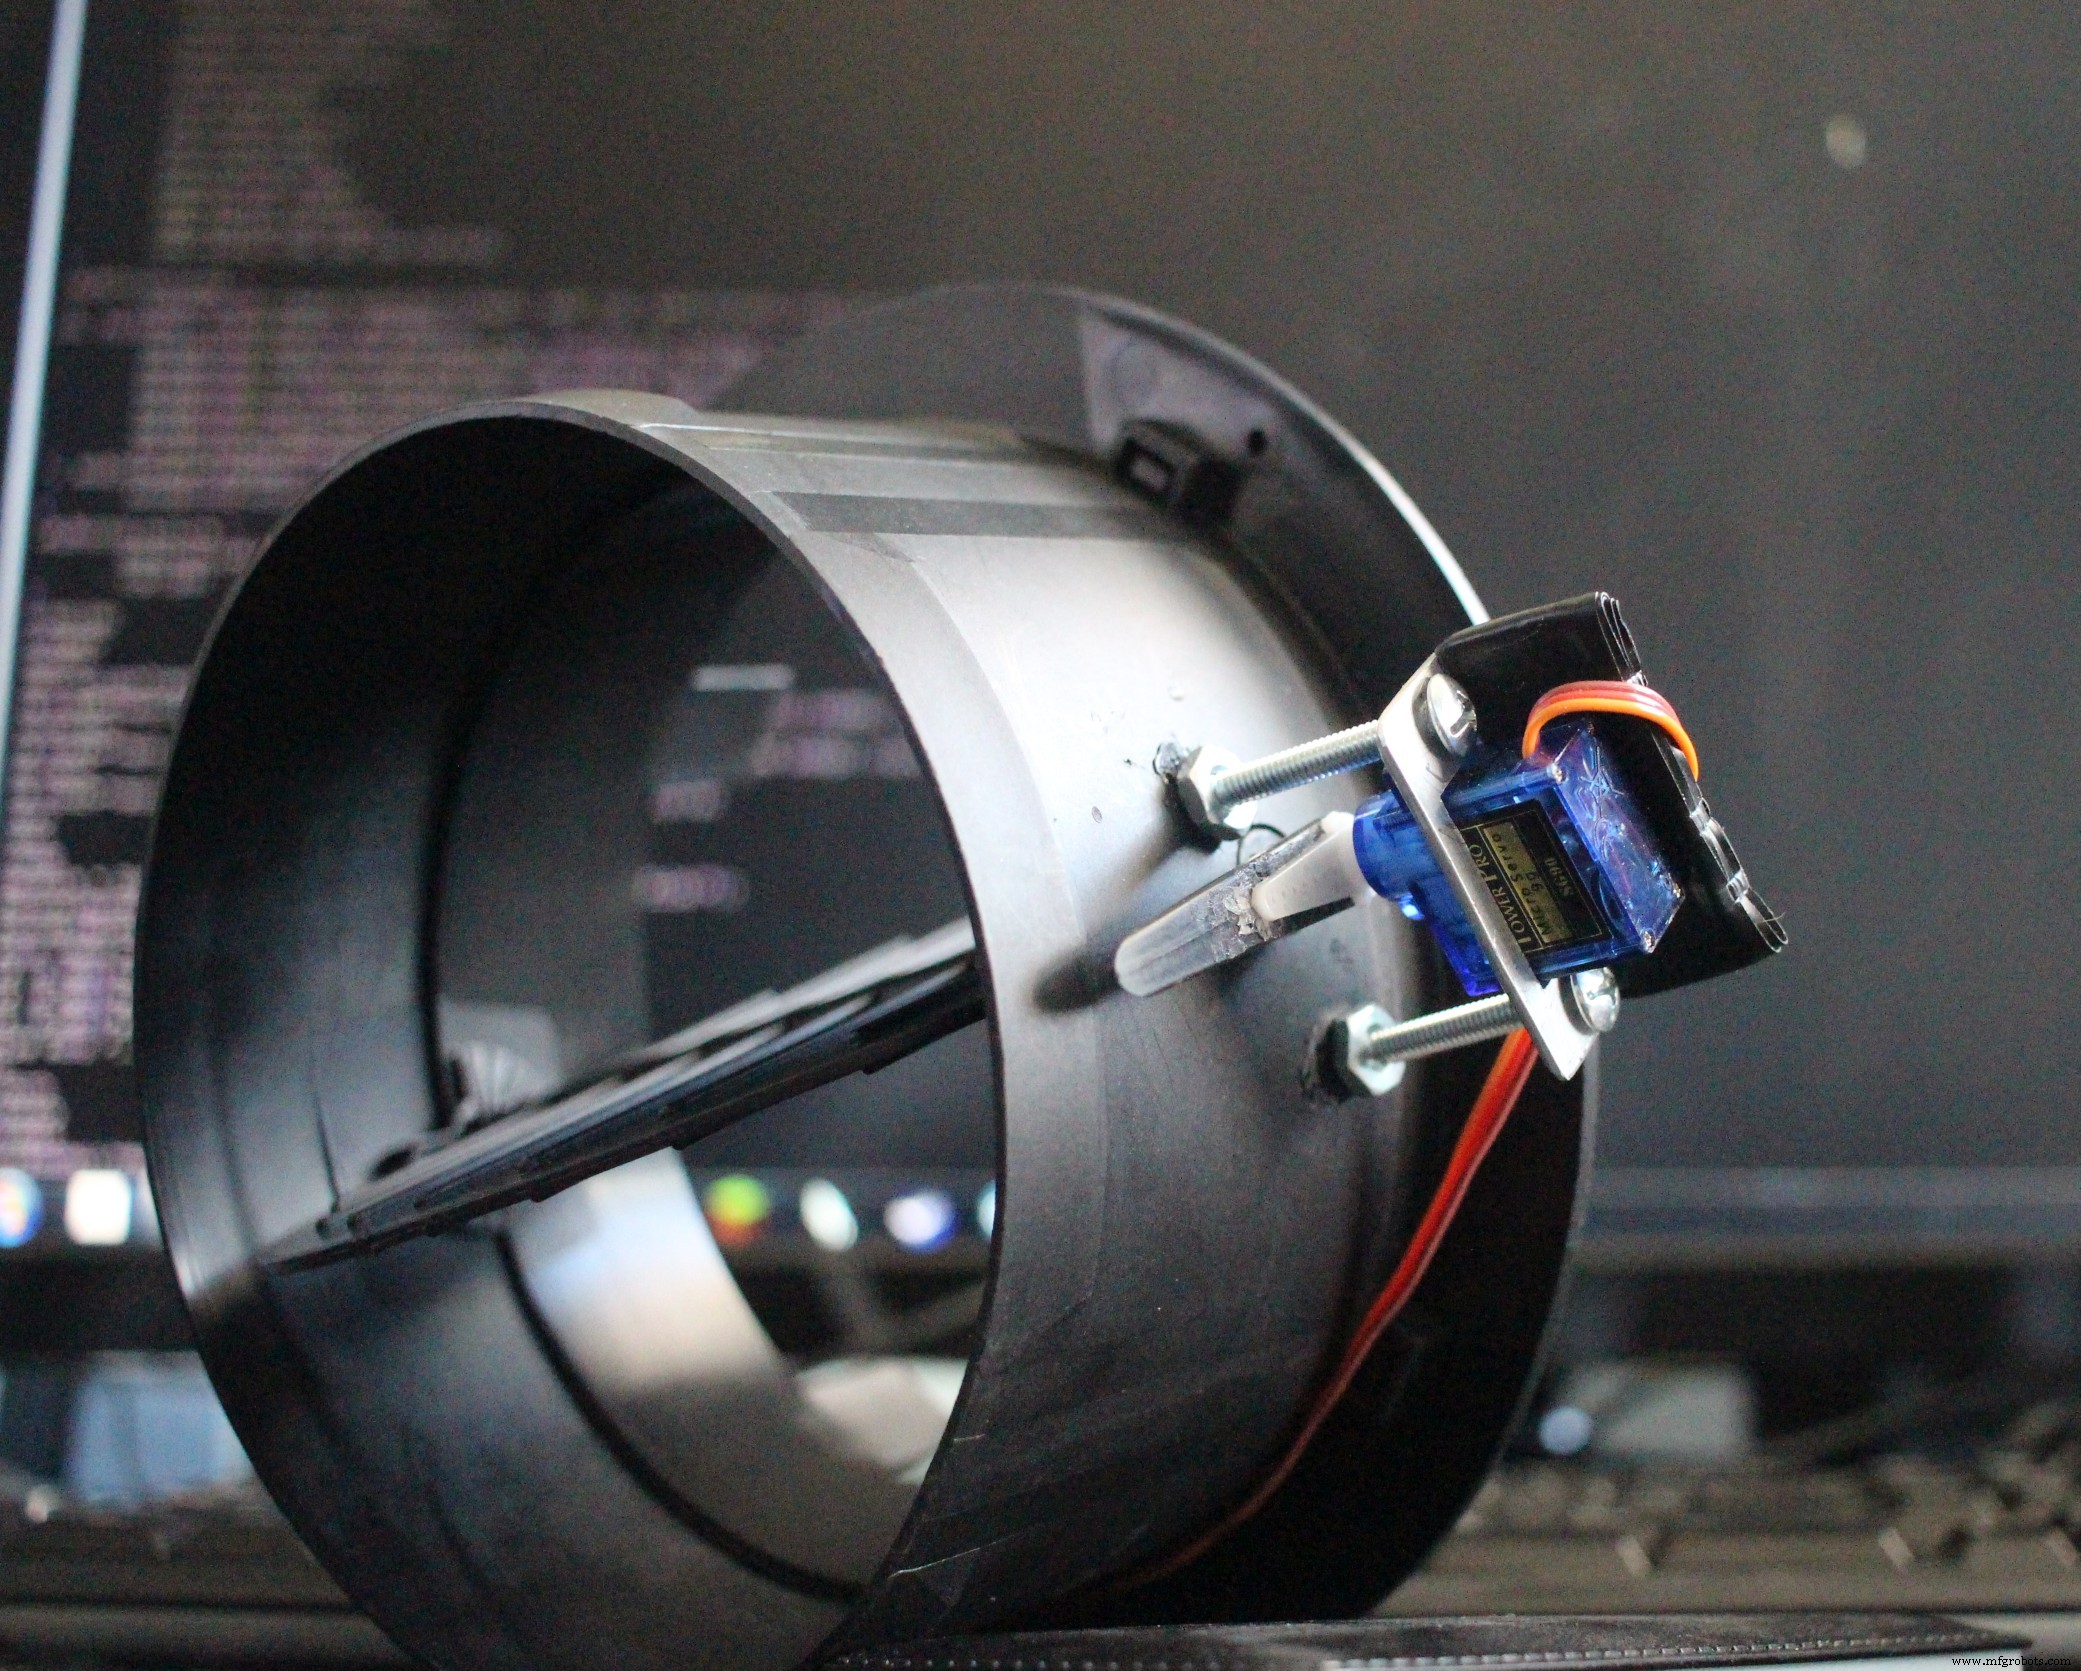
HardwareI attached the servo horn directly to the vent and fabricated an aluminum bracket to hold the servo in position with some stainless steel standoffs. There is still a little play, so I'll be adding some zip ties to make this a little more permanent.
This build really boils down to three components:
- Temperature sensors around the house send periodic updates to the uHTTPd web server running on the LinkIt Smart 7688.
- A WebApp running on the LinkIt Smart 7688 that shows the current state and allows you to manually reconfigure the vents.
- The MCU on the LinkIt Smart 7688 that controls the vents to direct warm air either upstairs or downstairs depending on the time of day.
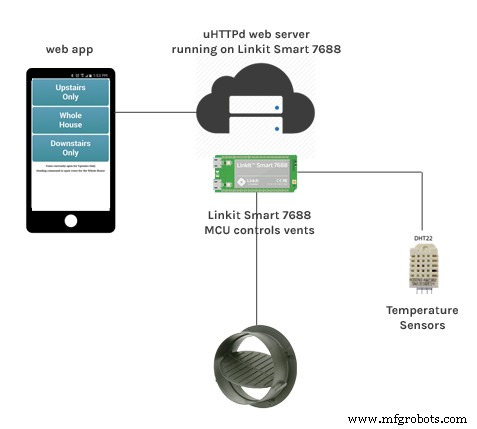
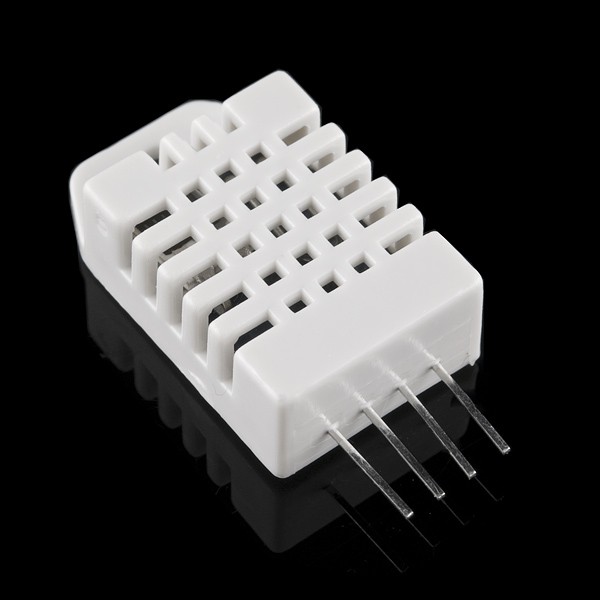
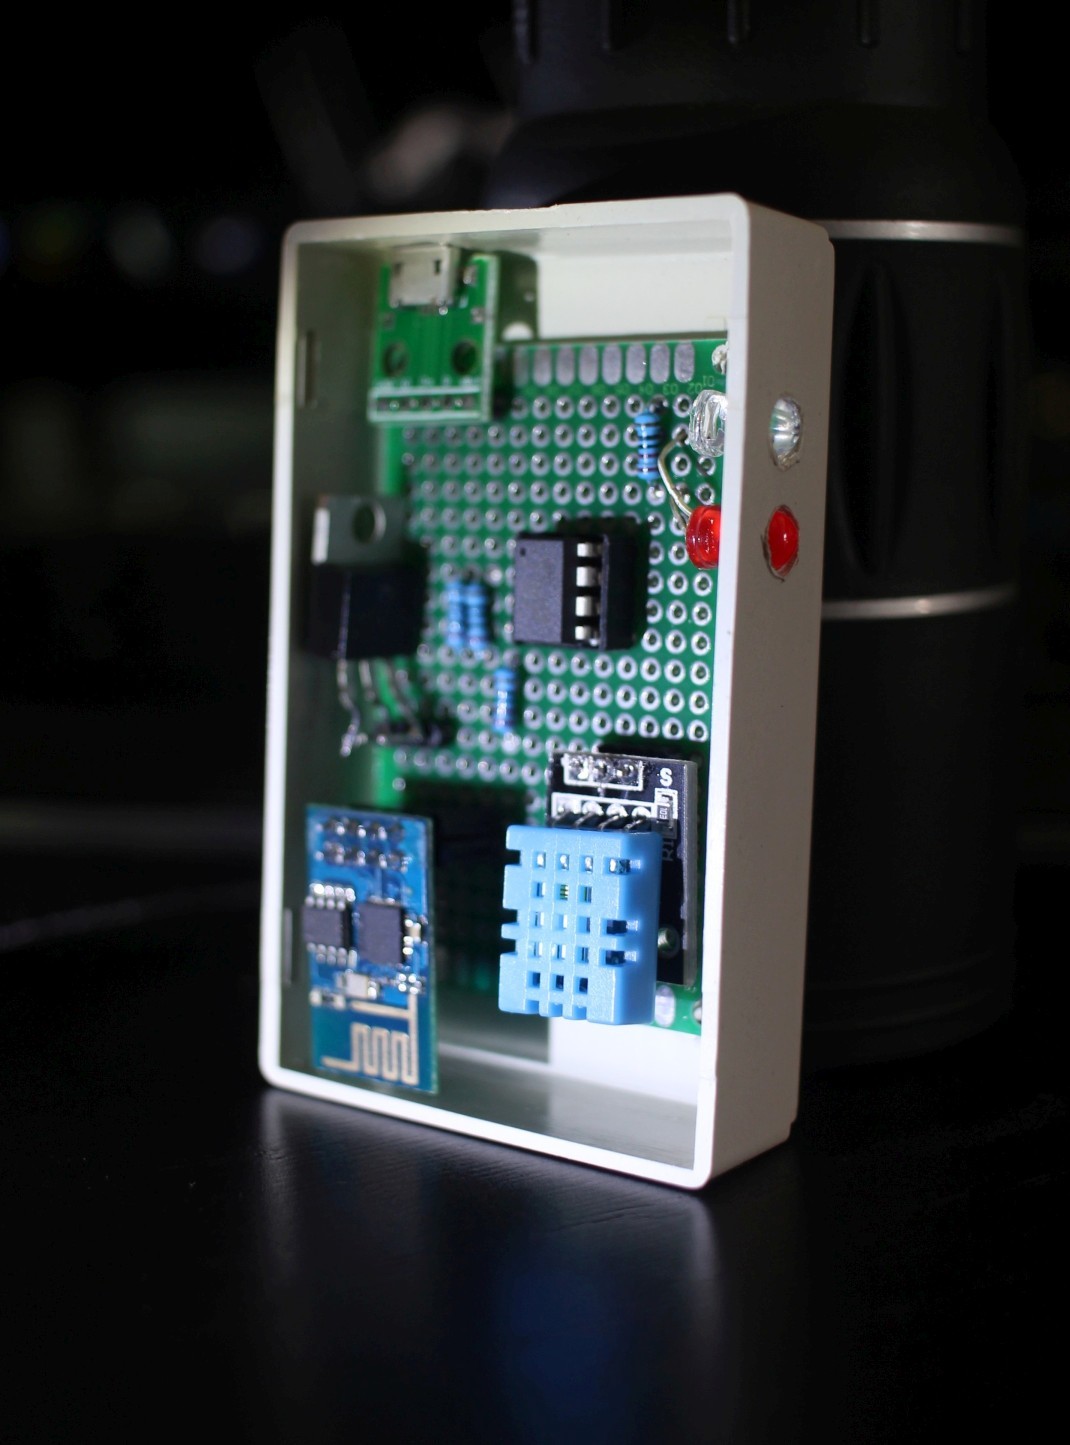
The temp sensors are just ATtiny85s or Arduino Nanos connected to a DHT11 or DHT22 and sending that temperature/humidity information to a web server via an ESP8266 over software serial. I have a full writeup on those sensors on here since they were originally designed and developed as phase II of my point-of-use air conditioner project (this part is completely optional, but it will give you additional metrics that can be used to tune the system and eventually automate it).
The LinkIt Smart 7688 HDK itself is in my attic connected directly to the duct vents. On the OpenWRT side a cronjob updates the vent state text file. The MCU side running the arduino sketch checks this text file periodically and adjusts the vents accordingly.
To check the status of the vents and manually reconfigure them, I created a small WebApp that is hosted directly on the LinkIt Smart 7688. With dyndns and port forwarding I can view and control all of this from outside the house if I need to.
With the nights already getting colder, I needed to get this working ASAP so some concessions were made in the name of rapid deployment. On the hardware side, I'll be 3d printing proper mounts for the servos since my hack-job mounts have a little play. Also, the little RC servo I used in the demo has all plastic gears which I don't expect to last for years, so since I don't want to be climbing back in the attic anytime soon, I'm going to be swapping them out for larger servos with metal gears.
I may one day add additional WiFi connected servos to vents in each room and have them all connect back to the single LinkIt Smart 7688.
Currently the temperature probes are only dumping the readings to a csv file so I can easily track and graph it. It would be nice to kick on the heater early if the house is particularly cold, but my WiFi thermostat doesn't have an API yet. I would also like to tie into my home automation system so the vents automatically adjust based on real time room occupancy derived from motion sensors rather than being entirely based on time of day (especially for weekends because of our dynamic schedules).
Code
- LinkIt Smart Duo WiFi Vent
- WiFi Temp Sensor
- Vent.php
- LinkIt Smart Vent Android WebApp
LinkIt Smart Duo WiFi VentC/C++
This sketch uses the Bridge and HTTP Client libraries from the Arduino Yun to poll a web server and open/close HVAC vents as needed./*
Adapted from Sweep servo example
by BARRAGAN <http://barraganstudio.com>
and
Yun HTTP Client example
created by Tom igoe <http://www.arduino.cc/en/Tutorial/HttpClient>
*
* Both are in the public domain.
*
*
* Code Adapted for HAI (Home Automation w/ Intelligence) by Buddy Crotty
*
* This arduino sketch relies on a web server to do all the heavy lifting. This can be
a seperate device like a Raspberry Pi, or you can run it on the MPU side of the LinkIt Smart in
OpenWRT.
*
* The web server collects temp readings from around the house and determins where hot/cold air
needs to go based on time of day, outside weather (including forcast), and home occupancy.
*
* It then outputs 'upstairs', 'downstairs', or 'wholehouse' depending on where the air needs
to be sent.
*/
#include <Servo.h>
#include <Bridge.h>
#include <HttpClient.h>
Servo upservo; // create servo object to control upstairs servo
Servo downservo; // downstairs air vent damper servo
int uppos = 0; // variable to store the (upstairs) servo position
int downpos = 0; // downstairs servo position
const char* host = "192.168.1.80"; // Internal IP of Home Automation Webserver
int dopenangle = 80; // Number of degrees your servo needs to turn between open/close on the vent
int dcloseangle = 0;
int uopenangle = 140;
int ucloseangle = 0;
void setup()
{
upservo.attach(9); // Pin for Servo attached to upstairs air vent damper
downservo.attach(10); // Pin for Servo attached to downstairs air vent damper
//start bridge to OpenWRT
pinMode(13, OUTPUT);
digitalWrite(13, LOW);
Bridge.begin();
digitalWrite(13, HIGH);
}
void wholehouse()
{
if (downpos <= dcloseangle){ // Make sure vent isn't already in position
//open downstairs vent
for(downpos = dcloseangle; downpos <= dopenangle; downpos += 1) // Move from set close angle to open angle one step at a time
{
downservo.write(downpos);
delay(20); // waits between steps until servo reaches position
}
}
if (uppos <= uopenangle) {
//open upstairs vent
for(uppos = ucloseangle; uppos <= uopenangle; uppos += 1)
{
upservo.write(uppos);
delay(20);
}
}
}
void downstairs()
{
if (downpos <= dopenangle) {
//open downstairs vent
for(downpos = dcloseangle; downpos <= dopenangle; downpos += 1)
{
downservo.write(downpos);
delay(20);
}
}
if (uppos >= ucloseangle){
//close upstairs vent
for(uppos = uopenangle; uppos >= ucloseangle; uppos-= 1)
{
upservo.write(uppos);
delay(20);
}
}
}
void upstairs()
{
if (uppos <= uopenangle) {
//open upstairs vent
for(uppos = ucloseangle; uppos <= uopenangle; uppos += 1)
{
upservo.write(uppos);
delay(20);
}
}
if (downpos >= dcloseangle){
//close downstairs vent
for(downpos = dopenangle; downpos >= dcloseangle; downpos -= 1)
{
downservo.write(downpos);
delay(20);
}
}
}
void loop()
{
HttpClient client;
// Create and make a HTTP request:
String cmd = "http://";
cmd += host;
cmd += "/vent.txt";
client.get(cmd);
// Read incoming bytes from the server
while (client.available()) {
int c = client.read();
if (c == '2') upstairs();
if (c == '1') downstairs();
if (c == '0') wholehouse();
}
delay(60000);
}
WiFi Temp SensorC/C++
Connected Temperature and Humidity sensor. Logs data to central Home Automation server./*
* Code Adapted for HAI (Home Automation w/ Intelligence) by Buddy Crotty
*
* Sends data via HTTP GET requests to your HAI server
*
* Connectivity is via software serial connection to an ESP8266 WiFi
* interface already configured to connect to your wLAN,
* but you can uncomment out the WiFi settings to reset SSID/password
*
*/
const char* host = "192.168.1.80"; // Internal IP of Home Automation Webserver
const char* devID = "downstairs"; // Device ID (single word, no spaces, no special characters)
#include <SoftwareSerial.h>
SoftwareSerial ser(10, 11); // (RX, TX) // Software serial for controling ESP8266 Module
// Hardware serial for debugging
long utime = 300000; // Time in between updates
// 900000 = 15 minutes (for battery/solar power)
// 300000 = 5 minutes (for AC power)
// 5000 = 5 seconds (for testing)
// Must be longer than 10000 for ESP8266 to come out of sleep mode (battery mode)
// Temperature and Humidity Sensor
#include <DHT.h>
#define DHTPIN 2 //Pin for temp/humidity sensor
#define DHTTYPE DHT22 // DHT11, DHT22 (AM2302, or DHT21 (AM2301)
DHT dht(DHTPIN, DHTTYPE);
void setup() {
Serial.begin(9600);
ser.begin(9600);
//ser.listen();
/*
// Uncomment to reset WiFi settings
delay(1000);
ser.println("AT+CWMODE=1");
ser.println("AT+CWJAP=\"SSID\",\"Password\"");
*/
ser.println("AT+RST"); // Reset ESP8266 since arduino was reset
delay(10);
dht.begin(); // Start DHT
Serial.println("Giving everything a chance to warm up"); //wait 25 seconds for WiFi to connect
Serial.println("|-------------------------|");
Serial.print("|");
for(int x = 0; x < 25; x++){
Serial.print("#");
delay(1000);
}
Serial.println("|");
Serial.println("Done");
}
float t = 0;
int h = 0;
float hi = 0;
void loop() {
Serial.println();
//Temp and Humidity
float t = dht.readTemperature(true);
int h = dht.readHumidity();
float hi = dht.computeHeatIndex(t, h);
// Output values being sent to ThingSpeak
Serial.print("Temperature: ");
Serial.print(t);
Serial.print(" *F\t");
Serial.print("Heat Index: ");
Serial.print(hi);
Serial.println(" *F");
Serial.print("Humidity: ");
Serial.print(h);
Serial.println("%\t");
Serial.print("...connecting to ");
Serial.println(host);
// TCP connection
String cmd = "AT+CIPSTART=\"TCP\",\"";
cmd += host;
cmd += "\",80";
ser.println(cmd);
delay(1000);
if(ser.find("Error")){
Serial.println("AT+CIPSTART error");
return;
}
else{
}
// prepare GET string
String getStr = "GET /tempupdate.php?ID=";
getStr += devID;
getStr += "&field1="; //Temp
getStr += t;
getStr += "&field2="; //Humidity
getStr += h;
getStr += "&field3="; //Heat Index
getStr += hi;
getStr += "\r\n\r\n";
Serial.print("Sending data URL: ");
Serial.println(getStr);
// send data length
cmd = "AT+CIPSEND=";
cmd += String(getStr.length());
ser.println(cmd);
if(ser.find(">")){
ser.print(getStr);
Serial.println("Success!");
}
else{
ser.println("AT+CIPCLOSE");
Serial.println("Connection Failed"); // alert user
}
Serial.print("Next update in ");
Serial.print(utime / 1000);
Serial.println(" seconds");
delay(utime); //wait between updates
}
Vent.phpPHP
Check status and manually override the vent configuration.<html>
<head>
<style>
.myButton {
-moz-box-shadow: 0px 10px 14px -7px #276873;
-webkit-box-shadow: 0px 10px 14px -7px #276873;
box-shadow: 0px 10px 14px -7px #276873;
background:-webkit-gradient(linear, left top, left bottom, color-stop(0.05, #599bb3), color-stop(1, #408c99));
background:-moz-linear-gradient(top, #599bb3 5%, #408c99 100%);
background:-webkit-linear-gradient(top, #599bb3 5%, #408c99 100%);
background:-o-linear-gradient(top, #599bb3 5%, #408c99 100%);
background:-ms-linear-gradient(top, #599bb3 5%, #408c99 100%);
background:linear-gradient(to bottom, #599bb3 5%, #408c99 100%);
filter:progid:DXImageTransform.Microsoft.gradient(startColorstr='#599bb3', endColorstr='#408c99',GradientType=0);
background-color:#599bb3;
-moz-border-radius:20px;
-webkit-border-radius:20px;
border-radius:20px;
display:inline-block;
cursor:pointer;
color:#ffffff;
font-family:Arial;
font-size:100px;
font-weight:bold;
/*padding:13px 80px;*/
padding: 50px 200px;
text-align: center;
text-decoration:none;
text-shadow:0px 5px 0px #3d768a;
}
.myButton:hover {
background:-webkit-gradient(linear, left top, left bottom, color-stop(0.05, #408c99), color-stop(1, #599bb3));
background:-moz-linear-gradient(top, #408c99 5%, #599bb3 100%);
background:-webkit-linear-gradient(top, #408c99 5%, #599bb3 100%);
background:-o-linear-gradient(top, #408c99 5%, #599bb3 100%);
background:-ms-linear-gradient(top, #408c99 5%, #599bb3 100%);
background:linear-gradient(to bottom, #408c99 5%, #599bb3 100%);
filter:progid:DXImageTransform.Microsoft.gradient(startColorstr='#408c99', endColorstr='#599bb3',GradientType=0);
background-color:#408c99;
}
.myButton:active {
position:relative;
top:1px;
}
</style>
<link rel="manifest" href="manifest.json">
</head>
<body>
<div align="center">
<a href="vent.php?zone=2" class="myButton">Upstairs Only</a><br><br>
<a href="vent.php?zone=0" class="myButton">Whole House </a><br><br>
<a href="vent.php?zone=1" class="myButton">Downstairs Only</a>
<br><br>
<?php
$myfile = fopen("vent.txt", "r") or die("Unable to open file!");
$status = fgets($myfile);
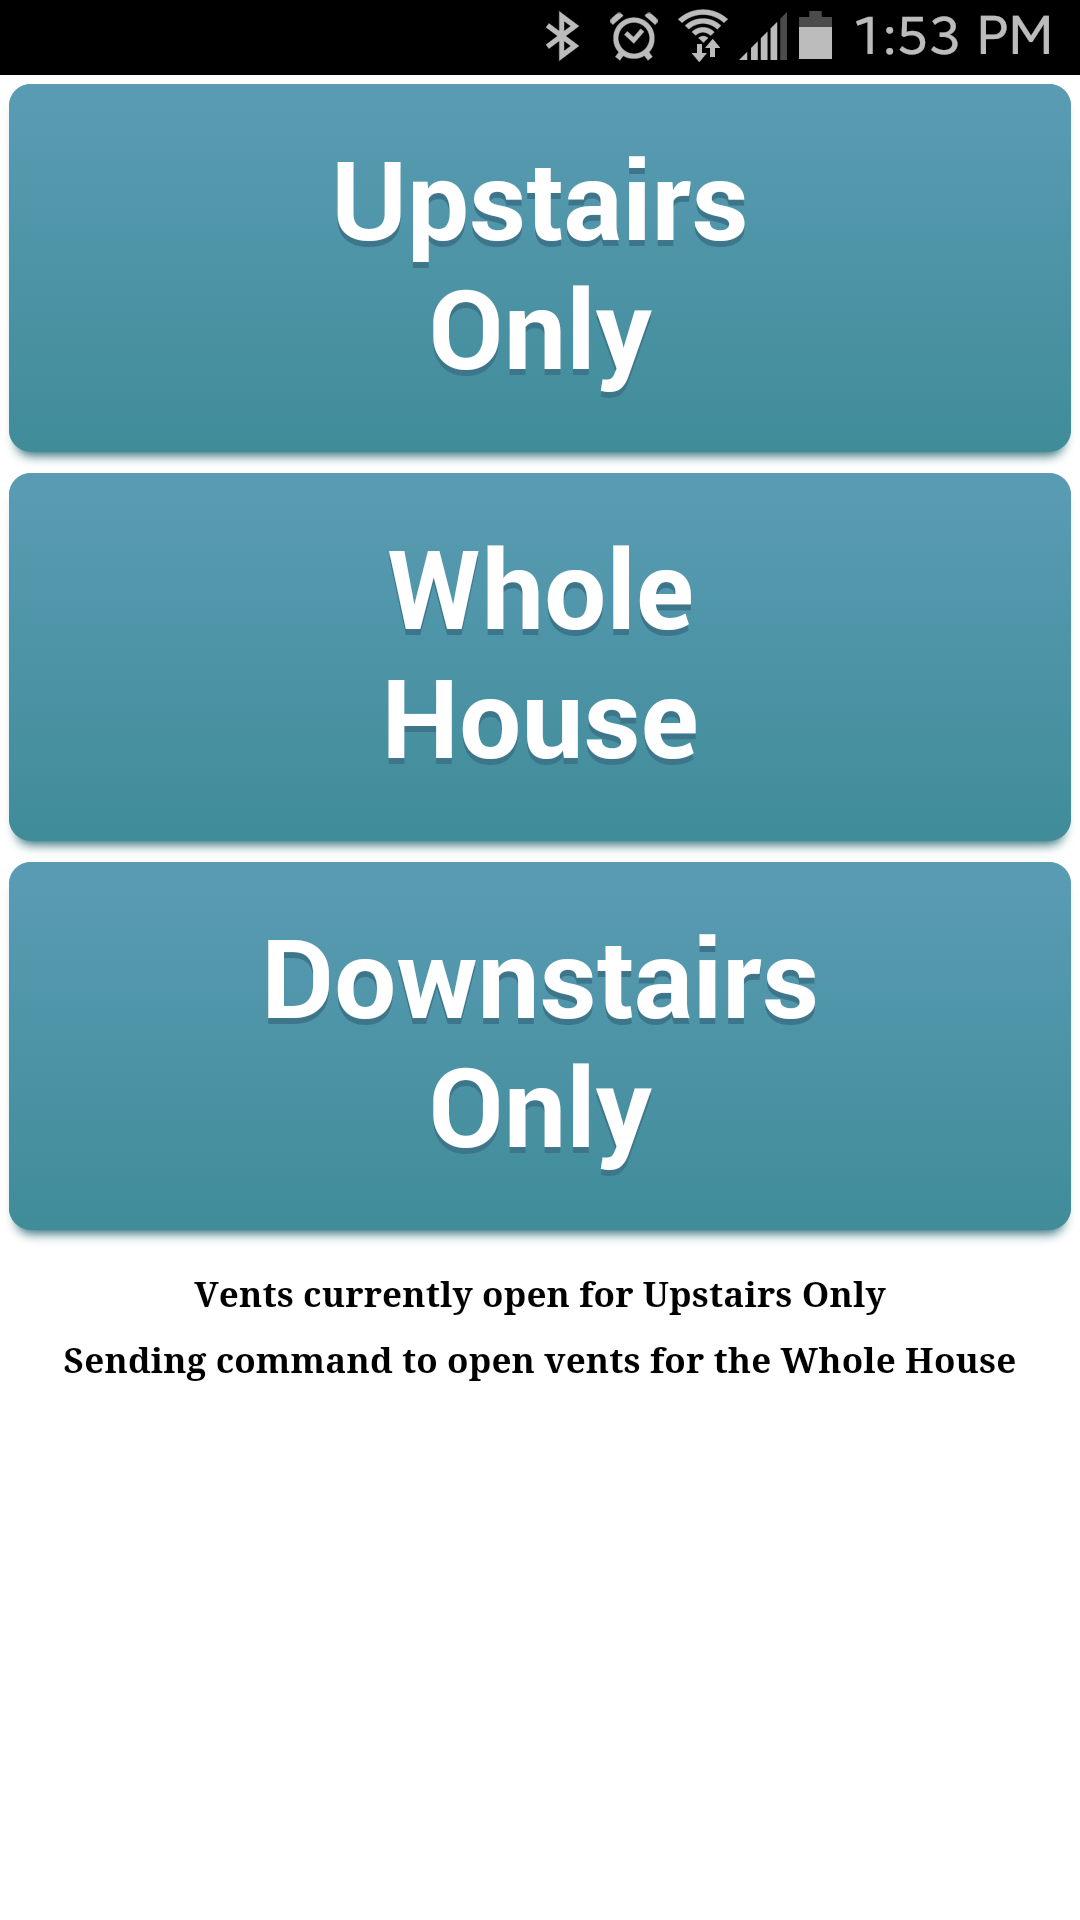
if ($status != "") print "<h1>Vents currently open for ";
if ($status === "0") print "the Whole House";
if ($status === "1") print "Downstairs Only";
if ($status === "2") print "Upstairs Only";
print "<br>";
fclose($myfile);
if ($_GET["zone"] == "");
else {
$myfile = fopen("vent.txt", "w+") or die("Unable to open file!");
if ($_GET["zone"] != "") print "<h1>Sending command to open vents for ";
if ($_GET["zone"] === "0") print "the Whole House";
if ($_GET["zone"] === "1") print "Downstairs Only";
if ($_GET["zone"] === "2") print "Upstairs Only";
print "</h1>";
fwrite($myfile, $_GET['zone']);
fclose($myfile);
}
?>
</div>
</body>
</html>
LinkIt Smart Vent Android WebAppJSON
Manifest file so chrome on Android opens up the vent controller as a web app.{
"name": "LinkIt Smart Vent",
"icons": [
{
"src": "LinkIt_icon_36.png",
"sizes": "36x36",
"type": "image/png",
"density": 0.75
},
{
"src": "LinkIt_icon_48.png",
"sizes": "48x48",
"type": "image/png",
"density": 1.0
},
{
"src": "LinkIt_icon_128.png",
"sizes": "128x128",
"type": "image/png",
"density": 1.0
},
{
"src": "LinkIt_icon_192.png",
"sizes": "192x192",
"type": "image/png",
"density": 1.0
}
],
"start_url": "vent.php",
"display": "standalone",
"orientation": "portrait"
}
Schematics
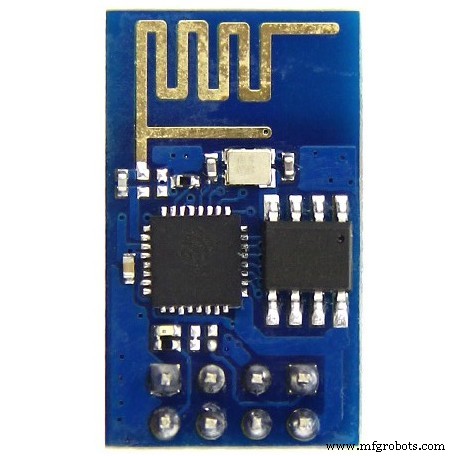
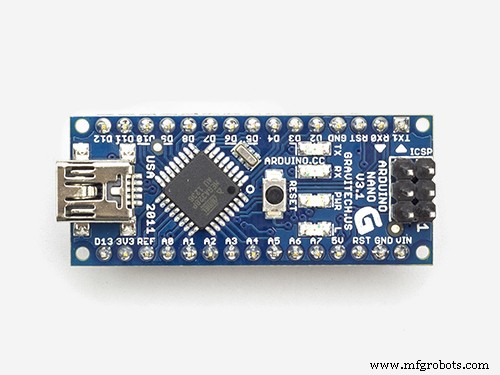
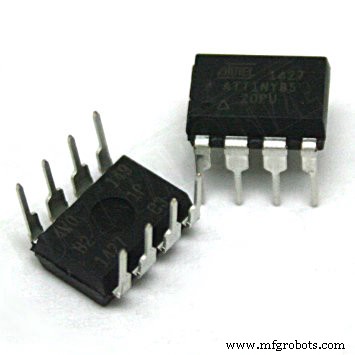
ATtiny85 or Arduino Nano pulling temps from a DHT11/22 and WiFi connected with an ESP8266.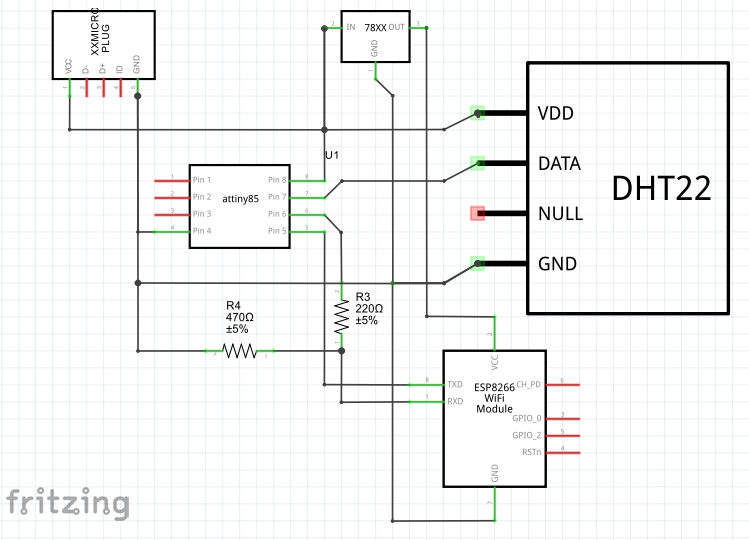
Manufacturing process
- DATA MODUL Launches 23.1” Ultra‑Slim TFT Display with Smart Wi‑Fi Control
- Integrated QR, RFID, and Temperature Verification Access Control System
- Elevating Quality Control: 3D‑Printed Tooling Enhances Manufacturing Precision
- Smart Procurement: Merging AI with Human Insight
- Build a Smart Piggy Bank: Control a Coin Acceptor with Arduino Nano
- Control an LED via Bluetooth with Arduino – Simple DIY Guide
- Smart Door Access System with Facial Recognition Unlocking
- Display Numbers on a 7‑Segment Display Using a Keypad – Step‑by‑Step Guide
- Bluetooth-Enabled Smart Thermostat & Lighting Control System
- Millport SmartLathez 1740 CNC Lathe – Precision & Power