Arduino Yun‑Based Smart Air Purifier System with Sharp Plasmacluster
Components and supplies
Arduino Yun
×
1
Sharp Plasmacluster Air Purifier
×
1
GP2Y1010AU0F Compact Optical Dust Sensor
×
1
Relay Module
×
1
Breadboard (generic)
×
1
Capacitor 220 µF
×
1
Resistor 150Ω
×
1
1-meter AC Cable
×
1
Male/Male Jumper Wires
×
1
Male/Female Jumper Wires
×
1
Terminal Block
×
1
Solder Wire
×
1
Necessary tools and machines
Multimeter
Soldering Gun
Wire Stripper
Apps and online services
Amazon Web Services AWS IoT
Arduino IDE
Terminal
Mosquitto MQTT
About this project
The presence of dust in homes, offices, and other human environments are unavoidable. In fact, according to the Environmental Protection Agency, indoor air can be 2 to 5 times more polluted than outdoor air. This airborne pollution contributes to minor annoyances such as itchy eyes, sneezing, and headaches to human beings. Worst still, it can be a major contributing factor to severe allergies, life-threatening asthma.
To solve this problem, a working air purifier machine well address this issue. But, I would like to leverage the advantages of IoT to make the the air purifier smarter. Instead of the conventional way that turning on the air purifier whole day, I would like to implement a “brain - microcontroller” and "sensor” to operate only if the presence of dust reach certain level of awareness, this could save a lot of electricity! And the operational status will be available to my "terminal window" in my laptop or any "MQTT-enabled client" devices whenever I travel to anywhere around the world.
Step 1: Gather all Components
To view all the components, you can download the BOM List from my Dropbox.
Or refer to my component and supplies section.
Step 2: Make Sure all Pieces Make Sense
The first thing I got all my components, I test it immediately to ensure the functionalities of my components behave as the way they should.
For GP2Y1010AU0F Sharp Dust Sensor setup, you can refer to this blog tutorial by Cyrille Médard de Chardon and Christophe Trefois. The tutorial cover the best from wiring-connection to coding.
For Relay Module setup, I just use a simple toggle (on and off) state to test the connection for the relay function.
Step 3: Coding
The coding is straight-forward. The challenge here is to use AWS IoT to communicate the data from sensor to any MQTT-enabled device (like my case, I'm using a laptop). Please refer to the coding section. Interesting enough, I also created a video tutorial for AWS CLI IoT, so anyone can learn about it.
(Please note: as the time of making this video it covers only beta version)
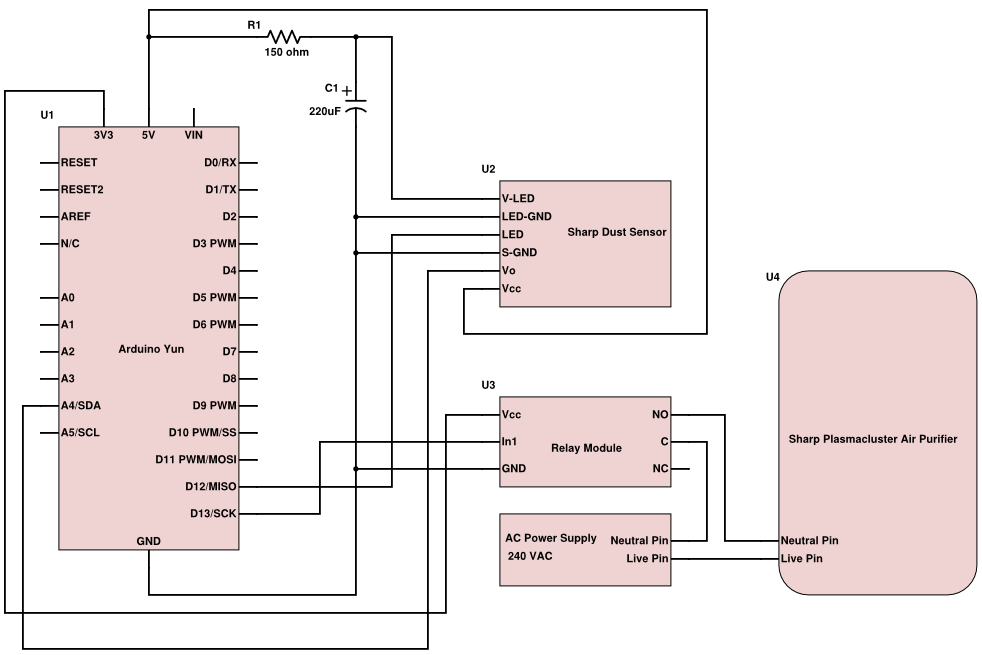
Step 4: Wiring
Step 5: Get the Result
Video Demonstration
Future Improvement
I know there's still a lot of improvement can be done for this project, especially "IoT Project". But due to my work during the day, I could use only partial of my free time for this project development. However, the "real-time way for data monitoring" app (hint: NodeJS) interest me. And it will be added as a wish-list (or to-do-list) for this project in coming future. Stay tune!
Conclusion
There's a lot of fun when doing this project, especially with "IoT - Internet of Things". The possibilities and improvement is still vast in IoT. Also, I enjoy learning how to use the IoT service provided by AWS, because it is very convenient to use (simple setup with AWS IoT dashboard) and secure every connection with encryption.
Problems | Questions | Comments | Suggestion
Probably, there is some technical problem in this project that I'm not aware of, you can leave a comment or private message me, your feedback is highly valued!
Any questions or problem replicating this project, you can contact me or leave a comment below. I will try my very best to help you out, again we are here to learn hardware together!
All sorts of comments and suggestions are welcome.
Code
Simple-and-Smart-Air-Purifier-System.ino
iot_config.h
iot_config.cpp
dust_config.h
dust_config.cpp
aws_iot_config.h
LICENSE
Simple-and-Smart-Air-Purifier-System.inoArduino
Arduino Main Code
/*
  Source Code for Simple and Smart Air Purifier System
  Written by Aaron Kow
  Licence: MIT Licence
*/

#include "iot_config.h"
#include "dust_config.h"

aws_iot_setup aws_iot;
dust_setup dust_sensor;

int measurePin = 4;
int ledPower = 12;
int relayPin = 13;
float result;


void setup() {
  pinMode(ledPower, OUTPUT);
  pinMode(relayPin, OUTPUT);
  aws_iot.config();
}

void loop() {
  // set dust density result
  result = dust_sensor.init(measurePin, ledPower);

  // AWS IoT MQTT for real-time data monitoring
  aws_iot.data(result);

  // if dust density more than 0.25 mg/m3, turn on air filter
  if (result > 0.25){
    digitalWrite(relayPin, HIGH);
  } else {
    digitalWrite(relayPin, LOW);
  }

  delay(1000);
}
iot_config.hC/C++
Header file for my IoT Configuration
/*
  Source Code for Simple and Smart Air Purifier System
  Written by Aaron Kow
  Licence: MIT Licence
*/

#ifndef iotconfig_h
#define iotconfig_h

#include <Arduino.h>
#include <aws_iot_mqtt.h>
#include <aws_iot_version.h>
#include "aws_iot_config.h"

class aws_iot_setup {
  public:
    void config(void);
    void test(void);
    void data(float);
};

#endif
iot_config.cppC/C++
My IoT Configuration File
/*
 * Copyright 2010-2015 Amazon.com, Inc. or its affiliates. All Rights Reserved.
 *
 * Licensed under the Apache License, Version 2.0 (the "License").
 * You may not use this file except in compliance with the License.
 * A copy of the License is located at
 *
 *  http://aws.amazon.com/apache2.0
 *
 * or in the "license" file accompanying this file. This file is distributed
 * on an "AS IS" BASIS, WITHOUT WARRANTIES OR CONDITIONS OF ANY KIND, either
 * express or implied. See the License for the specific language governing
 * permissions and limitations under the License.
 */


/*
 * This Source Code is Modified for Simple and Smart Air Purifier System
 * Written by Aaron Kow
*/

#include "iot_config.h"

aws_iot_mqtt_client myClient; // init iot_mqtt_client
char msg[32]; // read-write buffer
int cnt = 0; // loop counts
int rc = -100; // return value placeholder

void msg_callback(char* src, int len) {
  Serial.println("CALLBACK:");
  int i;
  for(i = 0; i < len; i++) {
    Serial.print(src[i]);
  }
  Serial.println("");
}

void aws_iot_setup::config(void){
  // Start Serial for print-out and wait until it's ready
  Serial.begin(115200);
//  while(!Serial);

  char curr_version[80];
  sprintf(curr_version, "AWS IoT SDK Version(dev) %d.%d.%d-%s\n", VERSION_MAJOR, VERSION_MINOR, VERSION_PATCH, VERSION_TAG);
  Serial.println(curr_version);

  // Set up the client
  if((rc = myClient.setup(AWS_IOT_CLIENT_ID)) != 0) {
    Serial.println("Setup failed!");
    Serial.println(rc);
  }
  // Load user configuration
  if((rc = myClient.config(AWS_IOT_MQTT_HOST, AWS_IOT_MQTT_PORT, AWS_IOT_ROOT_CA_PATH, AWS_IOT_PRIVATE_KEY_PATH, AWS_IOT_CERTIFICATE_PATH)) != 0) {
    Serial.println("Config failed!");
    Serial.println(rc);
  }
  // Use default connect: 60 sec for keepalive
  if((rc = myClient.connect()) != 0) {
    Serial.println("Connect failed!");
    Serial.println(rc); // fail = -5
  }
  // Subscribe to "topic1"
  if((rc = myClient.subscribe("dustlevel", 1, msg_callback)) != 0) {
    Serial.println("Subscribe failed!");
    Serial.println(rc); // fail = -7
  }
  // Delay to make sure SUBACK is received, delay time could vary according to the server
  delay(2000);
}

void aws_iot_setup::test(void){
  // Generate a new message in each loop and publish to "topic1"
  char msg[32];
  sprintf(msg, "new message %d", cnt);
  if((rc = myClient.publish("dustlevel", msg, strlen(msg), 1, false)) != 0) {
    Serial.println("Publish failed!");
    Serial.println(rc); // fail = -6
  }

  // Get a chance to run a callback
  if((rc = myClient.yield()) != 0) {
    Serial.println("Yield failed!");
    Serial.println(rc);
  }

  // Done with the current loop
  sprintf(msg, "loop %d done", cnt++);
  Serial.println(msg);

  delay(1000);
}

void aws_iot_setup::data(float data){
  char msg[32], mqtt[32];
  dtostrf(data , 3, 2, msg);

  // if dust level more than 0.25 mg/m3, the filter is ON
  if(atof(msg) > 0.25){
    sprintf(mqtt, "Dust density: %s mg/m3, air filter is ON", msg);
  } else {
    sprintf(mqtt, "Dust density: %s mg/m3, air filter is OFF", msg);
  }

  if((rc = myClient.publish("dustlevel", mqtt, strlen(mqtt), 1, false)) != 0) {
    Serial.println("Publish failed!");
    Serial.println(rc); // fail = -6
  }

  // for debug print
  Serial.print("Dust density: ");
  Serial.print(data);
  Serial.println(" mg/m3");
}
dust_config.hC/C++
Header File for Dust Sensor Configuration Source Code
/*
  Source Code for Simple and Smart Air Purifier System
  Written by Aaron Kow
  Licence: MIT Licence
*/

#ifndef dustconfig_h
#define dustconfig_h

#include <Arduino.h>

class dust_setup {
  public:
    float init(int, int);
};

#endif
dust_config.cppC/C++
Dust Sensor Configuration Source Code
/*
 Standalone Sketch to use with a Arduino Fio and a
 Sharp Optical Dust Sensor GP2Y1010AU0F

 Blog: http://arduinodev.woofex.net/2012/12/01/standalone-sharp-dust-sensor/
 Code: https://github.com/Trefex/arduino-airquality/

 For Pin connections, please check the Blog or the github project page
 Authors: Cyrille Mdard de Chardon (serialC), Christophe Trefois (Trefex)
 Changelog:
   2012-Dec-01:  Cleaned up code

 This work is licensed under the
 Creative Commons Attribution-NonCommercial-ShareAlike 3.0 Unported License.
 To view a copy of this license, visit http://creativecommons.org/licenses/by-nc-sa/3.0/
 or send a letter to Creative Commons, 444 Castro Street, Suite 900,
 Mountain View, California, 94041, USA.
*/


/*
 * This Source Code is Modified for Simple and Smart Air Purifier System
 * Written by Aaron Kow
*/

#include "dust_config.h"

int samplingTime = 280;
int deltaTime = 40;
int sleepTime = 9680;

float voMeasured = 0;
float calcVoltage = 0;
float dustDensity = 0;


float dust_setup::init(int measurePin, int ledPower){
  digitalWrite(ledPower,LOW); // power on the LED
  delayMicroseconds(samplingTime);

  voMeasured = analogRead(measurePin); // read the dust value

  delayMicroseconds(deltaTime);
  digitalWrite(ledPower,HIGH); // turn the LED off
  delayMicroseconds(sleepTime);

  // 0 - 5V mapped to 0 - 1023 integer values
  // recover voltage
  calcVoltage = voMeasured * (5.0 / 1024);

  // linear eqaution taken from http://www.howmuchsnow.com/arduino/airquality/
  // Chris Nafis (c) 2012
  dustDensity = 0.17 * calcVoltage - 0.1;

  return dustDensity; // unit: mg/m3
}
aws_iot_config.hC/C++
Header File for AWS IoT Configuration
/*
 * Copyright 2010-2015 Amazon.com, Inc. or its affiliates. All Rights Reserved.
 *
 * Licensed under the Apache License, Version 2.0 (the "License").
 * You may not use this file except in compliance with the License.
 * A copy of the License is located at
 *
 *  http://aws.amazon.com/apache2.0
 *
 * or in the "license" file accompanying this file. This file is distributed
 * on an "AS IS" BASIS, WITHOUT WARRANTIES OR CONDITIONS OF ANY KIND, either
 * express or implied. See the License for the specific language governing
 * permissions and limitations under the License.
 */

#ifndef config_usr_h
#define config_usr_h

// Copy and paste your configuration into this file
//===============================================================
#define AWS_IOT_MQTT_HOST "<your-endpoint>"
#define AWS_IOT_MQTT_PORT 8883									                    // your port
#define AWS_IOT_CLIENT_ID	"<your-client-ID>"
#define AWS_IOT_MY_THING_NAME "<your-thing-name>"
#define AWS_IOT_ROOT_CA_FILENAME "<your-rootCA-filename>"
#define AWS_IOT_CERTIFICATE_FILENAME "<your-certificate-filename>"
#define AWS_IOT_PRIVATE_KEY_FILENAME "<your-private-key-filename>"
//===============================================================
// SDK config, DO NOT modify it
#define AWS_IOT_PATH_PREFIX "./certs/"
#define AWS_IOT_ROOT_CA_PATH AWS_IOT_PATH_PREFIX AWS_IOT_ROOT_CA_FILENAME			// use this in config call
#define AWS_IOT_CERTIFICATE_PATH AWS_IOT_PATH_PREFIX AWS_IOT_CERTIFICATE_FILENAME	// use this in config call
#define AWS_IOT_PRIVATE_KEY_PATH AWS_IOT_PATH_PREFIX AWS_IOT_PRIVATE_KEY_FILENAME	// use this in config call


#endif
LICENSEMarkdown
MIT Licence
The MIT License (MIT)

Copyright (c) 2015 AaronKow

Permission is hereby granted, free of charge, to any person obtaining a copy
of this software and associated documentation files (the "Software"), to deal
in the Software without restriction, including without limitation the rights
to use, copy, modify, merge, publish, distribute, sublicense, and/or sell
copies of the Software, and to permit persons to whom the Software is
furnished to do so, subject to the following conditions:

The above copyright notice and this permission notice shall be included in
all copies or substantial portions of the Software.

THE SOFTWARE IS PROVIDED "AS IS", WITHOUT WARRANTY OF ANY KIND, EXPRESS OR
IMPLIED, INCLUDING BUT NOT LIMITED TO THE WARRANTIES OF MERCHANTABILITY,
FITNESS FOR A PARTICULAR PURPOSE AND NONINFRINGEMENT. IN NO EVENT SHALL THE
AUTHORS OR COPYRIGHT HOLDERS BE LIABLE FOR ANY CLAIM, DAMAGES OR OTHER
LIABILITY, WHETHER IN AN ACTION OF CONTRACT, TORT OR OTHERWISE, ARISING FROM,
OUT OF OR IN CONNECTION WITH THE SOFTWARE OR THE USE OR OTHER DEALINGS IN
THE SOFTWARE.
Source Code for Simple and Smart Air Purifier System
GitHub repository for Simple and Smart Air Purifier Systemhttps://github.com/AaronKow/Simple-and-Smart-Air-Purifier-System