Description: This segregator can separate dry waste and wet waste successfully.
Note: It cannot segregate plastic or metal. For that you have to use additional Sensors and modules
Construction:
1. I have used 2 acrylic sheets as body of my segregator
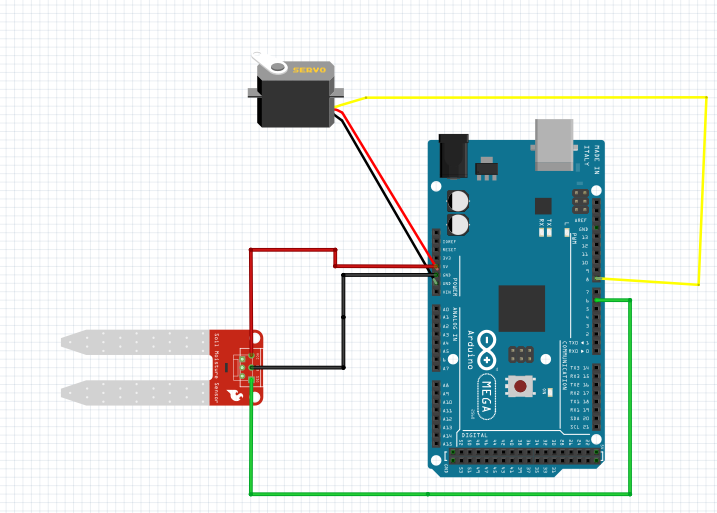
2.Servo motor is used as an actuator which will rotate depending on the type of waste (dry or wet)
3. I have used very low cost stationary Scale /Ruler as the shaft of my servo motor. This connects the upper base and servo Motor. I have used Glue gun to stick it.
Note: you can also use feviquick as your glue but its risky so use it carefully.
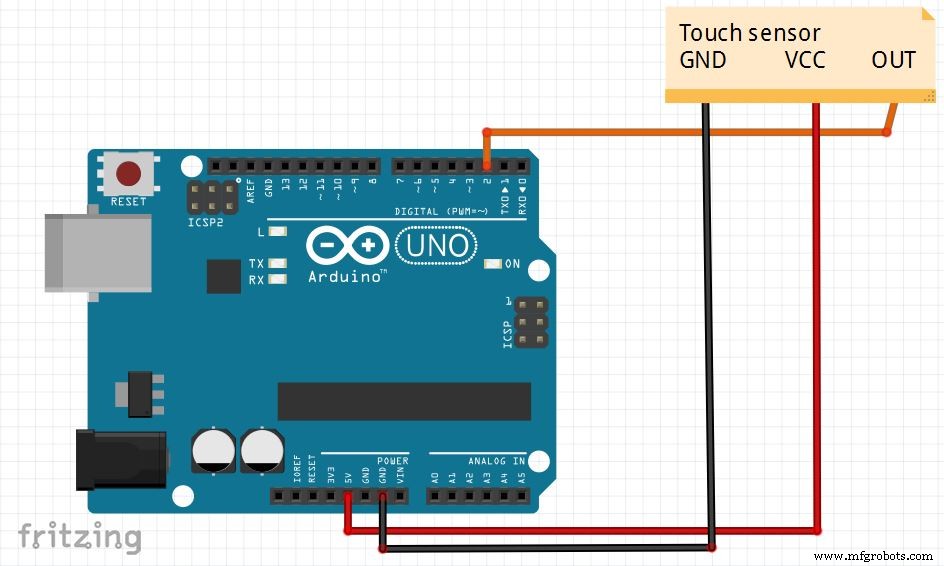
4.Moisture sensor is fixed on to upper part of segregator such that when is waste is put it directly lands on sensor. There is also a touch sensor besides it to detect dry waste. This Completes the construction of this project.
Why touch Sensor when moisture sensor can alone classify the type of waste?
yes it's true that moisture can classify wet waste. but it cannot classify dry waste. why? imagine you want to have a neutral state when there is no waste put on the sensor. No matter how much you try you won't be able to achieve this neutral state. The moisture sensor will always be in a dry state by default which will result in segregator always tilting to either side. To overcome this problem Touch Sensor is used.
Implementation Step by Step:
Step1: As shown in the above image gather 2 Acrylic sheets. You can get these sheets anywhere in local shops or order it online through amazon.
Step 2: Make the holes in the acrylic sheets as shown in the image so that you can fix the batter holder to it.
Step 3: Then on the upper side of the battery holder stick the servo motor pointing straight ahead as shown in the image. You can fix the servo motor by double sided tape or glue gun.
Step 4: Then take a plastic stationary scale( That you used to use in schools for drawing lines) and make a hole in it at its bottom which will be little less than the diameter of the motor shaft.(You can make the holes by using a hot soldering iron or any other thin steel rod.)
Step 5: Stick the other acrylic sheet on the top of the scale as shown in the image using glue gun. Make sure it's fixed tight and doesn't move.
Step 6: Place the moisture sensor and touch sensor on the top of the acrylic plate.
>> By following these 6 steps correctly you are good to go :)
Hardware Explanation:
For implementing this hardware setup you will need to learn the following concepts in depth:
Arduino: Arduino is a microcontroller which will be used in this project. You can learn everything about this at this link . Also don't forget to check the official documentation of Arduino.
C++ Programming: For programming Arduino you will to learn C++ Programming to an intermediate level. You will also have to learn the Basic functions of Arduino.
Moisture Sensor: You will need to learn the Interfacing of Arduino with the Moisture sensor with circuit diagram.
Touch Sensor : You will need to learn the Interfacing of Arduino with the Touch sensor with circuit diagram.
Servo Motor : You will have to learn about Servo Motor and how exactly it is operated with Arduino.
Working of Smart Segregator Step by Step:
Step1: Waste is put and lands on moisture sensor.
Step 2: Depending upon the Threshold set Moisture sensor classifies it as dry or wet.
Step 3: As soon step 2 is done Servo Motor runs to either direction depending upon the type of waste and the waste goes in the appropriate compartment.
Step 4: The whole process is autonomous and Continuous.
Video: Don't Forget to check out the awesome working of this project (link is given below :)
Code
Smart Segregator
Smart SegregatorC/C++
#include <Servo.h>

class Smart_Segregator
/*
   _____________________________________________________________
  |
  | Description
  | -----------
  | - This is a smart segregator which seperates dry and wet
  |   wet waste. (It cannot segregate metal or plastic)
  |
  |.............................................................
  |
  | Attributes
  | ----------
  | pin_1 : int
  |    -  Servo Motor pin number.
  |
  | pin_2 : int
  |    -  Moisture Sensor pin number.
  |
  | pin_3 : int
  |    - Touch Sensor pin number.
  |
  |............................................................
  |
  | Methods
  | -------
  | dry_waste()
  |       - Lid of the segregator slides towards right side.
  |
  | wet_waste()
  |       - Lid of the segregator slides towards left side
  |
  | neutral_state()
  |       - In which the lid of segregator is in the middle.
  |
  | execute()
  |       - Smart Segregator starts operating.
  |
  |___________________________________________________________
  */
{
  public:
     int servo_pin;
     int moisture_sensor_pin;
     int touch_sensor_pin;
     int detect_moisture;
     int detect_touch;

     Servo servo;

     Smart_Segregator(int pin_1, int pin_2, int pin_3)
     {
       servo_pin = pin_1;
       moisture_sensor_pin = pin_2;
       touch_sensor_pin = pin_3;

       detect_moisture = 0;
       detect_touch = false;
     }

    void init()
    {
      Serial.begin(9600);
      servo.attach(servo_pin);
      servo.write(90);

      pinMode(moisture_sensor_pin, INPUT);
      pinMode(touch_sensor_pin, INPUT);

      Serial.println("Your Smart Segregator is ready to Segregate!");
    }

    void dry_waste()
    {
      servo.write(0);
    }

    void wet_waste()
    {
      servo.write(180);
    }

    void neutral_state()
    {
      servo.write(90);
    }

    void execute()
    {
      detect_moisture = digitalRead(moisture_sensor_pin);
      detect_touch = digitalRead(touch_sensor_pin);

      if (detect_moisture > 85 && detect_touch == true)
      {
        wet_waste();
      }

      else if (detect_moisture <= 85 && detect_touch == true)
      {
        dry_waste();
      }

      else
      {
        neutral_state();
      }
    }
}

segregator = Smart_Segregator(8,6,2);

void setup()
{
  segregator.init();
}

void loop()
{
 segregator.execute();
}