


Driving VHDL Testbenches from External Stimulus Files with TEXTIO
Reading stimulus data from an external file is a powerful way to control a Device‑Under‑Test (DUT) in VHDL. By scripting a sequence of signal values and simulation times in a plain‑text file, designers can quickly swap test patterns without modifying the testbench logic. This article, the second in a series on VHDL file access, demonstrates how to read a stimulus file with the TEXTIO library and apply its values to a 4‑input multiplexer.
Test Case Overview
The DUT is a standard, asynchronous 4‑to‑1 multiplexer with 8‑bit data words. The testbench does not perform any output verification – it merely drives the inputs so that the waveform can be examined manually. The entity declaration is reproduced below for reference.
entity mux_4 is
  port(
    din_0 : in unsigned(7 downto 0);
    din_1 : in unsigned(7 downto 0);
    din_2 : in unsigned(7 downto 0);
    din_3 : in unsigned(7 downto 0);
    sel  : in unsigned(1 downto 0);
    dout : out unsigned(7 downto 0));
end entity;
Signals that connect to the DUT are declared in the testbench architecture and instantiated with the label DUT:
signal din_0 : unsigned(7 downto 0);
signal din_1 : unsigned(7 downto 0);
signal din_2 : unsigned(7 downto 0);
signal din_3 : unsigned(7 downto 0);
signal sel  : unsigned(1 downto 0);
signal dout : unsigned(7 downto 0);

DUT: entity work.mux_4(rtl)
port map (
    din_0 => din_0,
    din_1 => din_1,
    din_2 => din_2,
    din_3 => din_3,
    sel  => sel,
    dout => dout
);
Designing the Stimulus File
Although many formats are possible, the example below illustrates a clear, human‑readable layout. Each line represents a simulation step and contains:
- wait_time – delay from the previous step (e.g.,
10 ns) - sel – 2‑bit selector value
- din_0 to din_3 – 8‑bit data values in hexadecimal
- Optional trailing comment starting with
#for console output
Comments that begin a line are ignored by the testbench; comments that follow a data set are printed to the simulator console.
# Column description:
# wait_time | sel | din_0 | din_1 | din_2 | din_3 # Optional console printout

0 ns 0 AA BB CC DD # Setting initial values
10 ns 1 AA BB CC DD # Testing by changing the selector signal
10 ns 2 AA BB CC DD
10 ns 3 AA BB CC DD
10 ns 3 A1 B1 C1 D1 # Testing by changing all data inputs
10 ns 3 A2 B2 C2 D2
10 ns 3 A3 B3 C3 D3
10 ns 3 00 00 00 D2 # Changing all unselected inputs
10 ns 3 01 02 03 D2
10 ns 3 11 22 33 D2
1 ns 0 CC DD EE FF # Changing all inputs fast
1 ns 1 DD EE FF CC
1 ns 2 EE FF CC DD
1 ns 3 FF CC DD EE
10 ns 0 00 00 00 00 # Simulation stop
Reading the File with TEXTIO
Below is the core process that opens the stimulus file, parses each line, assigns values to the DUT inputs, and handles comments. The example assumes a well‑formatted file – one space separates columns, and the # character is followed by a single space.
PROC_SEQUENCER : process
  file text_file : text open read_mode is "stimulus.txt";
  variable text_line : line;
  variable ok : boolean;
  variable char : character;
  variable wait_time : time;
  variable selector : sel'subtype;
  variable data : dout'subtype;
begin
  while not endfile(text_file) loop
    readline(text_file, text_line);

    -- Skip empty lines and single‑line comments
    if text_line.all'length = 0 or text_line.all(1) = '#' then
      next;
    end if;

    read(text_line, wait_time, ok);
    assert ok
      report "Read 'wait_time' failed for line: " & text_line.all
      severity failure;

    hread(text_line, selector, ok);
    assert ok
      report "Read 'sel' failed for line: " & text_line.all
      severity failure;
    sel <= selector;

    hread(text_line, data, ok);
    assert ok
      report "Read 'din_0' failed for line: " & text_line.all
      severity failure;
    din_0 <= data;

    hread(text_line, data, ok);
    assert ok
      report "Read 'din_1' failed for line: " & text_line.all
      severity failure;
    din_1 <= data;

    hread(text_line, data, ok);
    assert ok
      report "Read 'din_2' failed for line: " & text_line.all
      severity failure;
    din_2 <= data;

    hread(text_line, data, ok);
    assert ok
      report "Read 'din_3' failed for line: " & text_line.all
      severity failure;
    din_3 <= data;

    wait for wait_time;

    -- Print trailing comment to console, if any
    read(text_line, char, ok); -- Skip expected newline
    read(text_line, char, ok);
    if char = '#' then
      read(text_line, char, ok); -- Skip expected newline
      report text_line.all;
    end if;

  end loop;

  finish;

end process;
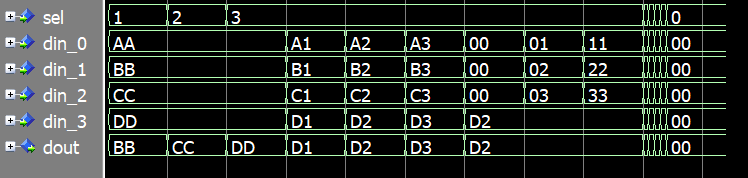
Simulation Output
When run in ModelSim the console displays the trailing comments along with the cumulative simulation time. The following excerpt shows the sequence of printed notes:
# ** Note: Setting initial values
#    Time: 0 ns  Iteration: 1  Instance: /file_stim_tb
# ** Note: Testing by changing the selector signal
#    Time: 10 ns  Iteration: 0  Instance: /file_stim_tb
# ** Note: Testing by changing all data inputs
#    Time: 40 ns  Iteration: 0  Instance: /file_stim_tb
# ** Note: Changing all unselected inputs
#    Time: 70 ns  Iteration: 0  Instance: /file_stim_tb
# ** Note: Changing all inputs fast
#    Time: 91 ns  Iteration: 0  Instance: /file_stim_tbf
# ** Note: Simulation stop
#    Time: 104 ns  Iteration: 0  Instance: /file_stim_tb
# Break in Process PROC_SEQUENCER at file_stim_tb.vhd line 98
The waveform produced by the testbench mirrors the timing and data values from the file, allowing designers to verify the DUT’s behavior visually.
Key Takeaways
- External stimulus files give designers fine‑grained control over test sequences without altering testbench code.
- Using
TEXTIOkeeps the testbench concise, but requires disciplined file formatting. - Always include a self‑checking mechanism – either by comparing against a behavioral model or by embedding expected outputs in the stimulus file.
By following the example above, you can harness the full flexibility of VHDL’s TEXTIO to drive complex test scenarios while maintaining a clean, maintainable testbench structure.
VHDL
- Reading BMP Bitmap Images in VHDL Testbenches with TEXTIO
- Initializing FPGA Block RAM from Text Files Using VHDL’s TEXTIO Library
- Enhance Hardware Verification with a Tcl-Based Interactive Testbench
- C++ File Handling: Mastering Open, Read, Write, and Close Operations
- File Operations in C# – A Practical Guide
- Reading Files in Java with BufferedReader – A Practical Guide with Examples
- How to Rename Files and Directories in Python with os.rename() – Step-by-Step Guide
- How to Read and Write CSV Files in Python: A Comprehensive Guide
- Python JSON: Encoding, Decoding, and File Handling – A Practical Guide
- Seamless PLC‑to‑Cloud Integration: Harnessing IoT for Real‑Time Data Retrieval