Code
LED clock CODEsArduino
Download this code and upload to the project/*
4 digit 7 segment display: http://www.sparkfun.com/products/9483
Datasheet: http://www.sparkfun.com/datasheets/Components/LED/7-Segment/YSD-439AR6B-35.pdf
*/
// modified connexion by niq_ro from http://nicuflorica.blogspot.com
// dataseet: http://www.tme.eu/ro/Document/dfc2efde2e22005fd28615e298ea2655/KW4-563XSA.pdf
// Code modified by BMIAK Basnayaka
// http://www.setnfix.com
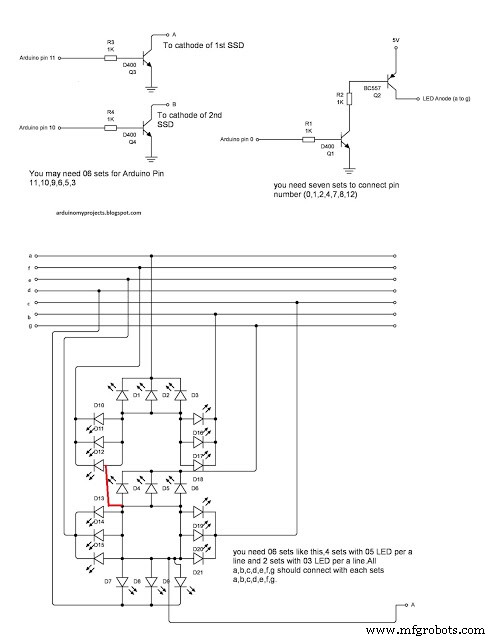
int digit1 = 11;
int digit2 = 10;
int digit3 = 9;
int digit4 = 6;
int digit5 = 5;
int digit6 = 3;
//Pin mapping from Arduino to the ATmega DIP28 if you need it
//http://www.arduino.cc/en/Hacking/PinMapping
int segA = 0; //Display pin 11
int segB = 1; //Display pin 7
int segC = 2; //Display pin 4
int segD = 4; //Display pin 2
int segE = 7; //Display pin 1
int segF = 8; //Display pin 10
int segG = 12; //Display pin 5
int segDP =13; // Display pin 3
#include <Wire.h>
#include "RTClib.h"
RTC_DS1307 RTC;
// Date and time functions using a DS1307 RTC connected via I2C and Wire lib
// original sketck from http://learn.adafruit.com/ds1307-real-time-clock-breakout-board-kit/
// add part with SQW=1Hz from http://tronixstuff.wordpress.com/2010/10/20/tutorial-arduino-and-the-i2c-bus/
// add part with manual adjust http://www.bristolwatch.com/arduino/arduino_ds1307.htm
byte SW0 = A0;
byte SW1 = A2;
byte SW2 = A1;
byte SWT = A3;
int Adhr=0;
int Admnt=0;
int D = 0;
int Z =0;
// use for hexa in zecimal conversion
long zh, uh, ore;
long zm, um, miniti;
void setup() {
//Serial.begin(57600);
Wire.begin();
RTC.begin();
// RTC.adjust(DateTime(F(__DATE__), F(__TIME__)));
// if you need set clock... just remove // from line above this
// part code for flashing LED
Wire.beginTransmission(0x68);
Wire.write(0x07); // move pointer to SQW address
// Wire.write(0x00); // turns the SQW pin off
Wire.write(0x10); // sends 0x10 (hex) 00010000 (binary) to control register - turns on square wave at 1Hz
// Wire.write(0x13); // sends 0x13 (hex) 00010011 (binary) 32kHz
Wire.endTransmission();
pinMode(segA, OUTPUT);
pinMode(segB, OUTPUT);
pinMode(segC, OUTPUT);
pinMode(segD, OUTPUT);
pinMode(segE, OUTPUT);
pinMode(segF, OUTPUT);
pinMode(segG, OUTPUT);
pinMode(segDP, OUTPUT);
pinMode(digit1, OUTPUT);
pinMode(digit2, OUTPUT);
pinMode(digit3, OUTPUT);
pinMode(digit4, OUTPUT);
pinMode(digit5, OUTPUT);
pinMode(digit6, OUTPUT);
//Serial.begin(9600);
pinMode(SW0, INPUT); // N.O. push button switch
pinMode(SW1, INPUT); // N.O. push button switch
pinMode(SW2, INPUT); // N.O. push button switch
pinMode(SWT, INPUT); // N.O. push button switch
digitalWrite(SW0, HIGH); // pull-ups on
digitalWrite(SW1, HIGH);
digitalWrite(SW2, HIGH);
digitalWrite(segDP, LOW);
}
void loop() {
DateTime now = RTC.now();
long HR = now.hour()*1000;
long timp = (HR*10)+now.minute()*100+now.second();
Adhr = now.hour();
Admnt=now.minute();
int DIM = 0;
if (timp >=250000)
timp=timp-240000;
//------------------------------------------------------
//12/24 hours shitching
//------------------------------------------------------
if (timp < 130000){
digitalWrite(segDP, LOW);}
if (digitalRead(SWT)==0){delay(300);
if (D == 0) {
D =1;delay(200);}
else{
D =0;}
}
if (D == 0){
if (timp>=130000){
timp=timp-120000;
digitalWrite(segDP, HIGH);}
}
if (timp>=130000){
digitalWrite(segDP, LOW);
}
if ((D==1)& (timp <130000))
digitalWrite(segDP, LOW);
//------------------------------------------------------
//int timp = (now.minute(), DEC);
// displayNumber(12); // this is number to diplay
for(int i = 100 ; i >0 ; i--) {
if (timp >= 100000) displayNumber01(timp);
else displayNumber02(timp);
}
for(int i = 100 ; i >0 ; i--) {
if (timp >= 100000) displayNumber03(timp);
else displayNumber04(timp);
}
for(int i = 100 ; i >0 ; i--) {
if (timp >= 100000) displayNumber05(timp);
else displayNumber06(timp);
}
if (digitalRead(SW0)==0){delay(100);Z=1; set_time(); }// hold the switch to set time
}
void set_time() {
byte minutes1 = 0;
byte hours1 = 0;
byte minutes = 0;
byte hours = 0;
hours=Adhr;
minutes=Admnt;
if ((hours & 0x0f) > 9) hours = hours + 6;
if (hours > 0x24) hours = 1; // Mid night 12.00 will show as 12:00 (With PM LED on) or 24:00
//if (hours > 0x24) hours = 1; // Mid night 12.00 will show as 0:00
if ((minutes & 0x0f) > 9) minutes = minutes + 6;
if (minutes > 0x59) minutes = 0;
while (!(Z==0)){ // set time switch must be released to exit
int TST = digitalRead(SW2);
while (TST==0) // set hours
{
hours++;
// converting hexa in zecimal:
zh = hours / 16;
uh = hours - 16 * zh ;
ore = 10 * zh + uh;
zm = minutes / 16;
um = minutes - 16 * zm ;
miniti = 10 * zm + um;
if ((hours & 0x0f) > 9) hours = hours + 6;
if (hours > 0x24) hours = 1; // Mid night 12.00 will show as 12:00 (With PM LED on) or 24:00
//if (hours > 0x24) hours = 1; // Mid night 12.00 will show as 0:00
if (hours <= 9)
delay(1);
for(int i = 400 ; i >0 ; i--) {
displayNumber01(ore*10000+miniti*100);
}
TST = digitalRead(SW2);
}
while (!(digitalRead(SW1))) // set minutes
{
minutes++;
// converting hexa in zecimal:
zh = hours / 16;
uh = hours - 16 * zh ;
ore = 10 * zh + uh;
zm = minutes / 16;
um = minutes - 16 * zm ;
miniti = 10 * zm + um;
for(int i = 400 ; i >0 ; i--) {
displayNumber01(ore*10000+miniti*100);
}
if ((minutes & 0x0f) > 9) minutes = minutes + 6;
if (minutes > 0x59) minutes = 0;
if (minutes >= 9)
delay(1);
}
Wire.beginTransmission(0x68); // activate DS1307
Wire.write(0); // where to begin
Wire.write(0x00); //seconds
Wire.write(minutes); //minutes
Wire.write(0x80 | hours); //hours (24hr time)
Wire.write(0x06); // Day 01-07
Wire.write(0x01); // Date 0-31
Wire.write(0x05); // month 0-12
Wire.write(0x09); // Year 00-99
Wire.write(0x10); // Control 0x10 produces a 1 HZ square wave on pin 7.
Wire.endTransmission();
// converting hexa in zecimal:
zh = hours / 16;
uh = hours - 16 * zh ;
ore = 10 * zh + uh;
zm = minutes / 16;
um = minutes - 16 * zm ;
miniti = 10 * zm + um;
for(int i = 400 ; i >0 ; i--) {
displayNumber01(ore*10000+miniti*100);
}
delay(100);
//Serial.print(digitalRead(SW0));
if (digitalRead(SW0)==0) Z = 0;
delay(300);
}
//Serial.print(SW2);
}
void displayNumber01(long toDisplay) {
#define DISPLAY_BRIGHTNESS 25
#define DIGIT_ON HIGH
#define DIGIT_OFF LOW
for(int digit = 6 ; digit > 0 ; digit--) {
//Turn on a digit for a short amount of time
switch(digit) {
case 1:
digitalWrite(digit1, DIGIT_ON);
break;
case 2:
digitalWrite(digit2, DIGIT_ON);
//digitalWrite(segDP, LOW);
break;
case 3:
digitalWrite(digit3, DIGIT_ON);
break;
case 4:
digitalWrite(digit4, DIGIT_ON);
break;
case 5:
digitalWrite(digit5, DIGIT_ON);
break;
case 6:
digitalWrite(digit6, DIGIT_ON);
break;
}
lightNumber(toDisplay % 10);
toDisplay /= 10;
delayMicroseconds(DISPLAY_BRIGHTNESS);
//Turn off all segments
lightNumber(10);
//Turn off all digits
digitalWrite(digit1, DIGIT_OFF);
digitalWrite(digit2, DIGIT_OFF);
digitalWrite(digit3, DIGIT_OFF);
digitalWrite(digit4, DIGIT_OFF);
digitalWrite(digit5, DIGIT_OFF);
digitalWrite(digit6, DIGIT_OFF);
}
}
void displayNumber02(long toDisplay) {
#define DISPLAY_BRIGHTNESS 25
#define DIGIT_ON HIGH
#define DIGIT_OFF LOW
for(int digit = 6 ; digit > 0 ; digit--) {
//Turn on a digit for a short amount of time
switch(digit) {
case 1:
lightNumber(10);
break;
case 2:
digitalWrite(digit2, DIGIT_ON);
//digitalWrite(segDP, LOW);
break;
case 3:
digitalWrite(digit3, DIGIT_ON);
break;
case 4:
digitalWrite(digit4, DIGIT_ON);
break;
case 5:
digitalWrite(digit5, DIGIT_ON);
break;
case 6:
digitalWrite(digit6, DIGIT_ON);
break;
}
lightNumber(toDisplay % 10);
toDisplay /= 10;
delayMicroseconds(DISPLAY_BRIGHTNESS);
//Turn off all segments
lightNumber(10);
//Turn off all digits
digitalWrite(digit1, DIGIT_OFF);
digitalWrite(digit2, DIGIT_OFF);
digitalWrite(digit3, DIGIT_OFF);
digitalWrite(digit4, DIGIT_OFF);
digitalWrite(digit5, DIGIT_OFF);
digitalWrite(digit6, DIGIT_OFF);
}
}
void displayNumber03(long toDisplay) {
#define DISPLAY_BRIGHTNESS 25
#define DIGIT_ON HIGH
#define DIGIT_OFF LOW
for(int digit = 6 ; digit > 0 ; digit--) {
//Turn on a digit for a short amount of time
switch(digit) {
case 1:
digitalWrite(digit1, DIGIT_ON);
break;
case 2:
digitalWrite(digit2, DIGIT_ON);
break;
case 3:
digitalWrite(digit3, DIGIT_ON);
break;
case 4:
digitalWrite(digit4, DIGIT_ON);
break;
case 5:
digitalWrite(digit5, DIGIT_ON);
break;
case 6:
digitalWrite(digit6, DIGIT_ON);
break;
}
lightNumber(toDisplay % 10);
toDisplay /= 10;
delayMicroseconds(DISPLAY_BRIGHTNESS);
//Turn off all segments
lightNumber(10);
//Turn off all digits
digitalWrite(digit1, DIGIT_OFF);
digitalWrite(digit2, DIGIT_OFF);
digitalWrite(digit3, DIGIT_OFF);
digitalWrite(digit4, DIGIT_OFF);
digitalWrite(digit5, DIGIT_OFF);
digitalWrite(digit6, DIGIT_OFF);
}
}
void displayNumber04(long toDisplay) {
#define DISPLAY_BRIGHTNESS 25
#define DIGIT_ON HIGH
#define DIGIT_OFF LOW
for(int digit = 6 ; digit > 0 ; digit--) {
//Turn on a digit for a short amount of time
switch(digit) {
case 1:
lightNumber(10);
break;
case 2:
digitalWrite(digit2, DIGIT_ON);
break;
case 3:
digitalWrite(digit3, DIGIT_ON);
break;
case 4:
digitalWrite(digit4, DIGIT_ON);
break;
case 5:
digitalWrite(digit5, DIGIT_ON);
break;
case 6:
digitalWrite(digit6, DIGIT_ON);
break;
}
lightNumber(toDisplay % 10);
toDisplay /= 10;
delayMicroseconds(DISPLAY_BRIGHTNESS);
//Turn off all segments
lightNumber(10);
//Turn off all digits
digitalWrite(digit1, DIGIT_OFF);
digitalWrite(digit2, DIGIT_OFF);
digitalWrite(digit3, DIGIT_OFF);
digitalWrite(digit4, DIGIT_OFF);
digitalWrite(digit5, DIGIT_OFF);
digitalWrite(digit6, DIGIT_OFF);
}
}
void displayNumber05(long toDisplay) {
#define DISPLAY_BRIGHTNESS 25
#define DIGIT_ON HIGH
#define DIGIT_OFF LOW
for(int digit = 6 ; digit > 0 ; digit--) {
//Turn on a digit for a short amount of time
switch(digit) {
case 1:
digitalWrite(digit1, DIGIT_ON);
break;
case 2:
digitalWrite(digit2, DIGIT_ON);
break;
case 3:
digitalWrite(digit3, DIGIT_ON);
break;
case 4:
digitalWrite(digit4, DIGIT_ON);
break;
case 5:
digitalWrite(digit5, DIGIT_ON);
break;
case 6:
digitalWrite(digit6, DIGIT_ON);
break;
}
lightNumber(toDisplay % 10);
toDisplay /= 10;
delayMicroseconds(DISPLAY_BRIGHTNESS);
//Turn off all segments
lightNumber(10);
//Turn off all digits
digitalWrite(digit1, DIGIT_OFF);
digitalWrite(digit2, DIGIT_OFF);
digitalWrite(digit3, DIGIT_OFF);
digitalWrite(digit4, DIGIT_OFF);
digitalWrite(digit5, DIGIT_OFF);
digitalWrite(digit6, DIGIT_OFF);
}
}
void displayNumber06(long toDisplay) {
#define DISPLAY_BRIGHTNESS 25
#define DIGIT_ON HIGH
#define DIGIT_OFF LOW
for(int digit = 6 ; digit > 0 ; digit--) {
//Turn on a digit for a short amount of time
switch(digit) {
case 1:
//digitalWrite(digit1, DIGIT_ON);
break;
case 2:
digitalWrite(digit2, DIGIT_ON);
break;
case 3:
digitalWrite(digit3, DIGIT_ON);
break;
case 4:
digitalWrite(digit4, DIGIT_ON);
break;
case 5:
digitalWrite(digit5, DIGIT_ON);
break;
case 6:
digitalWrite(digit6, DIGIT_ON);
break;
}
lightNumber(toDisplay % 10);
toDisplay /= 10;
delayMicroseconds(DISPLAY_BRIGHTNESS);
//Turn off all segments
lightNumber(10);
//Turn off all digits
digitalWrite(digit1, DIGIT_OFF);
digitalWrite(digit2, DIGIT_OFF);
digitalWrite(digit3, DIGIT_OFF);
digitalWrite(digit4, DIGIT_OFF);
digitalWrite(digit5, DIGIT_OFF);
digitalWrite(digit6, DIGIT_OFF);
}
}
//Given a number, turns on those segments
//If number == 10, then turn off number
void lightNumber(int numberToDisplay) {
//Common Anode *************************
#define SEGMENT_ON HIGH
#define SEGMENT_OFF LOW
/* Common Cathode *****************
#define SEGMENT_ON LOW
#define SEGMENT_OFF HIGH
*/
switch (numberToDisplay){
case 0:
digitalWrite(segA, SEGMENT_ON);
digitalWrite(segB, SEGMENT_ON);
digitalWrite(segC, SEGMENT_ON);
digitalWrite(segD, SEGMENT_ON);
digitalWrite(segE, SEGMENT_ON);
digitalWrite(segF, SEGMENT_ON);
digitalWrite(segG, SEGMENT_OFF);
break;
case 1:
digitalWrite(segA, SEGMENT_OFF);
digitalWrite(segB, SEGMENT_ON);
digitalWrite(segC, SEGMENT_ON);
digitalWrite(segD, SEGMENT_OFF);
digitalWrite(segE, SEGMENT_OFF);
digitalWrite(segF, SEGMENT_OFF);
digitalWrite(segG, SEGMENT_OFF);
break;
case 2:
digitalWrite(segA, SEGMENT_ON);
digitalWrite(segB, SEGMENT_ON);
digitalWrite(segC, SEGMENT_OFF);
digitalWrite(segD, SEGMENT_ON);
digitalWrite(segE, SEGMENT_ON);
digitalWrite(segF, SEGMENT_OFF);
digitalWrite(segG, SEGMENT_ON);
break;
case 3:
digitalWrite(segA, SEGMENT_ON);
digitalWrite(segB, SEGMENT_ON);
digitalWrite(segC, SEGMENT_ON);
digitalWrite(segD, SEGMENT_ON);
digitalWrite(segE, SEGMENT_OFF);
digitalWrite(segF, SEGMENT_OFF);
digitalWrite(segG, SEGMENT_ON);
break;
case 4:
digitalWrite(segA, SEGMENT_OFF);
digitalWrite(segB, SEGMENT_ON);
digitalWrite(segC, SEGMENT_ON);
digitalWrite(segD, SEGMENT_OFF);
digitalWrite(segE, SEGMENT_OFF);
digitalWrite(segF, SEGMENT_ON);
digitalWrite(segG, SEGMENT_ON);
break;
case 5:
digitalWrite(segA, SEGMENT_ON);
digitalWrite(segB, SEGMENT_OFF);
digitalWrite(segC, SEGMENT_ON);
digitalWrite(segD, SEGMENT_ON);
digitalWrite(segE, SEGMENT_OFF);
digitalWrite(segF, SEGMENT_ON);
digitalWrite(segG, SEGMENT_ON);
break;
case 6:
digitalWrite(segA, SEGMENT_ON);
digitalWrite(segB, SEGMENT_OFF);
digitalWrite(segC, SEGMENT_ON);
digitalWrite(segD, SEGMENT_ON);
digitalWrite(segE, SEGMENT_ON);
digitalWrite(segF, SEGMENT_ON);
digitalWrite(segG, SEGMENT_ON);
break;
case 7:
digitalWrite(segA, SEGMENT_ON);
digitalWrite(segB, SEGMENT_ON);
digitalWrite(segC, SEGMENT_ON);
digitalWrite(segD, SEGMENT_OFF);
digitalWrite(segE, SEGMENT_OFF);
digitalWrite(segF, SEGMENT_OFF);
digitalWrite(segG, SEGMENT_OFF);
break;
case 8:
digitalWrite(segA, SEGMENT_ON);
digitalWrite(segB, SEGMENT_ON);
digitalWrite(segC, SEGMENT_ON);
digitalWrite(segD, SEGMENT_ON);
digitalWrite(segE, SEGMENT_ON);
digitalWrite(segF, SEGMENT_ON);
digitalWrite(segG, SEGMENT_ON);
break;
case 9:
digitalWrite(segA, SEGMENT_ON);
digitalWrite(segB, SEGMENT_ON);
digitalWrite(segC, SEGMENT_ON);
digitalWrite(segD, SEGMENT_ON);
digitalWrite(segE, SEGMENT_OFF);
digitalWrite(segF, SEGMENT_ON);
digitalWrite(segG, SEGMENT_ON);
break;
// all segment are ON
case 10:
digitalWrite(segA, SEGMENT_OFF);
digitalWrite(segB, SEGMENT_OFF);
digitalWrite(segC, SEGMENT_OFF);
digitalWrite(segD, SEGMENT_OFF);
digitalWrite(segE, SEGMENT_OFF);
digitalWrite(segF, SEGMENT_OFF);
digitalWrite(segG, SEGMENT_OFF);
break;
}
// End of the coding, BUDHUSARANAI, Best of luck.
}