Build a Reliable Sigfox kWh Meter with Arduino MKR Fox 1200
Components and supplies
Arduino MKR Fox 1200
×
1
Breadboard (generic)
×
1
Jumper wires (generic)
×
1
CNY70
×
1
Resistor 221 ohm
×
1
Resistor 10k ohm
×
1
Resistor 100 ohm
×
1
Rotary potentiometer (generic)
×
1
SparkFun Pushbutton switch 12mm
×
1
LED (generic)
×
1
Apps and online services
Arduino IDE
Sigfox
ThingSpeak API
About this project
1) In a nutshell
This tutorial will help you create a device that will connect your old inductive power meter to the Internet. And what kind of meter exactly is it? It is the kind of oldest, but still used power meter. It has the rotary disk, which has reflective paint all the way round it with a little black stripe. Each time you see that black part passing by, it means one rotation has been completed. In this project 120 turns are equal to consumption of 1 kWh.
2) Microcontroller, IoT network and other stuff used
So, we will need Arduino MKRFOX1200, which has the Sigfox (and that is the network) connectivity. Sigfox is LPWAN network, that allows to connect anything to the Internet. The network works in ISM band 868 MHz and allows us to send 140 messages (12 bytes of payload each) daily uplink. But that is not all just about network. Sigfox gives us an opportunity to customize the way we want to work with messages. In fact all messages are stored on Sigfox cloud, from where we can retrieve them by defining their destination - callbacks, etc.
ThingSpeak:
ThingSpeak is an IoT platform for the user-friendly display of data. In this project it is the Sigfox callback destination that displays received consumption using charts as soon as the transfer occurred.
1.Connectalllistedpartsasshowninthe wiringdiagram. I will not explain the theory behind connection, if anything is unclear, feel free to ask. Do not forget to give it some juice :) (usb power bank, or your laptop usb output, etc.).
2.Writeacode. You will find the Code attached on the bottom of this page. Again, if anything in code is unclear to you, feel free to ask.
3.CreateThingSpeakChannelswithAnalysis. Register on https://thingspeak.com/ and create channel no. 1 by giving it name, description and Field 1 - Consumption. Create channel no. 2 based on channel no. 1, but with different name. Then select Matlab Analysis option on channel no. 2 and write the following code:
4.CreateSigfoxCallback. I hope you already registered yours MKRFOX1200 in backend so I am gonna skip tutorial on how to do this. After you logged in on https://backend.sigfox.com/ go to the callbacks section and create one as following:
*EXPLAINED1- replace this with Channel 1 ThingSpeak WriteApiKey
4) Device installation & logic behind
So you already have accomplished most difficult parts of this project. Now attach the CNY70 sensor to the glass of your power meter with double sided tape - take care to place it on the centre of rotary disk (fig. Installation). Next, press the device button two times and do the calibration - if the sensor reads reflective part of disk, the diode should light up. If the sensor reads black stripe, the diode should go off. After successful calibration, press the device button one more time. Now the device starts reading the power consumption and sends this value every 30 minutes to Internet using Sigfox. The precision of reading is set to 25 Wh (in our case every 3 disk turns).
5) Final Output
After all these steps you will be able to see your actual electric energy consumption in a beautiful ThingSpeak chart as below.
Code
Sigfox kWh electric energy power meter
Sigfox kWh electric energy power meterArduino
This is .ino code for making your power meter intelligent.
#include <SigFox.h>

int DIODE = 13;
int BTN = 12;
int BTN_state = 0;
int BTN_prev = 0;
int BTN_NR_OF_PRESS = 0;
int CALC = 0;
unsigned long i = 0;
uint32_t CONSUMPTION = 0;
boolean SHINE = false;
boolean KARDAN = false;


void setup() {

  pinMode(DIODE, OUTPUT);
  pinMode(BTN, INPUT);
  Serial.begin(9600);
  if (!SigFox.begin()) {
    Serial.println("Sigfox module unavailable.");
  }

}

void loop() {


  int senzor = analogRead(A3);


  BTN_state = digitalRead(BTN);

  if (BTN_state != BTN_prev) {
    if (BTN_state == HIGH) {
      BTN_NR_OF_PRESS++;
    }
  }

  BTN_prev = BTN_state;

  if (BTN_NR_OF_PRESS % 3 == 0) {

    if (senzor > 300 && senzor < 950) {
      digitalWrite(DIODE, HIGH);
    }
    else {
      digitalWrite(DIODE, LOW);
    }
  }


  if (senzor < 1020 && SHINE == false)
  {
    SHINE = true;

  }
  if (senzor > 1020 && SHINE == true && BTN_NR_OF_PRESS == 4)
  {
    CALC++;
    SHINE = false;


  }
  if (CALC % 3 == 0 && CALC != 0 && KARDAN == false)
  {
    KARDAN = true;
    CONSUMPTION += 25;
  }
  if (CALC % 3 != 0) {
    KARDAN = false;
  }

  if (BTN_NR_OF_PRESS % 4 == 0) {
    digitalWrite(DIODE, LOW);


    if (SHINE == false)

    {


      for (millis(); (millis() - i) > 1800000;) {
        i = millis();
        SigFox.debug();
        SigFox.beginPacket();
        SigFox.write(CONSUMPTION);
        SigFox.endPacket();
      }

    }
  }


}
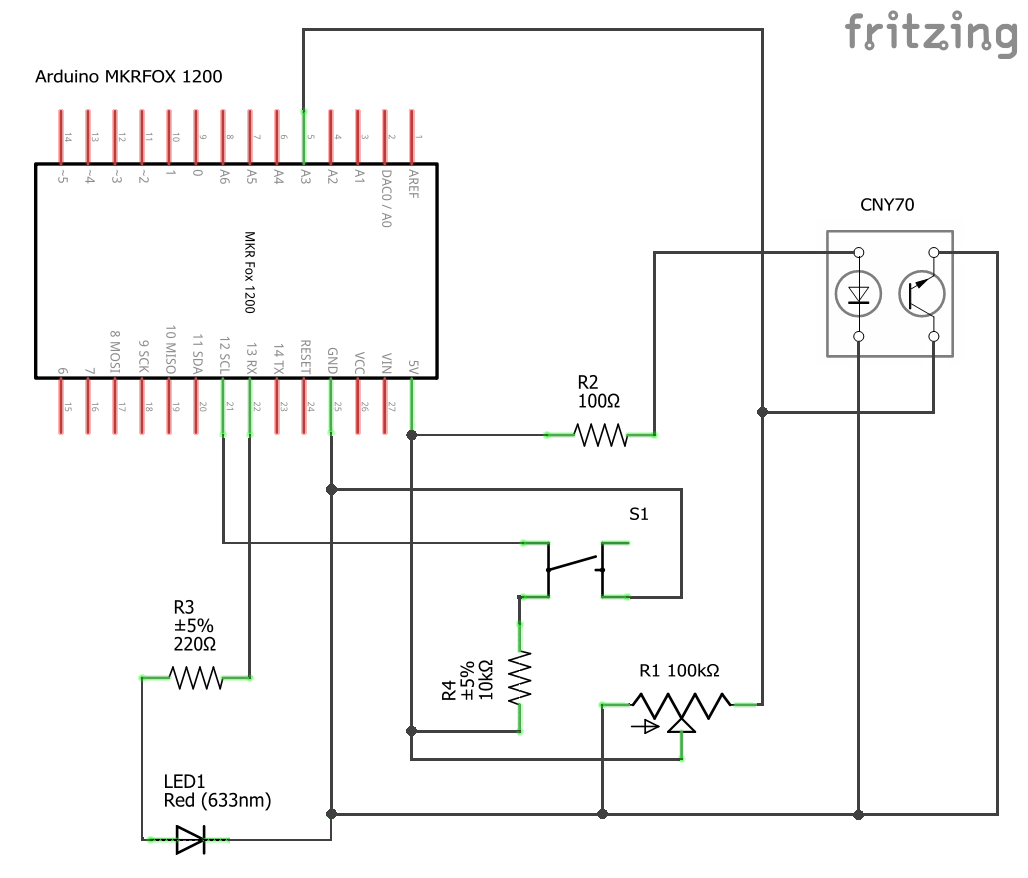
Schematics
Schematic for connection of MKRFOX1200 with CNY70 and other stuff.