USB MIDI Adapter Kit for Arduino Micro / Leonardo – Complete Parts List
Components and supplies
Arduino Micro
Or Arduino Leonardo
×
1
6n137 Opto coupler
×
1
1N4148 – General Purpose Fast Switching
×
1
Capacitor 100 nF
×
1
Resistor 220 ohm
×
3
Resistor 10k ohm
×
1
Through Hole Resistor, 470 ohm
×
1
LED (generic)
×
1
led holder
something to mount the LED in the plastic case
×
1
DIN Audio / Video Connector, 5 Contacts
plus bolts and nuts to mount the connectors
×
2
Case
A plastic case to fit all the components in
×
1
PCB
A piece of generic PCB
×
1
PCB mounts
Something to mount your PCB to the case, such as nylon standoffs
×
1
Apps and online services
Arduino IDE
About this project
I searched the net how to build a USB to MIDI adapter using an Arduino, but unfortunately I only found solutions that were not that great (poor MIDI software or hardware implementations). So I decided to build my own and put the result here on hackster.io.
I used an Arduino Leonardo with a breadboard to build the first prototype. Once everything was working, I built a soldered version using an Arduino Micro instead. Both are based on the ATmega32u4, which has native USB allowing it to present itself as a USB MIDI interface to the PC you connect it to.
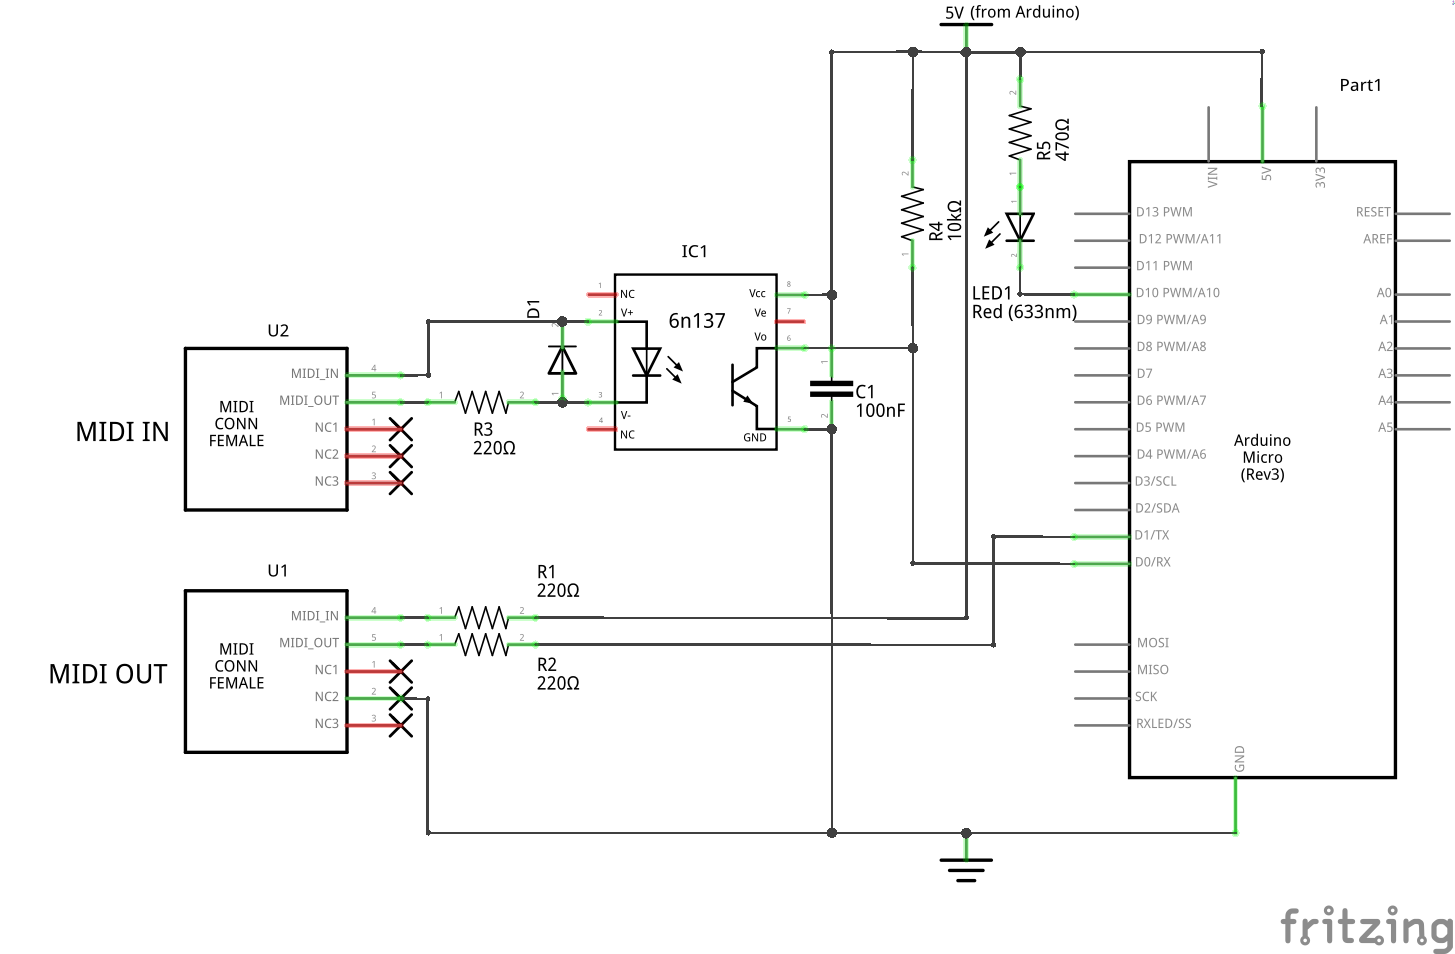
MIDI uses an opto-coupler and some resistors to create a fully isolated current loop. The circuit is pretty standard, I used a 6n137 as it's fast and widely available. As indicated by the circuit diagram, only the MIDI OUT connector has pin 2 connected to the ground, this is standard for MIDI.
Some photos of the end result:
On the software side I decided to use the excellent Control Surface library. Unlike some other libraries or manually coded implementations, Control Surface handles all the different aspects of the somewhat complex MIDI protocol correctly.
Control Surface also lets you add all kinds of extras. You could for example add some potentiometers, pedals or buttons connected to the analog / digital inputs to add extra MIDI controls. Just take a look on the Control Surface website for more information, it's really easy to do!
You can also register callbacks so you can process the data before passing from MIDI to USB or the other direction. In my case I used this to fix the broken MIDI implementation of my Roland D50 synthesizer. The D50 sends an "all notes off" command each time the last key is depressed. Modern implementations, such as most of the VST instruments I use, interpret this as an immediate hard cut-off of all running note sustains. By filtering the "all notes off", the D50 becomes useful again as a master keyboard.
One issue I ran into with the Control Surface library is that it doesn't handle large SysEx packages well. This resulted in errors when trying to use a D50 editor/librarian, as it sent rather large SysEx packages. I added instructions in the comment heading of the source code on how to fix this issue. The person who wrote the library indicated that this issue would be fixed once the 2.x version comes out.
I included both the basic USB to MIDI interface source code and a version with "all notes off" filtering.
You can also use other libraries or write your own MIDI implementation of course, the hardware should work with any MIDI library with USB MIDI and Serial MIDI support.
Troubleshooting tip: if you can't seem the get this interface to talk with external MIDI devices, then perhaps you swapped pins 4 and 5. The connector pin-out diagrams can be confusing sometimesas they do not always indicate clearly which side of the connector you're viewing.
I hope the schematics and source code are useful to anyone out here. Please give me a thumbs-up if you like this project and feel free to leave a comment below if you have any questions.
Code
Source code for basic MIDI to USB interface
Source code for MIDI to USB adapter with "all notes off" filter
Source code for basic MIDI to USB interfaceArduino
/*
 * USB MIDI adapter.
 *
 * ---
 *
 * To allow larger sysex packages, modify the Control Surface library as follows:
 *
 * In:
 * src\MIDI_Parsers\MIDI_MessageTypes.hpp
 * change:
 * uint8_t length;
 * to:
 * size_t length;
 *
 * In:
 * src/Settings/Settings.hpp
 * change:
 * constexpr size_t SYSEX_BUFFER_SIZE = 128;
 * to:
 * constexpr size_t SYSEX_BUFFER_SIZE = 320;
 *
 * This should be fixed when Control Surface 2.x will be released.
 *
 * ---
 *
 * To use a different USB device name, edit hardware/arduino/avr/boards.txt in your Arduino IDE install using admin privileges.
 * Change:
 * leonardo.build.usb_product="Arduino Leonardo"
 * to:
 * leonardo.build.usb_product="..."
 * change it back after uploading the project to your Arduino device.
 */

#include <Control_Surface.h> // Include the Control Surface library

USBMIDI_Interface midiusb;
// use this one instead to dump all MIDI data to the serial monitor
// USBDebugMIDI_Interface midiusb;
HardwareSerialMIDI_Interface midiser = {Serial1, MIDI_BAUD};

// Create a MIDI pipe factory to connect the MIDI interfaces to eachother and to the Control Surface
MIDI_PipeFactory<5> pipes;

// Example for adding extra controllers:
// CCPotentiometer pot = { A0, MIDI_CC::Expression_Controller };

// pin to which the power LED is connected
const int ledPin = 10;

// setup code
void setup() {
  Serial.begin(115200);

  // turn on the power LED
  pinMode(ledPin, OUTPUT);
  digitalWrite(ledPin, HIGH);

  // forward MIDI USB to MIDI serial
  midiusb >> pipes >> midiser;
  // forward MIDI serial to MIDI USB
  midiser >> pipes >> midiusb;
  // send control suface messages only to MIDI USB
  Control_Surface >> pipes >> midiusb;

  // connect both MIDI USB and serial to control surface
  midiser >> pipes >> Control_Surface;
  midiusb >> pipes >> Control_Surface;

  // initialize Control Surface _after_ connecting the interfaces
  Control_Surface.begin();
}

// main processing loop
void loop() {
  Control_Surface.loop();
}
Source code for MIDI to USB adapter with "all notes off" filterArduino
/*
 * USB MIDI adapter with "all notes off" filter.
 *
 * ---
 *
 * To allow larger sysex packages, modify the Control Surface library as follows:
 *
 * In:
 * src\MIDI_Parsers\MIDI_MessageTypes.hpp
 * change:
 * uint8_t length;
 * to:
 * size_t length;
 *
 * In:
 * src/Settings/Settings.hpp
 * change:
 * constexpr size_t SYSEX_BUFFER_SIZE = 128;
 * to:
 * constexpr size_t SYSEX_BUFFER_SIZE = 320;
 *
 * This should be fixed when Control Surface 2.x will be released.
 *
 * ---
 *
 * To use a different USB device name, edit hardware/arduino/avr/boards.txt in your Arduino IDE install using admin privileges.
 * Change:
 * leonardo.build.usb_product="Arduino Leonardo"
 * to:
 * leonardo.build.usb_product="..."
 * change it back after uploading the project to your Arduino device.
 */

#include <Control_Surface.h> // Include the Control Surface library

USBMIDI_Interface midiusb;
// use this one instead to dump all MIDI data to the serial monitor
// USBDebugMIDI_Interface midiusb;
HardwareSerialMIDI_Interface midiser = {Serial1, MIDI_BAUD};

// Create a MIDI pipe factory to connect the MIDI interfaces to eachother and to the Control Surface
MIDI_PipeFactory<4> pipes;

// Example for adding extra controllers:
// CCPotentiometer pot = { A0, MIDI_CC::Expression_Controller };

// pin to which the power LED is connected
const int ledPin = 10;

// Custom MIDI callback that prints incoming messages.
struct MyMIDI_Callbacks : MIDI_Callbacks {

  // Callback for channel messages (notes, control change, pitch bend, etc.).
  void onChannelMessage(Parsing_MIDI_Interface &midi) override {
    ChannelMessage cm = midi.getChannelMessage();

    if (cm.header == 0xb0 && cm.data1 == 0x7b) {
      // ignore "all notes off" messages
      return;
    } else if (cm.header == 0x90 && cm.data2 == 0x00) {
      // convert "note on" messages with velocity of 0 to "note off" messages
      cm.header = 0x80;
    }

    midiusb.send(cm);
  }

  // Callback for system exclusive messages
  void onSysExMessage(Parsing_MIDI_Interface &midi) override {
    SysExMessage se = midi.getSysExMessage();

    // forward system exclusive messages without changes
    midiusb.send(se);
  }

  // Callback for real-time messages
  void onRealTimeMessage(Parsing_MIDI_Interface &midi) override {
    RealTimeMessage rt = midi.getRealTimeMessage();

    // forward real-time messages without changes
    midiusb.send(rt);
  }

} callbacks;

// setup code
void setup() {
  Serial.begin(115200);

  // turn on the power LED
  pinMode(ledPin, OUTPUT);
  digitalWrite(ledPin, HIGH);

  // forward MIDI USB to MIDI serial
  midiusb >> pipes >> midiser;
  // send control suface messages only to MIDI USB
  Control_Surface >> pipes >> midiusb;

  // connect both MIDI USB and serial to control surface
  midiser >> pipes >> Control_Surface;
  midiusb >> pipes >> Control_Surface;

  // initialize Control Surface _after_ connecting the interfaces
  Control_Surface.begin();

  // set the callback methods
  midiser.setCallbacks(callbacks);
}

// main processing loop
void loop() {
  Control_Surface.loop();
}
Schematics
Only the schematic tab is filled inusb_midi_interface_twiE32gvR3.fzz


 Only the schematic tab is filled inusb_midi_interface_twiE32gvR3.fzz