Industrial manufacturing
Industrial Internet of Things | Industrial materials | Equipment Maintenance and Repair | Industrial programming |
home  MfgRobots >> Industrial manufacturing >  >> Manufacturing Technology >> Manufacturing process

DIY LED Roulette Game – Build a One‑Person Arcade with Arduino Nano

Components and supplies
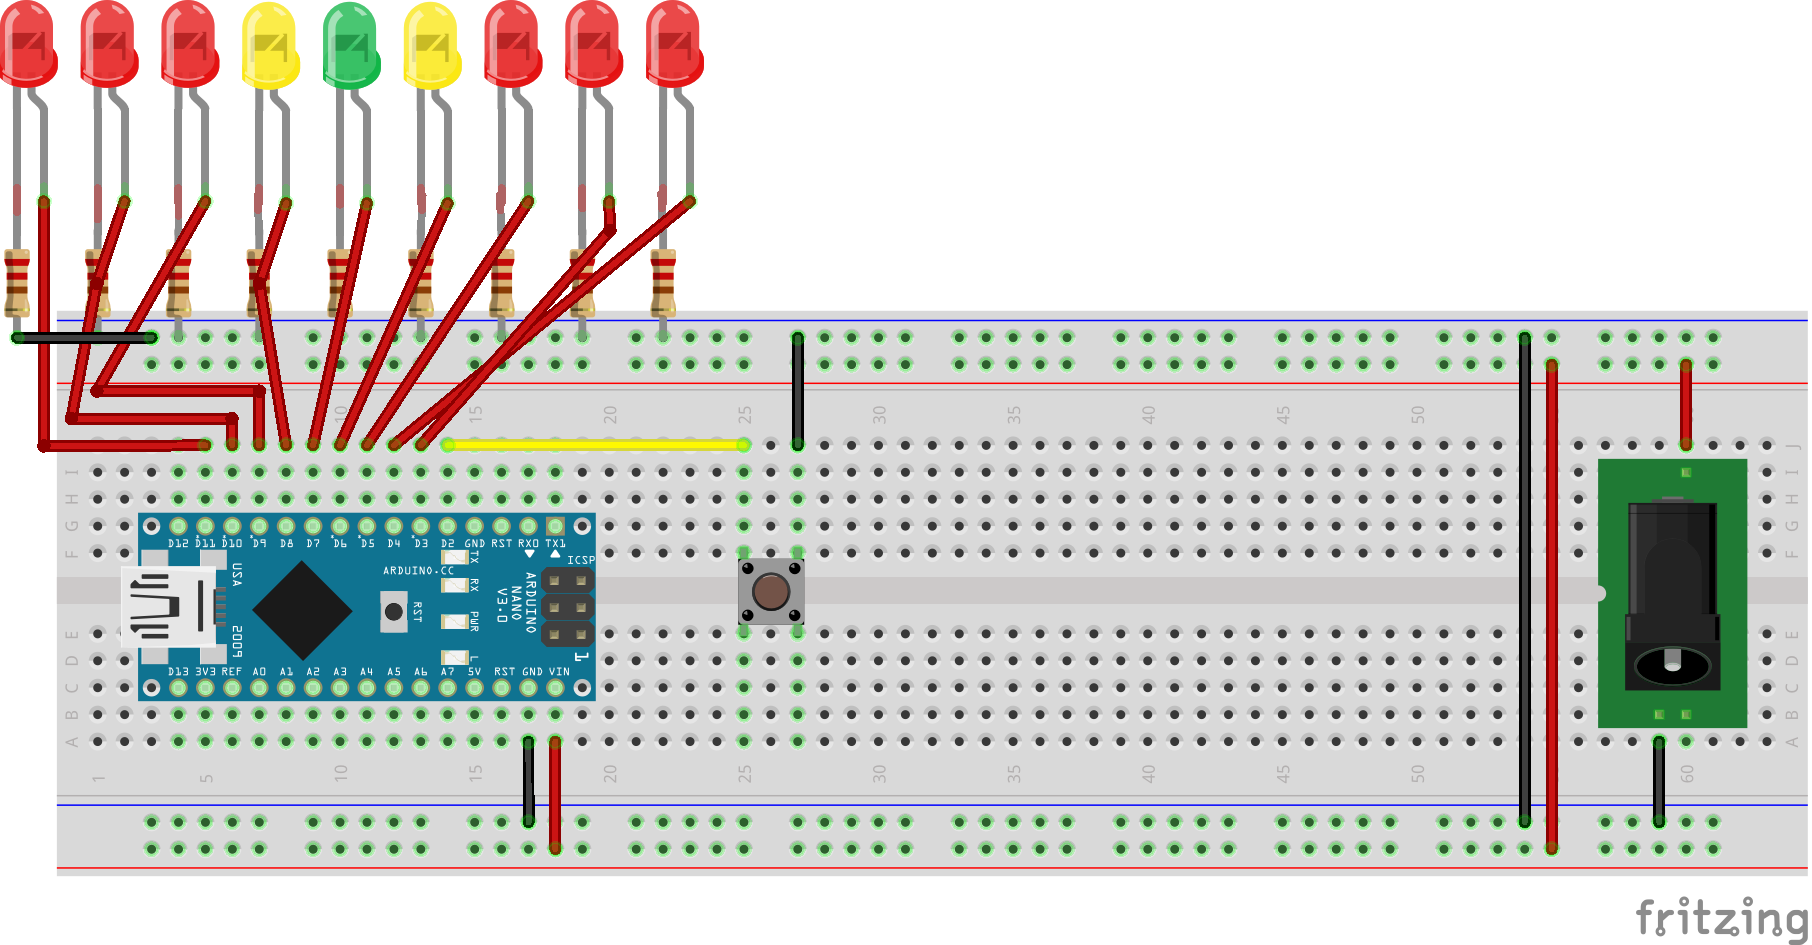
DIY LED Roulette Game – Build a One‑Person Arcade with Arduino Nano
LED (generic)
6 red, 2 yellow, 1 green
×9
DIY LED Roulette Game – Build a One‑Person Arcade with Arduino Nano
SparkFun Pushbutton switch 12mm
×1
DIY LED Roulette Game – Build a One‑Person Arcade with Arduino Nano
Arduino Nano R3
×1
DIY LED Roulette Game – Build a One‑Person Arcade with Arduino Nano
Female Header 8 Position 1 Row (0.1")
×1
DC Barrel Jack
×1

Necessary tools and machines

CNC Router

Apps and online services

DIY LED Roulette Game – Build a One‑Person Arcade with Arduino Nano
Arduino IDE

About this project

Video:

Overview

For quite a while I have been wanting to create a simple, yet fun game that only requires one person to play. It is extremely simple, only taking one Arduino Nano to run it. It is LED roulette. The object of the game is to stop on the green LED, avoiding the red and yellow ones. Seems easy to play and make, and it is.

DIY LED Roulette Game – Build a One‑Person Arcade with Arduino Nano

Step 1

First, I began by designing the device in Fusion 360. I designed the front plate to contain 9 LEDs, 6 red, 2 yellow, and 1 green. I also made a space for a tact switch to go at the bottom. I then used the my Millright CNC router to cut out the pieces that I designed.

DIY LED Roulette Game – Build a One‑Person Arcade with Arduino Nano

Step 2

The game mechanics go like so: A light will "move" back and forth between the two edges, and will stop whenever there is a button press. In order for it to react immediately, I used an interrupt. Each LED corresponds to an index in an array that gets cycled through. the current LED index gets its own variable as well. There is also a delay between each step, corresponding to the difficulty. On startup, the user selects the difficulty by pushing the button to reduce the delay between each change of the LED. After the correct LED is lit up, the user can double click to lock it in.

Step 3

DIY LED Roulette Game – Build a One‑Person Arcade with Arduino Nano

I used some sandpaper to add a nice finish and rounding to the plywood pieces. After that, I used hot glue to fasten the pieces together.

Conlusions

DIY LED Roulette Game – Build a One‑Person Arcade with Arduino Nano

Now, whenever I am in the mood to play a simple game, whether for the road or just to get away from a screen, this device gives me a wonderful reprieve. I can also make it multiplayer by making each LED away from green a certain amount of points, making the person who got the least amount of points at the end wins.

Code

  • Code
CodeC/C++
/*Use pins 2-10
You can get the TTBOUNCE library here: https://github.com/TOLDOTECHNIK/TTBOUNCE
*/
#include <TTBOUNCE.h>

int delay_time = 0;
const uint8_t led_array[9] = {4,3,5,6,7,8,9,10,11};
const uint8_t button = 2;
uint8_t difficulty = 0;
uint8_t current_led = 0;
bool dir_flag = true; //true goes right, false goes left
bool game_ended = false;
bool is_win = false;
bool is_finished_selecting = false;

TTBOUNCE b = TTBOUNCE(button);

void doubleClick(){
  Serial.println("double click");
  is_finished_selecting = true;
  delay_time = floor(500/(difficulty+1)); //Formula: delay (in ms) = 500 / (difficulty + 1)
  Serial.println("difficulty: " + String(delay_time));
  sweep();
}

void click(){
  Serial.print("Click | ");
  digitalWrite(led_array[difficulty], LOW);
  difficulty++;
  if(difficulty>8){
    difficulty = 0;
  }
  digitalWrite(led_array[difficulty], HIGH);
  Serial.println("Difficulty is: "+String(difficulty));
  delay(100);
}

void setup()
{
	Serial.begin(9600);
  b.attachDoubleClick(doubleClick);
  b.attachClick(click);
  b.setActiveLow();
  b.enablePullup();
  
	for(int i=0;i<9;i++){
		pinMode(led_array[i], OUTPUT);
	}
 
	sweep();
	pulse();

  difficulty = 0;
  digitalWrite(led_array[difficulty], HIGH);
  while(!is_finished_selecting){
    b.update();
  }
  b.update();
  pinMode(button, INPUT_PULLUP);
  attachInterrupt(digitalPinToInterrupt(button), button_pressed, FALLING);
  delay(1000);
}

void loop()
{
	if(game_ended==false){
		move_led();
		delay(delay_time);
	}
	else if(game_ended){
    Serial.println(game_ended);
    Serial.println("Game over");
		if(is_win){
    Serial.println("you won");
			for(int i=0; i<5;i++){
				pulse();
				delay(100);
			}
		}
   sweep();
		game_ended = false;
		is_win = false;
   delay(2000);
	}
}

void move_led()
{
  digitalWrite(led_array[current_led], LOW);
	if(current_led == 8){
		dir_flag = false;
		current_led -= 1;
	}
	
	else if(current_led == 0){
		dir_flag = true;
		current_led += 1;
	}
	
	else if(dir_flag){
		current_led += 1;
	}
	
	else if(!dir_flag){
		current_led -= 1;
	}
	digitalWrite(led_array[current_led], HIGH);
}

void pulse(){
	for(int i=0; i<9;i++){
		digitalWrite(led_array[i], HIGH);
	}
	
	delay(100);
	
	for(int i=0; i<9;i++){
		digitalWrite(led_array[i], LOW);
	}
}

void sweep(){
	for(int i=0; i<9;i++){
		digitalWrite(led_array[i], HIGH);
		delay(50);
		digitalWrite(led_array[i], LOW);
	}
	
	for(int i=8; i>=0;i--){
		digitalWrite(led_array[i], HIGH);
		delay(50);
		digitalWrite(led_array[i], LOW);
	}
}

void button_pressed(){
  Serial.println("Button pressed on LED: "+String(current_led));
	game_ended = true;
	if(current_led==4){
		is_win = true;
	}
	else if(current_led != 4){
		is_win = false;
	}
 current_led = 0;
 delay(500);
}

Schematics

DIY LED Roulette Game – Build a One‑Person Arcade with Arduino Nano

Manufacturing process

  1. Build a Real-Time Gyroscope Game with Arduino Nano & MPU-6050 Sensor
  2. Build Your Own 37‑LED Roulette Game with Arduino Nano
  3. DIY Arduino USB Gaming Controller – Build Your Own High-Performance Gamepad
  4. Build a Smart Arduino Quadruped Robot: Step‑by‑Step Guide
  5. Pixel Chaser: Interactive One-Tap LED Game with Arduino Nano
  6. Build a 1‑D Pong Game with Arduino and WS2812 LED Strip – Step‑by‑Step DIY Tutorial
  7. Build a Classic Arduino LCD Arcade Game with Buzzer and Joystick
  8. Build an Arduino Snake Game on an 8x8 LED Matrix
  9. Build a Snake Game on a 16x16 LED Matrix with Arduino UNO
  10. Build an Interactive LCD Game with Arduino UNO