Touch‑Free Gesture Lock: Secure Access with APDS‑9960 and Arduino
Components and supplies
SparkFun APDS-9960
×
1
Arduino UNO
×
1
RGB Diffused Common Cathode
×
1
Adafruit Standard LCD - 16x2 White on Blue
×
1
Resistor 4.75k ohm
×
2
Jumper wires (generic)
×
1
Resistor 1k ohm
×
1
Apps and online services
Arduino IDE
About this project
*The APDS-9960 sensor does not work with the Arduino Nano or Mega 2560 (in my testing).
This project is easy to make and use. Feel free to use any kind of servo or latching mechanism with this project. This is meant to be a starting platform for a gesture based lock. Onto building!
Materials
I got most of my parts from Amazon.com and the APDS-9960 sensor from Sparkfun. You can only use an Arduino Uno or Micro 3.3v so far, as any other board won't work for some odd reason.
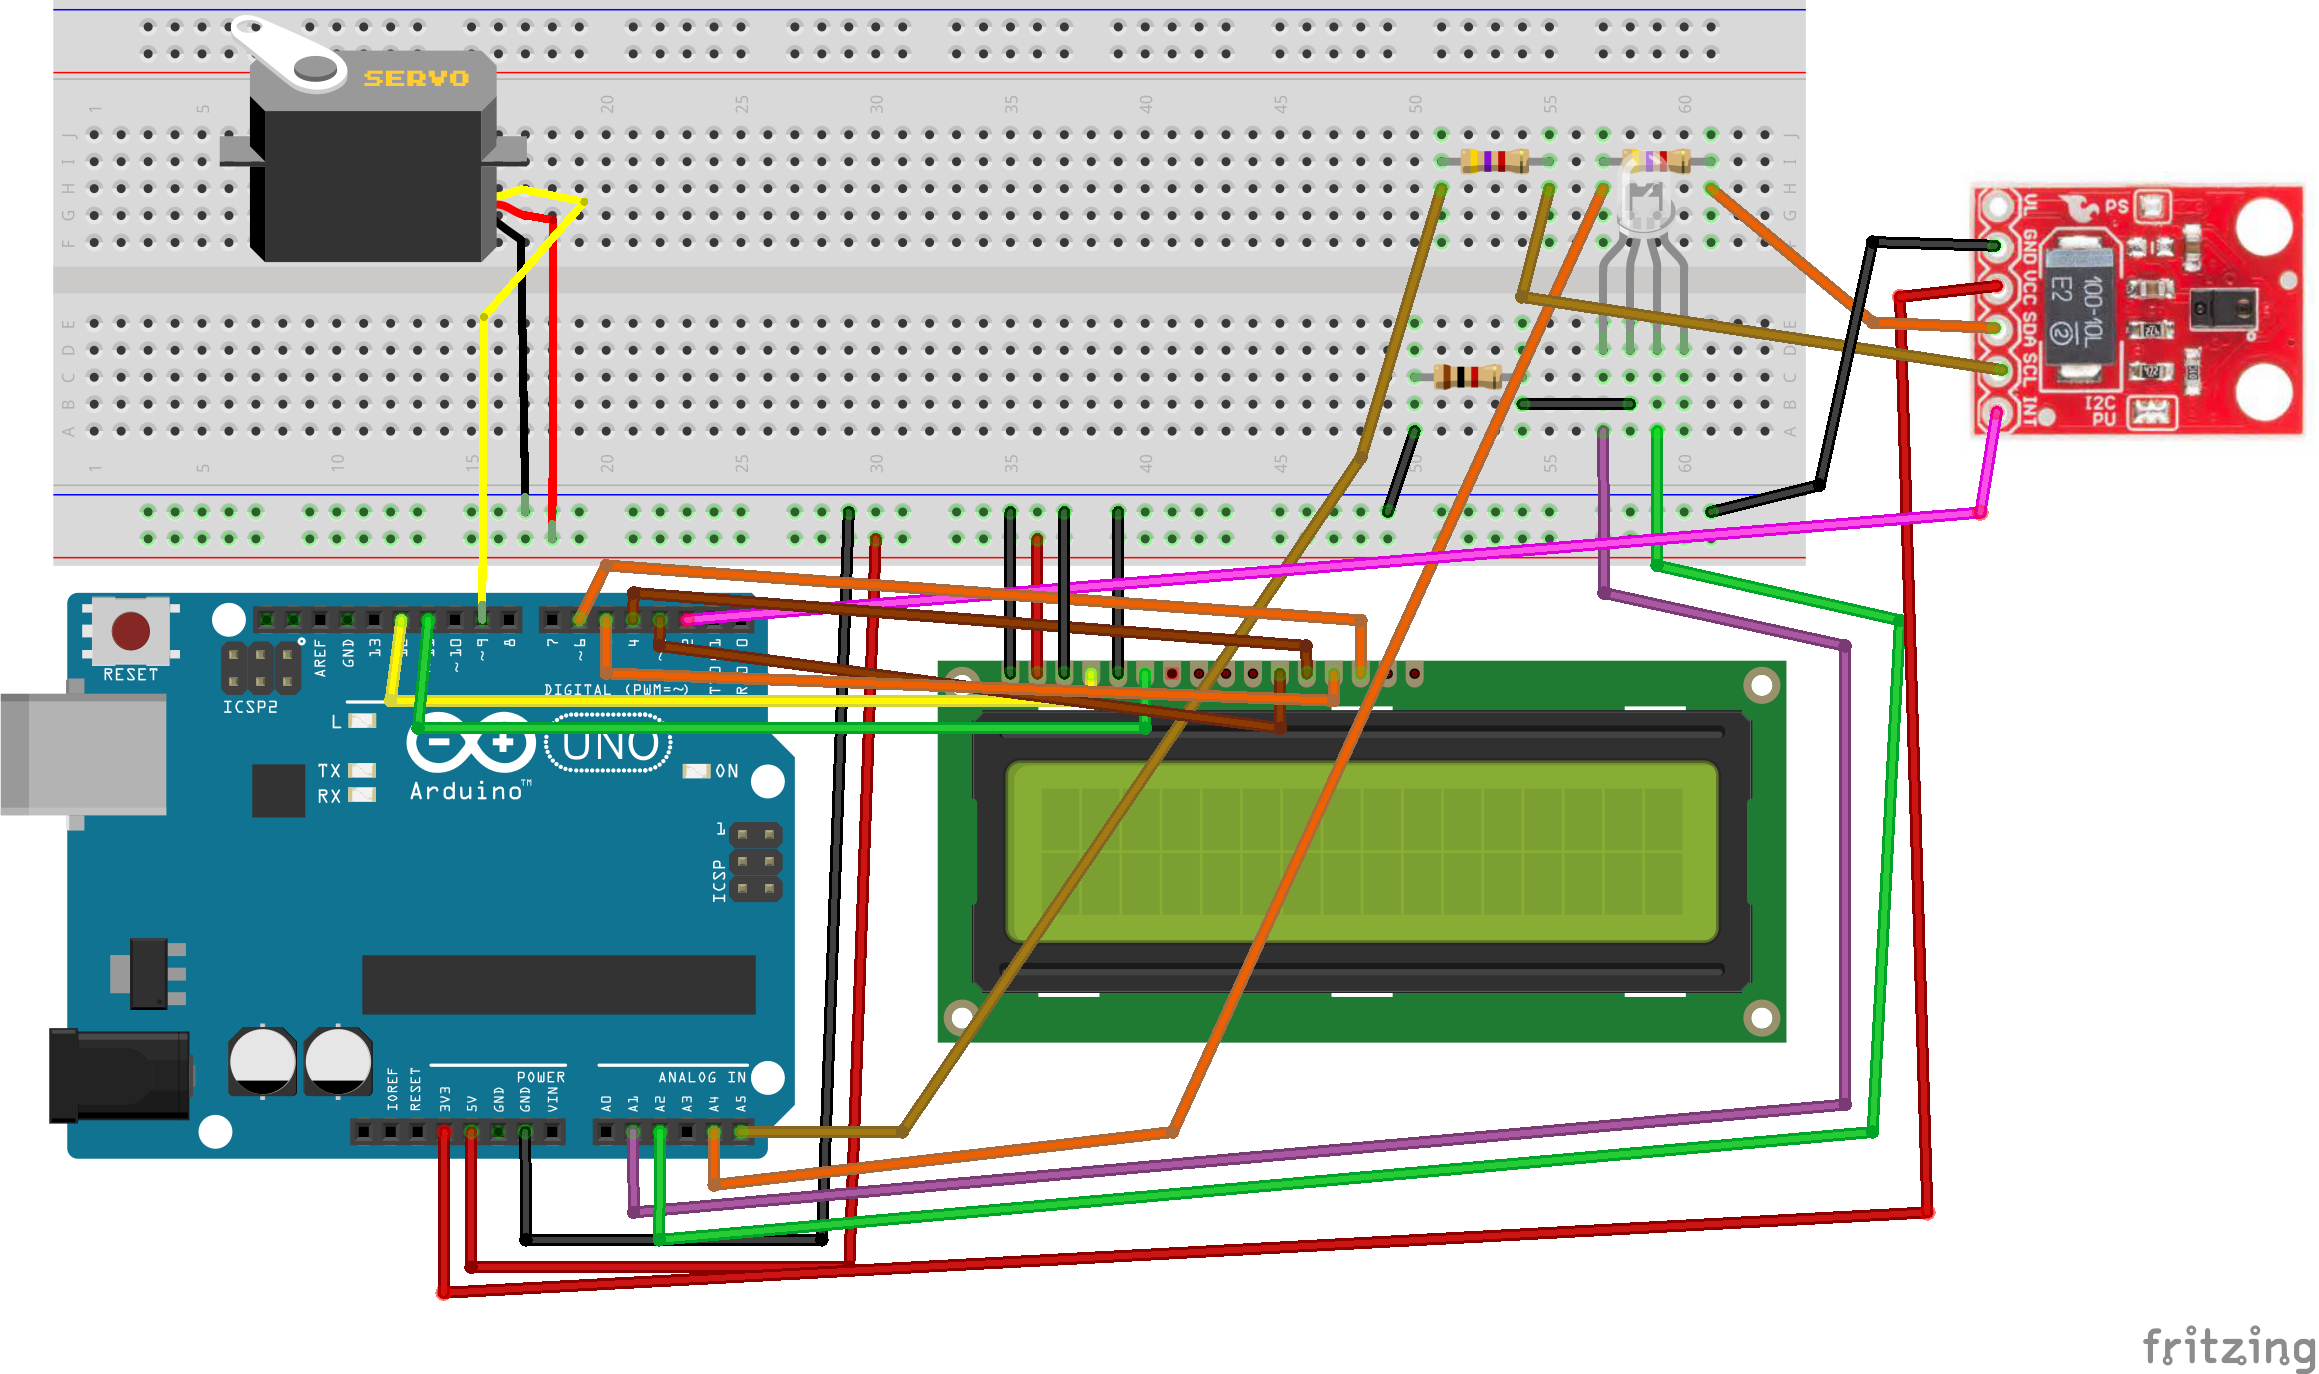
Assembly
Attach the LCD as shown. If you don't have a 10k potentiometer, use a 1k resistor going from contrast to GND. The APDS-9960 sensor will need to be shifted if using the Arduino Uno, so what I did is take the SCL and SDA and connect them to a 4.7k resistor, then draw them high by taking the 4.7k resistor to 3.3v. Then connect them to A4 and A5, accordingly (see schematic). The Arduino can run off of a 9v battery with a DC power barrel attached.
Enclosure
I used a simple cardboard box and cut holes out of it to match where the components would go. You could solder this all to a piece of perfboard, but I just left it in the breadboard and connected jumper wires to the components. After I was finished, it looked like this.
Code
Arduino Code
Arduino CodeC/C++
/* Hardware Connections:

IMPORTANT: The APDS-9960 can only accept 3.3V!

 Arduino Pin  APDS-9960 Board  Function

 3.3V         VCC              Power
 GND          GND              Ground
 A4           SDA              I2C Data
 A5           SCL              I2C Clock
 2            INT              Interrupt

Resources:
Include Wire.h and SparkFun_APDS-9960.h
*/

#include <Wire.h>
#include <SparkFun_APDS9960.h>
#include <LiquidCrystal.h>
#include <Servo.h>

#define PINSIZE 6
#define SERVOPIN 9//How many gestures long your password is
// Pins
#define APDS9960_INT    2 // Needs to be an interrupt pin
LiquidCrystal lcd(12,11,6,5,4,3);
Servo servo;
uint8_t proximity_data = 0;
int red_led = A1;
int green_led = A2;
int pageNum = 0; //The LCD "page"
String secret[PINSIZE] = {"UP","DOWN","UP","UP","RIGHT","LEFT"}; //Password goes here. Must be in CAPS. Can be "UP", "DOWN", "LEFT", or "RIGHT"
String currentGesture = "";
int numRight = 0;

SparkFun_APDS9960 apds = SparkFun_APDS9960(); //Init APDS-9960 library
int isr_flag = 0;

void setup() {

  // Set interrupt pin as input
  pinMode(APDS9960_INT, INPUT);
lcd.begin(16,2);
servo.attach(SERVOPIN);
servo.write(0);
servo.detach();
  // Initialize Serial port
  Serial.begin(9600);
  Serial.print("Your password is ");
  Serial.print(PINSIZE);
  Serial.println(" gestures long.");
  Serial.println();
  Serial.println(F("----------------"));
  Serial.println(F("APDS-9960 Lock"));
  Serial.println(F("----------------"));


  // Initialize interrupt service routine
  attachInterrupt(0, interruptRoutine, FALLING);

  // Initialize APDS-9960 (configure I2C and initial values)
  if ( apds.init() ) {
    Serial.println(F("APDS-9960 initialization complete"));
  } else {
    Serial.println(F("Something went wrong during APDS-9960 init!"));
  }
  if ( !apds.setProximityGain(PGAIN_1X) ) {
    Serial.println(F("Something went wrong trying to set PGAIN"));
  }
  if ( apds.enableProximitySensor(false) ) {
    Serial.println(F("Proximity sensor is now running"));
  } else {
    Serial.println(F("Something went wrong during sensor init!"));
  }
  // Start running the APDS-9960 gesture sensor engine
  if ( apds.enableGestureSensor(true) ) {
    Serial.println(F("Gesture sensor is now running"));
  } else {
    Serial.println(F("Something went wrong during gesture sensor init!"));
  }

}

void loop() {
  if(pageNum==0){
    if ( !apds.readProximity(proximity_data) ) {
    Serial.println("Error reading proximity value");
  } else {
    Serial.println(proximity_data);
    if((proximity_data >= 40) && (pageNum==0)){
    pageNum=1;
    delay(2000);
  }
  }
  }

  switch(pageNum){
    case 0:
    LCDClear();
    lcd.print("Locked- get");
    lcd.setCursor(0,1);
    lcd.print("3 inches away.");
    blinkRed();
    LCDClear();
  break;

  case 1:
  numRight = 0;
  lcd.print("Enter code...");
  lcd.setCursor(0,0);
  for(int x=0; x<PINSIZE;x++){
    Serial.println(x);
    while(apds.isGestureAvailable()==false){

    }
    if( isr_flag == 1 ) {
    detachInterrupt(0);
    handleGesture();
    isr_flag = 0;
    attachInterrupt(0, interruptRoutine, FALLING);
    if(currentGesture != "NONE"){
    if(currentGesture==secret[x]){
    LCDClear();
    lcd.print("Next");
    numRight += 1;
    analogWrite(green_led,255);
    delay(1000);
    allOff();
  }
  else if(currentGesture != secret[x]){
    LCDClear();
    lcd.print("Wrong, return to");
    lcd.setCursor(0,1);
    lcd.print("main page.");
    analogWrite(red_led,255);
    delay(1000);
    allOff();
    pageNum = 0;
    break;
  }
  if(numRight == PINSIZE){
    pageNum = 2;
    break;
  }
    }
    else if(currentGesture == "NONE"){
      LCDClear();
      lcd.print("Not recognized:");
      lcd.setCursor(0,1);
      lcd.print("Try again.");
      x -= 1;
    }
  }
  }

  break;

  case 2:
  LCDClear();
  lcd.print("Enter now.");
  pageNum = 0;
  servo.attach(SERVOPIN);
  servo.write(90);
  enter();
  delay(1000);
  servo.write(0);
  break;
  }


}

void interruptRoutine() {
  isr_flag = 1;
}

void handleGesture() {
    if ( apds.isGestureAvailable() ) {
    switch ( apds.readGesture() ) {
      case DIR_UP:
        Serial.println("UP");
        LCDClear();
        lcd.print("Up");
        currentGesture = "UP";
        break;
      case DIR_DOWN:
        Serial.println("DOWN");
        LCDClear();
        lcd.print("Down");
        currentGesture = "DOWN";
        break;
      case DIR_LEFT:
        Serial.println("LEFT");
        LCDClear();
        lcd.print("Left");
        currentGesture = "LEFT";
        break;
      case DIR_RIGHT:
        Serial.println("RIGHT");
        LCDClear();
        lcd.print("Right");
        currentGesture = "RIGHT";
        break;
      case DIR_NEAR:
        Serial.println("NEAR");
        LCDClear();
        lcd.print("Near");
        currentGesture = "NEAR";
        break;
      case DIR_FAR:
        Serial.println("FAR");
        LCDClear();
        lcd.print("Far");
        currentGesture = "FAR";
        break;
      default:
        Serial.println("NONE");
        LCDClear();
        lcd.print("None");
        currentGesture = "NONE";
    }
  }
}

void allOff(){
  analogWrite(red_led,0);
  analogWrite(green_led,0);
}

void blinkRed(){
  analogWrite(red_led,255);
  delay(250);
  allOff();
  delay(250);
}


void LCDClear(){
  lcd.clear();
  lcd.setCursor(0,0);
}

void enter(){
  //total delay of 16 seconds
  for(int x=0;x<30;x++){
  analogWrite(green_led,255);
  delay(100);
  allOff();
  delay(100);
}
for(int x=9;x>0;x--){
  LCDClear();
  lcd.print("Closing in: ");
  lcd.setCursor(0,1);
  lcd.print(x);
  lcd.setCursor(1,1);
  lcd.print(" seconds...");
  delay(1000);
}
LCDClear();
lcd.print("Closing");
}