


Build a Morse Code Transceiver with Arduino UNO – Hands‑On Communication Project
Components and supplies
 |
| × | 2 | |||
 |
| × | 2 | |||
 |
| × | 1 | |||
 |
| × | 1 |
About this project
I was teaching a class today on Communication Systems and wanted my students to learn by visualizing and experiencing. We did a few experiments to start with Stone Age and understand need for communication and what it means by Language and Grammar, what is reliable communication, signals, messages, etc.
While discussing all this stuff, we reached to a point where we wanted to define our own language for Visual communication, and there we devised Morse Code!
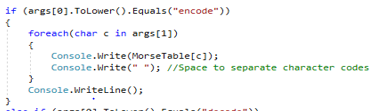
It was obvious that learning Morse code would be a tedious task for each one of us, and hence we needed a machine. So, we decided to write small program that can encode a given string to equivalent Morse code and another decoder that can give the string back for a given Morse code stream.
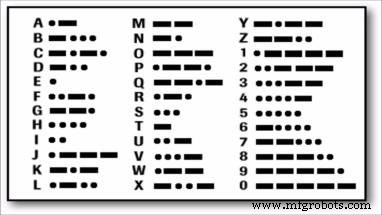
To find Morse code for a character, I referred following table –
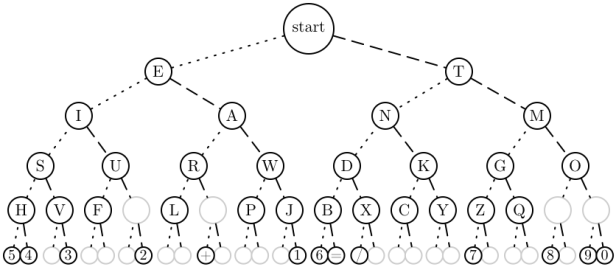
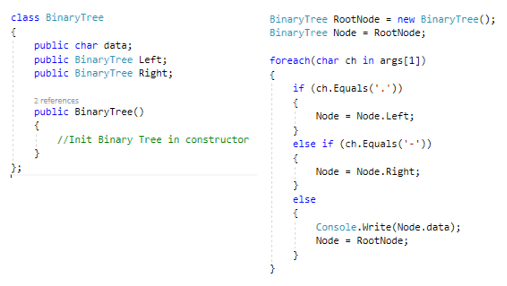
To translate Morse code to equivalent character, it can be organized into a binary tree as below. With each ‘dot’ moving to left sub tree and ‘dash’ moving to right sub tree.
This allowed me to quickly encode a string into respective Morse code and vice versa.
I wrote a program in C# as a PoC
Hello World
.... . .-.. .-.. ---  .-- --- .-. .-.. -..
However, Since communication has to happen between two parties, I wanted to transmit this encoded Morse code to another device and decode it there.
I used two Arduino boards to build a transmitter and a receiver.
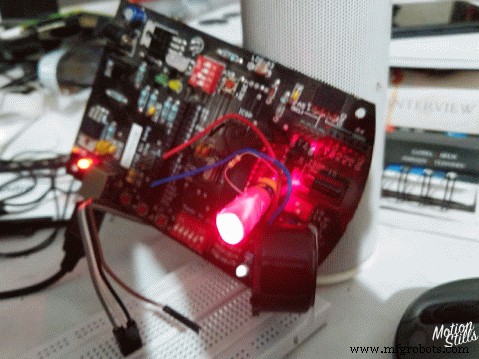
On the transmitter board, I connected a Laser diode from Keyes. Easily available and a cheap device. For the distance I am working, 3v input was more than sufficient, however with 5v, I can see the laser reaching at least 200m.
My transmitter is connected to a computer with Serial interface (over USB). It reads for any data on Serial port, character by character. Find the equivalent Morse code for the character and generate ‘dot’ and ‘dash’ light stream.
I created a 50ms pulse, where each ‘dot’ is a 50ms light beam and a ‘dash’ being 150ms light beam. Each ‘dot’ and ‘dash’ are separated by a 50ms silence. Each character is followed by another 100ms of silence.
Transmitter Codeconst char* MorseTable[] = {
NULL, NULL, NULL, NULL, NULL, NULL, NULL, NULL,
NULL, NULL, NULL, NULL, NULL, NULL, NULL, NULL,
NULL, NULL, NULL, NULL, NULL, NULL, NULL, NULL,
NULL, NULL, NULL, NULL, NULL, NULL, NULL, NULL,
// space, !, ", #, $, %, &, '
NULL, "-.-.--", ".-..-.", NULL, NULL, NULL, NULL, ".----.",
// ( ) * + , - . /
"-.--.", "-.--.-", NULL, ".-.-.", "--..--", "-....-", ".-.-.-", "-..-.",
// 0 1 2 3 4 5 6 7
"-----", ".----", "..---", "...--", "....-", ".....", "-....", "--...",
// 8 9 : ; < = > ?
"---..", "----.", "---...", "-.-.-.", NULL, "-...-", NULL, "..--..",
// @ A B C D E F G
".--.-.", ".-", "-...", "-.-.", "-..", ".", "..-.", "--.",
// H I J K L M N O
"....", "..", ".---", "-.-", ".-..", "--", "-.", "---",
// P Q R S T U V W
".--.", "--.-", ".-.", "...", "-", "..-", "...-", ".--",
// X Y Z [ \ ] ^ _
"-..-", "-.--", "--..", NULL, NULL, NULL, NULL, "..--.-",
// ' a b c d e f g
NULL, ".-", "-...", "-.-.", "-..", ".", "..-.", "--.",
// h i j k l m n o
"....", "..", ".---", "-.-", ".-..", "--", "-.", "---",
// p q r s t u v w
".--.", "--.-", ".-.", "...", "-", "..-", "...-", ".--",
// x y z { | } ~ DEL
"-..-", "-.--", "--..", NULL, NULL, NULL, NULL, NULL,
};
int dotLength = 50;
int dashLength = dotLength*3;
void setup() {
// put your setup code here, to run once:
pinMode(13, OUTPUT);
Serial.begin(9600);
}
void loop() {
char ch;
if(Serial.available()){
ch = Serial.read();
flashDashDot(MorseTable[ch]);
delay(dotLength*2);
}
}
void flashDashDot(const char * morseCode)
{
int i = 0;
while(morseCode[i] != 0)
{
if(morseCode[i] == '.'){
dot();
} else if (morseCode[i] == '-'){
dash();
}
i++;
}
}
void dot()
{
digitalWrite(13, HIGH);
delay(dotLength);
digitalWrite(13, LOW);
delay(dotLength);
}
void dash()
{
digitalWrite(13, HIGH);
delay(dashLength);
digitalWrite(13, LOW);
delay(dotLength);
}
On the Receiver Arduino board, I connected an LDR, a Piezo buzzer and an LED. LED and Buzzer are redundant, just that they give Audio and Video feedback and it feels nice to see things work 😉
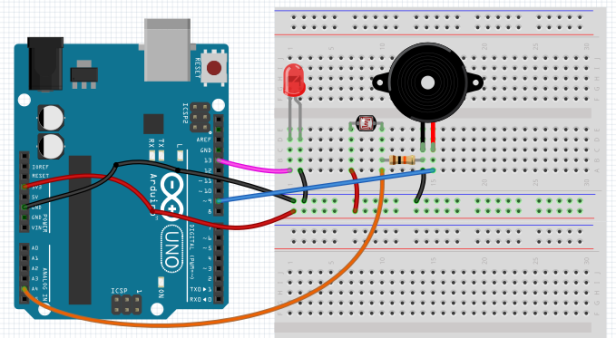
My receiver is also connected to a computer to read the resulting string character.
On the device, in a loop, I read for any light hitting the LDR that is connected to Analog port 4. I shielded it from any ambient light by encapsulating it with a long tube. When light from my Laser diode hits this LDR, the resulting value goes high and I turn the speaker and led on. When it goes down, I turn the speaker and led off.
I am calculating the length of light beam to determine if it was a ‘dot’ or a ‘dash’. Accounting all delays, it came to ~400 cycles for a pulse on my 16MHz Atmel processor.
Receiver Code//Morse Code Binary Tree
// Left child at 2n+1
// Right child at 2n+2
// <.|->
// .E -T
// .I -A .N -M
//
const char MorseTree[] = {'\0','E', 'T', 'I', 'A', 'N', 'M', 'S',
'U', 'R', 'W', 'D', 'K', 'G', 'O', 'H',
'V', 'F', 'U', 'L', 'A', 'P', 'J', 'B',
'X', 'C', 'Y', 'Z', 'Q', '\0','\0','5',
'4', '\0','3', '\0','\0','\0','2', '\0',
'\0','+', '\0','\0','\0','\0','1', '6',
'=', '/', '\0','\0','\0','(', '\0','7',
'\0','\0','\0','8', '\0','9', '0', '\0',
'\0','\0','\0','\0','\0','\0','\0','\0',
'\0','\0','\0','?', '_', '\0','\0','\0',
'\0','"', '\0','\0','.', '\0','\0','\0',
'\0','@', '\0','\0','\0','\0','\0','\0',
'-', '\0','\0','\0','\0','\0','\0','\0',
'\0',';', '!', '\0',')', '\0','\0','\0',
'\0','\0',',', '\0','\0','\0','\0',':',
'\0','\0','\0','\0','\0','\0','\0'
};
int val = 0; // A Variable to Store the Light Value from the LDR
int ctrHigh = 0;
int ctrLow = 0;
int codePtr = 0;
int dotLen = 400;
void setup()
{
Serial.begin(9600);// Start a Serial Connection
Serial.print(codePtr);
}
void loop()
{
val = analogRead(4);
if (val >= 10)
{
ctrHigh++;
ctrLow = 0;
digitalWrite(13, HIGH);
tone(9, 1000);
} else {
ctrLow++;
if ((ctrHigh >= dotLen) && (ctrHigh < dotLen*2)) {
Serial.print(".");
codePtr = (2*codePtr) + 1;
} else if (ctrHigh >= dotLen * 2) {
Serial.print("-");
codePtr = (2*codePtr) + 2;
} else {
if(ctrLow == dotLen*2){
Serial.print(MorseTree[codePtr]);
codePtr = 0;
}
}
ctrHigh = 0;
digitalWrite(13, LOW);
noTone(9);
}
}
Output at Receiver
 ....H.E.-..L.-..L---O.--W---O.-.R.-..L-..D-.-.--!
Code
- Transmitter
- Receiver
TransmitterArduino
Transmitter Codeconst char* MorseTable[] = {
NULL, NULL, NULL, NULL, NULL, NULL, NULL, NULL,
NULL, NULL, NULL, NULL, NULL, NULL, NULL, NULL,
NULL, NULL, NULL, NULL, NULL, NULL, NULL, NULL,
NULL, NULL, NULL, NULL, NULL, NULL, NULL, NULL,
// space, !, ", #, $, %, &, '
NULL, "-.-.--", ".-..-.", NULL, NULL, NULL, NULL, ".----.",
// ( ) * + , - . /
"-.--.", "-.--.-", NULL, ".-.-.", "--..--", "-....-", ".-.-.-", "-..-.",
// 0 1 2 3 4 5 6 7
"-----", ".----", "..---", "...--", "....-", ".....", "-....", "--...",
// 8 9 : ; < = > ?
"---..", "----.", "---...", "-.-.-.", NULL, "-...-", NULL, "..--..",
// @ A B C D E F G
".--.-.", ".-", "-...", "-.-.", "-..", ".", "..-.", "--.",
// H I J K L M N O
"....", "..", ".---", "-.-", ".-..", "--", "-.", "---",
// P Q R S T U V W
".--.", "--.-", ".-.", "...", "-", "..-", "...-", ".--",
// X Y Z [ \ ] ^ _
"-..-", "-.--", "--..", NULL, NULL, NULL, NULL, "..--.-",
// ' a b c d e f g
NULL, ".-", "-...", "-.-.", "-..", ".", "..-.", "--.",
// h i j k l m n o
"....", "..", ".---", "-.-", ".-..", "--", "-.", "---",
// p q r s t u v w
".--.", "--.-", ".-.", "...", "-", "..-", "...-", ".--",
// x y z { | } ~ DEL
"-..-", "-.--", "--..", NULL, NULL, NULL, NULL, NULL,
};
int dotLength = 50;
int dashLength = dotLength*3;
void setup() {
// put your setup code here, to run once:
pinMode(13, OUTPUT);
Serial.begin(9600);
}
void loop() {
char ch;
if(Serial.available()){
ch = Serial.read();
flashDashDot(MorseTable[ch]);
delay(dotLength*2);
}
}
void flashDashDot(const char * morseCode)
{
int i = 0;
while(morseCode[i] != 0)
{
if(morseCode[i] == '.'){
dot();
} else if (morseCode[i] == '-'){
dash();
}
i++;
}
}
void dot()
{
digitalWrite(13, HIGH);
delay(dotLength);
digitalWrite(13, LOW);
delay(dotLength);
}
void dash()
{
digitalWrite(13, HIGH);
delay(dashLength);
digitalWrite(13, LOW);
delay(dotLength);
}
ReceiverArduino
Receiver Code//Morse Code Binary Tree
// Left child at 2n+1
// Right child at 2n+2
// <.|->
// .E -T
// .I -A .N -M
//
const char MorseTree[] = {'\0','E', 'T', 'I', 'A', 'N', 'M', 'S',
'U', 'R', 'W', 'D', 'K', 'G', 'O', 'H',
'V', 'F', 'U', 'L', 'A', 'P', 'J', 'B',
'X', 'C', 'Y', 'Z', 'Q', '\0','\0','5',
'4', '\0','3', '\0','\0','\0','2', '\0',
'\0','+', '\0','\0','\0','\0','1', '6',
'=', '/', '\0','\0','\0','(', '\0','7',
'\0','\0','\0','8', '\0','9', '0', '\0',
'\0','\0','\0','\0','\0','\0','\0','\0',
'\0','\0','\0','?', '_', '\0','\0','\0',
'\0','"', '\0','\0','.', '\0','\0','\0',
'\0','@', '\0','\0','\0','\0','\0','\0',
'-', '\0','\0','\0','\0','\0','\0','\0',
'\0',';', '!', '\0',')', '\0','\0','\0',
'\0','\0',',', '\0','\0','\0','\0',':',
'\0','\0','\0','\0','\0','\0','\0'
};
int val = 0; // A Variable to Store the Light Value from the LDR
int ctrHigh = 0;
int ctrLow = 0;
int codePtr = 0;
int dotLen = 400;
void setup()
{
Serial.begin(9600);// Start a Serial Connection
Serial.print(codePtr);
}
void loop()
{
val = analogRead(4);
if (val >= 10)
{
ctrHigh++;
ctrLow = 0;
digitalWrite(13, HIGH);
tone(9, 1000);
} else {
ctrLow++;
if ((ctrHigh >= dotLen) && (ctrHigh < dotLen*2)) {
Serial.print(".");
codePtr = (2*codePtr) + 1;
} else if (ctrHigh >= dotLen * 2) {
Serial.print("-");
codePtr = (2*codePtr) + 2;
} else {
if(ctrLow == dotLen*2){
Serial.print(MorseTree[codePtr]);
codePtr = 0;
}
}
ctrHigh = 0;
digitalWrite(13, LOW);
noTone(9);
}
}
Schematics
Morse Code Receiver Circuitmorsereceiver_1JpG6jZ6yv.fzzMorse Code Transmitter Circuitmorsetransmitter_sOKvrIbOv3.fzzManufacturing process
- Bar Code Scanner: Technology, Design, and Future Trends
- C++ Comments: Best Practices for Readable, Maintainable Code
- SERENA: A Custom Arduino Mega 2560 Alarm System with TFT LCD Touchscreen
- Morse Code Communication with Laser Module – Dual‑Side Arduino Project
- Python 3 to Arduino UNO: Easy Command Control and LED Demo
- EL Tape Music Visualizer – Illuminate Your Sound with Arduino
- Build a Morse Code Transmitter with Arduino – Easy DIY Guide
- Understanding QR Codes: Definition, Uses, and Benefits
- k3ng Keyer: Open-Source Arduino Morse Code Transmitter Explained
- CNC G‑Codes Explained: Essential Guide for CNC Programmers