


Build a Web-Enabled Arduino Thermometer with DS18B20 Sensor
Components and supplies
 |
| × | 1 | |||
 |
| × | 1 | |||
| × | 1 | ||||
| × | 1 | ||||
| × | 1 |
About this project
If you are a beginner, you can learn about wifi and sensor in Arduino - Wifi and Arduino - DS18B20 temperature sensor tutorials
I made a similar project using only PHPoC here.
DemoData FlowArduino ---> PHPoC WiFi Shield ---> Web browser
Arduino reads temperature from sensor and send the temperature value to PHPoC WiFi Shield. When receiving the temperature value, PHPoC WiFi Shield send it to Web Browser via websocket. JavaScript function visualizes the temperature value on UI.
Note that: PHPoC shield has a built-in program to pass data from Arduino to web browser. Therefore, we don't need to care about it.
What We Need to Do- Set WiFi information for PHPoC shield (SSID and password)
- Upload new UI to PHPoC shield
- Write Arduino code
Setting WiFi Information for PHPoC Shield
See this instruction.
Upload new Web UI to PHPoC Shield
- Download PHPoC source code remote_thermometer.php (on code section).
- Upload it to PHPoC shield using PHPoC debugger according to this instruction.
Write Arduino Code
- Install three following libraries: PHPoC Library for Arduino , OneWire and Dallas Temperature (see instruction ).
- Upload Arduino code (on code section) to Arduino
- Click serial button on Arduino IDE to see the IP address.
- Open web browser, type
http://replace_ip_address/remote_thermometer.php - Click connect button and test it.
If you are looking for an Arduino kit, see The Best Arduino Kit for Beginners
Function References- Serial.begin()
- Serial.println()
- delay()
- millis()
- for loop
- while loop
- if else
- loop()
- setup()
- String.toInt()
- String.substring()
- String.indexOf()
- String.remove()
- String.equals()
Code
- Arduino Code
- remote_thermometer.php
Arduino CodeArduino
#include <OneWire.h>
#include <DallasTemperature.h>
#include "SPI.h"
#include "Phpoc.h"

// Data wire is plugged into port 8 on the Arduino
OneWire oneWire(8);
DallasTemperature sensors(&oneWire);

PhpocServer server(80);
boolean alreadyConnected = false;

void setup() {
	Serial.begin(9600);
	while(!Serial)
		;

	sensors.begin();

	Phpoc.begin(PF_LOG_SPI | PF_LOG_NET);

	server.beginWebSocket("thermometer");

	Serial.print("WebSocket server address : ");
	Serial.println(Phpoc.localIP());
}

void loop() {
	// when the client sends the first byte, say hello:
	PhpocClient client = server.available();

	if (client) {
		sensors.requestTemperatures();
		float temp = sensors.getTempCByIndex(0);
		String txtMsg = String(temp) + "\r\n";
		char buf[txtMsg.length()];
		txtMsg.toCharArray(buf, txtMsg.length());
		server.write(buf, txtMsg.length());
		delay(300);
	}
}
remote_thermometer.phpPHP
This file provide web user interface. Upload this file to PHPoC Wifi Shield or PHPoC Shield according to the described instruction.<!DOCTYPE html>
<html>
<head>
<title>Arduino - PHPoC Shield - Thermometer</title>
<meta name="viewport" content="width=device-width, initial-scale=0.7, maximum-scale=0.7">
<meta charset="utf-8">
<style>
body { text-align: center; font-size: width/2pt; }
h1 { font-weight: bold; font-size: width/2pt; }
h2 { font-weight: bold; font-size: width/2pt; }
button { font-weight: bold; font-size: width/2pt; }
</style>
<script>
var canvas_width = 200, canvas_height = 450;
var ws;
var buffer = "";
function init()
{
var canvas = document.getElementById("remote");
//canvas.style.backgroundColor = "#999999";
canvas.width = canvas_width;
canvas.height = canvas_height;
var ctx = canvas.getContext("2d");
ctx.translate(canvas_width/2, canvas_height - 80);
update_view(0);
}
function connect_onclick()
{
if(ws == null)
{
var ws_host_addr = "<?echo _SERVER("HTTP_HOST")?>";
if((navigator.platform.indexOf("Win") != -1) && (ws_host_addr.charAt(0) == "["))
{
// network resource identifier to UNC path name conversion
ws_host_addr = ws_host_addr.replace(/[\[\]]/g, '');
ws_host_addr = ws_host_addr.replace(/:/g, "-");
ws_host_addr += ".ipv6-literal.net";
}
ws = new WebSocket("ws://" + ws_host_addr + "/thermometer", "text.phpoc");
document.getElementById("ws_state").innerHTML = "CONNECTING";
ws.onopen = ws_onopen;
ws.onclose = ws_onclose;
ws.onmessage = ws_onmessage;
//ws.binaryType = "arraybuffer";
}
else
ws.close();
}
function ws_onopen()
{
document.getElementById("ws_state").innerHTML = "<font color='blue'>CONNECTED</font>";
document.getElementById("bt_connect").innerHTML = "Disconnect";
ws.send("B\r\n");
update_view(0);
}
function ws_onclose()
{
document.getElementById("ws_state").innerHTML = "<font color='gray'>CLOSED</font>";
document.getElementById("bt_connect").innerHTML = "Connect";
ws.onopen = null;
ws.onclose = null;
ws.onmessage = null;
ws = null;
update_view(0);
}
function ws_onmessage(e_msg)
{
e_msg = e_msg || window.event; // MessageEvent
console.log(e_msg.data);
update_view(parseFloat(e_msg.data));
}
function update_view(temp)
{
var canvas = document.getElementById("remote");
var ctx = canvas.getContext("2d");
var radius = 70;
var offset = 5;
var width = 45;
var height = 330;
ctx.clearRect(-canvas_width/2, -350, canvas_width, canvas_height);
if(ws != null)
{
ctx.strokeStyle="blue";
ctx.fillStyle="blue";
}
else
{
ctx.strokeStyle="Gray";
ctx.fillStyle="Gray";
}
//5-step Degree
var x = -width/2;
ctx.lineWidth=2;
for (var i = 0; i <= 100; i+=5)
{
var y = -(height - radius)*i/100 - radius - 5;
ctx.beginPath();
ctx.lineTo(x, y);
ctx.lineTo(x - 20, y);
ctx.stroke();
}
//20-step Degree
ctx.lineWidth=5;
for (var i = 0; i <= 100; i+=20)
{
var y = -(height - radius)*i/100 - radius - 5;
ctx.beginPath();
ctx.lineTo(x, y);
ctx.lineTo(x - 25, y);
ctx.stroke();
ctx.font="20px Georgia";
ctx.textBaseline="middle";
ctx.textAlign="right";
ctx.fillText(i.toString(), x - 35, y);
}
// shape
ctx.lineWidth=16;
ctx.beginPath();
ctx.arc(0, 0, radius, 0, 2 * Math.PI);
ctx.stroke();
ctx.beginPath();
ctx.rect(-width/2, -height, width, height);
ctx.stroke();
ctx.beginPath();
ctx.arc(0, -height, width/2, 0, 2 * Math.PI);
ctx.stroke();
ctx.fillStyle="#e6e6ff";
ctx.beginPath();
ctx.arc(0, 0, radius, 0, 2 * Math.PI);
ctx.fill();
ctx.beginPath();
ctx.rect(-width/2, -height, width, height);
ctx.fill();
ctx.beginPath();
ctx.arc(0, -height, width/2, 0, 2 * Math.PI);
ctx.fill();
// temperature value
if(ws != null)
ctx.fillStyle="#ff1a1a";
else
ctx.fillStyle="Gray";
ctx.beginPath();
ctx.arc(0, 0, radius - offset, 0, 2 * Math.PI);
ctx.fill();
temp = Math.round(temp);
var y = (height - radius)*temp/100.0 + radius + 5;
ctx.beginPath();
ctx.rect(-width/2 + offset, -y, width - 2*offset, y);
ctx.fill();
if(ws != null)
{
ctx.fillStyle="white";
ctx.font="bold 34px Georgia";
ctx.textBaseline="middle";
ctx.textAlign="center";
ctx.fillText(temp.toString() + "°C", 0, 0);
}
}
window.onload = init;
</script>
</head>
<body>
<p>
<h1>Arduino - Web Thermometer</h1>
</p>
<canvas id="remote"></canvas>
<h2>
<p>
WebSocket : <span id="ws_state">null</span>
</p>
<button id="bt_connect" type="button" onclick="connect_onclick();">Connect</button>
</h2>
</body>
</html>
Schematics
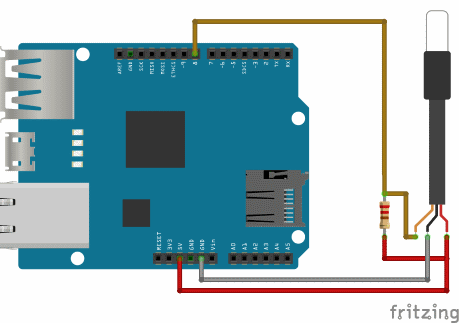
1. Stack PHPoC wifi shield or PHPoC shield on Arduino2. Wiring like below image

Manufacturing process
- The Thermometer: From Galileo’s Thermoscope to Modern Digital Sensors
- Arduino Web‑Controlled MP3 Player: Easy Audio Playback via Browser
- Secure Your Arduino with Web Pattern Unlock – Easy Setup & Remote Control
- Build a Non-Contact Infrared Thermometer with Arduino Nano and GY-906
- Create a Web-Operated Joystick with Arduino UNO & WiFi Shield
- 128x64 LCD Smart Clock with Analog/Digital Time & Temperature – Arduino Nano + DS3231 RTC
- Build a Web-Enabled Arduino Car Race Brick Game
- Build a Precise COVID‑19 Non‑Contact Thermometer with MLX90614 & Arduino Nano
- Build an Arduino LCD Thermometer Using LM35/36 Temperature Sensor
- Build a Web-Based Two-Player Game with Arduino UNO & PHPoC WiFi Shield