


DIY Arduino Snowflake: 30‑LED LED Display Project
Components and supplies
 |
| × | 1 |
About this project
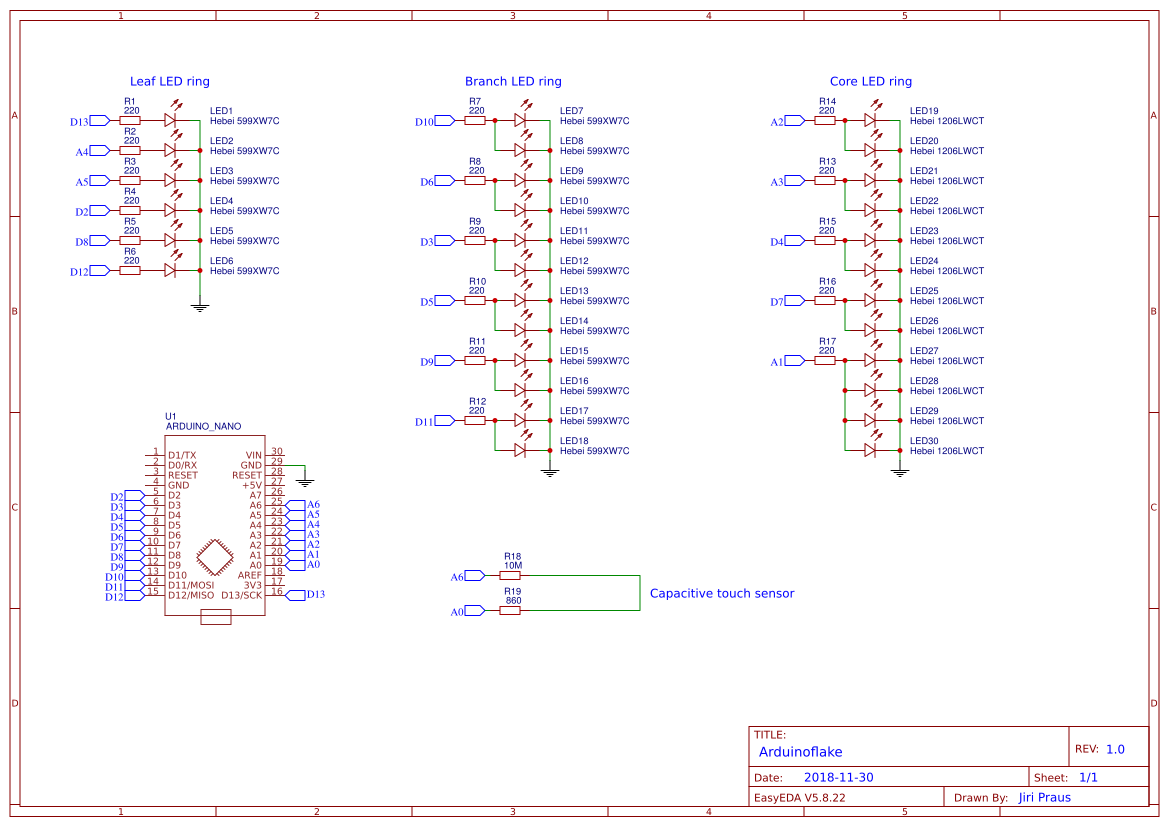
The snowflake consists of 30 LEDs grouped into 17 independent segments which can be controlled separately by Arduino Nano microcontroller. Each of the LED group can be dimmed with PWM to create some lovely animations.
ToolsAll you gonna need is soldering iron, solder, and pliers.
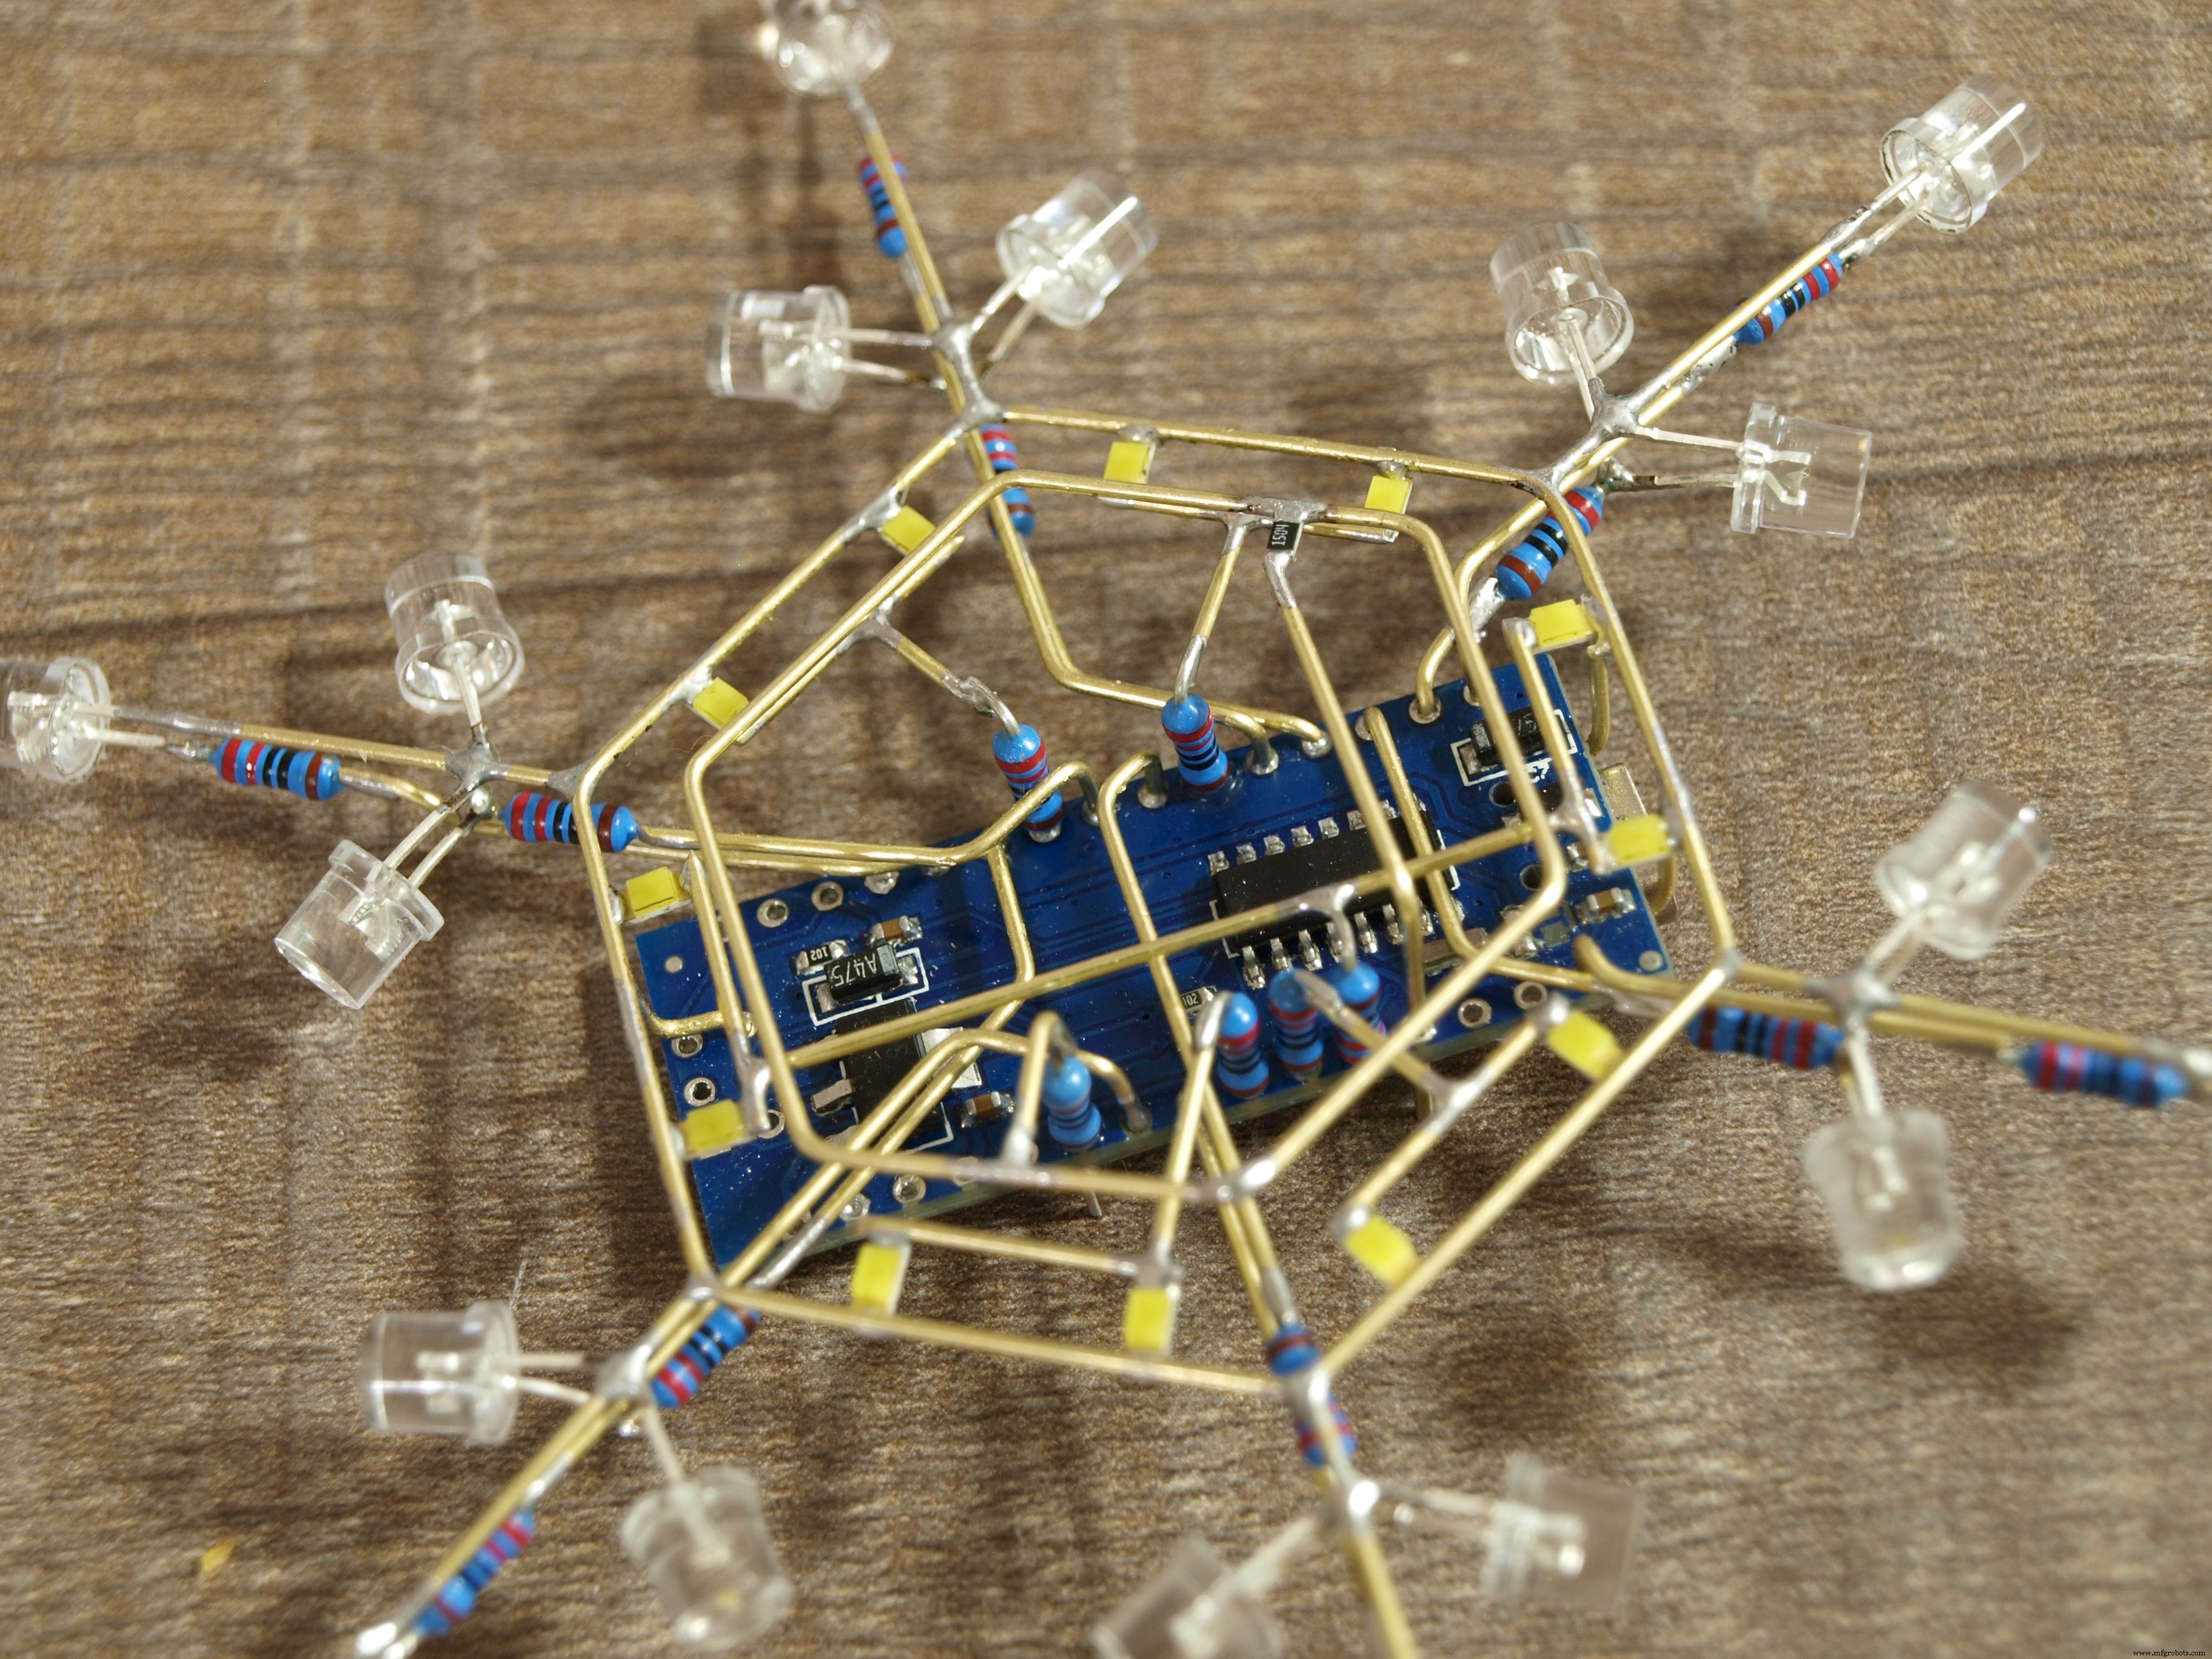
ConstructionFirst of all select some pattern. I choose a nice and simple snowflake crystal and print it to the size to fit Arduino Nano inside the hexagon - core of the crystal.

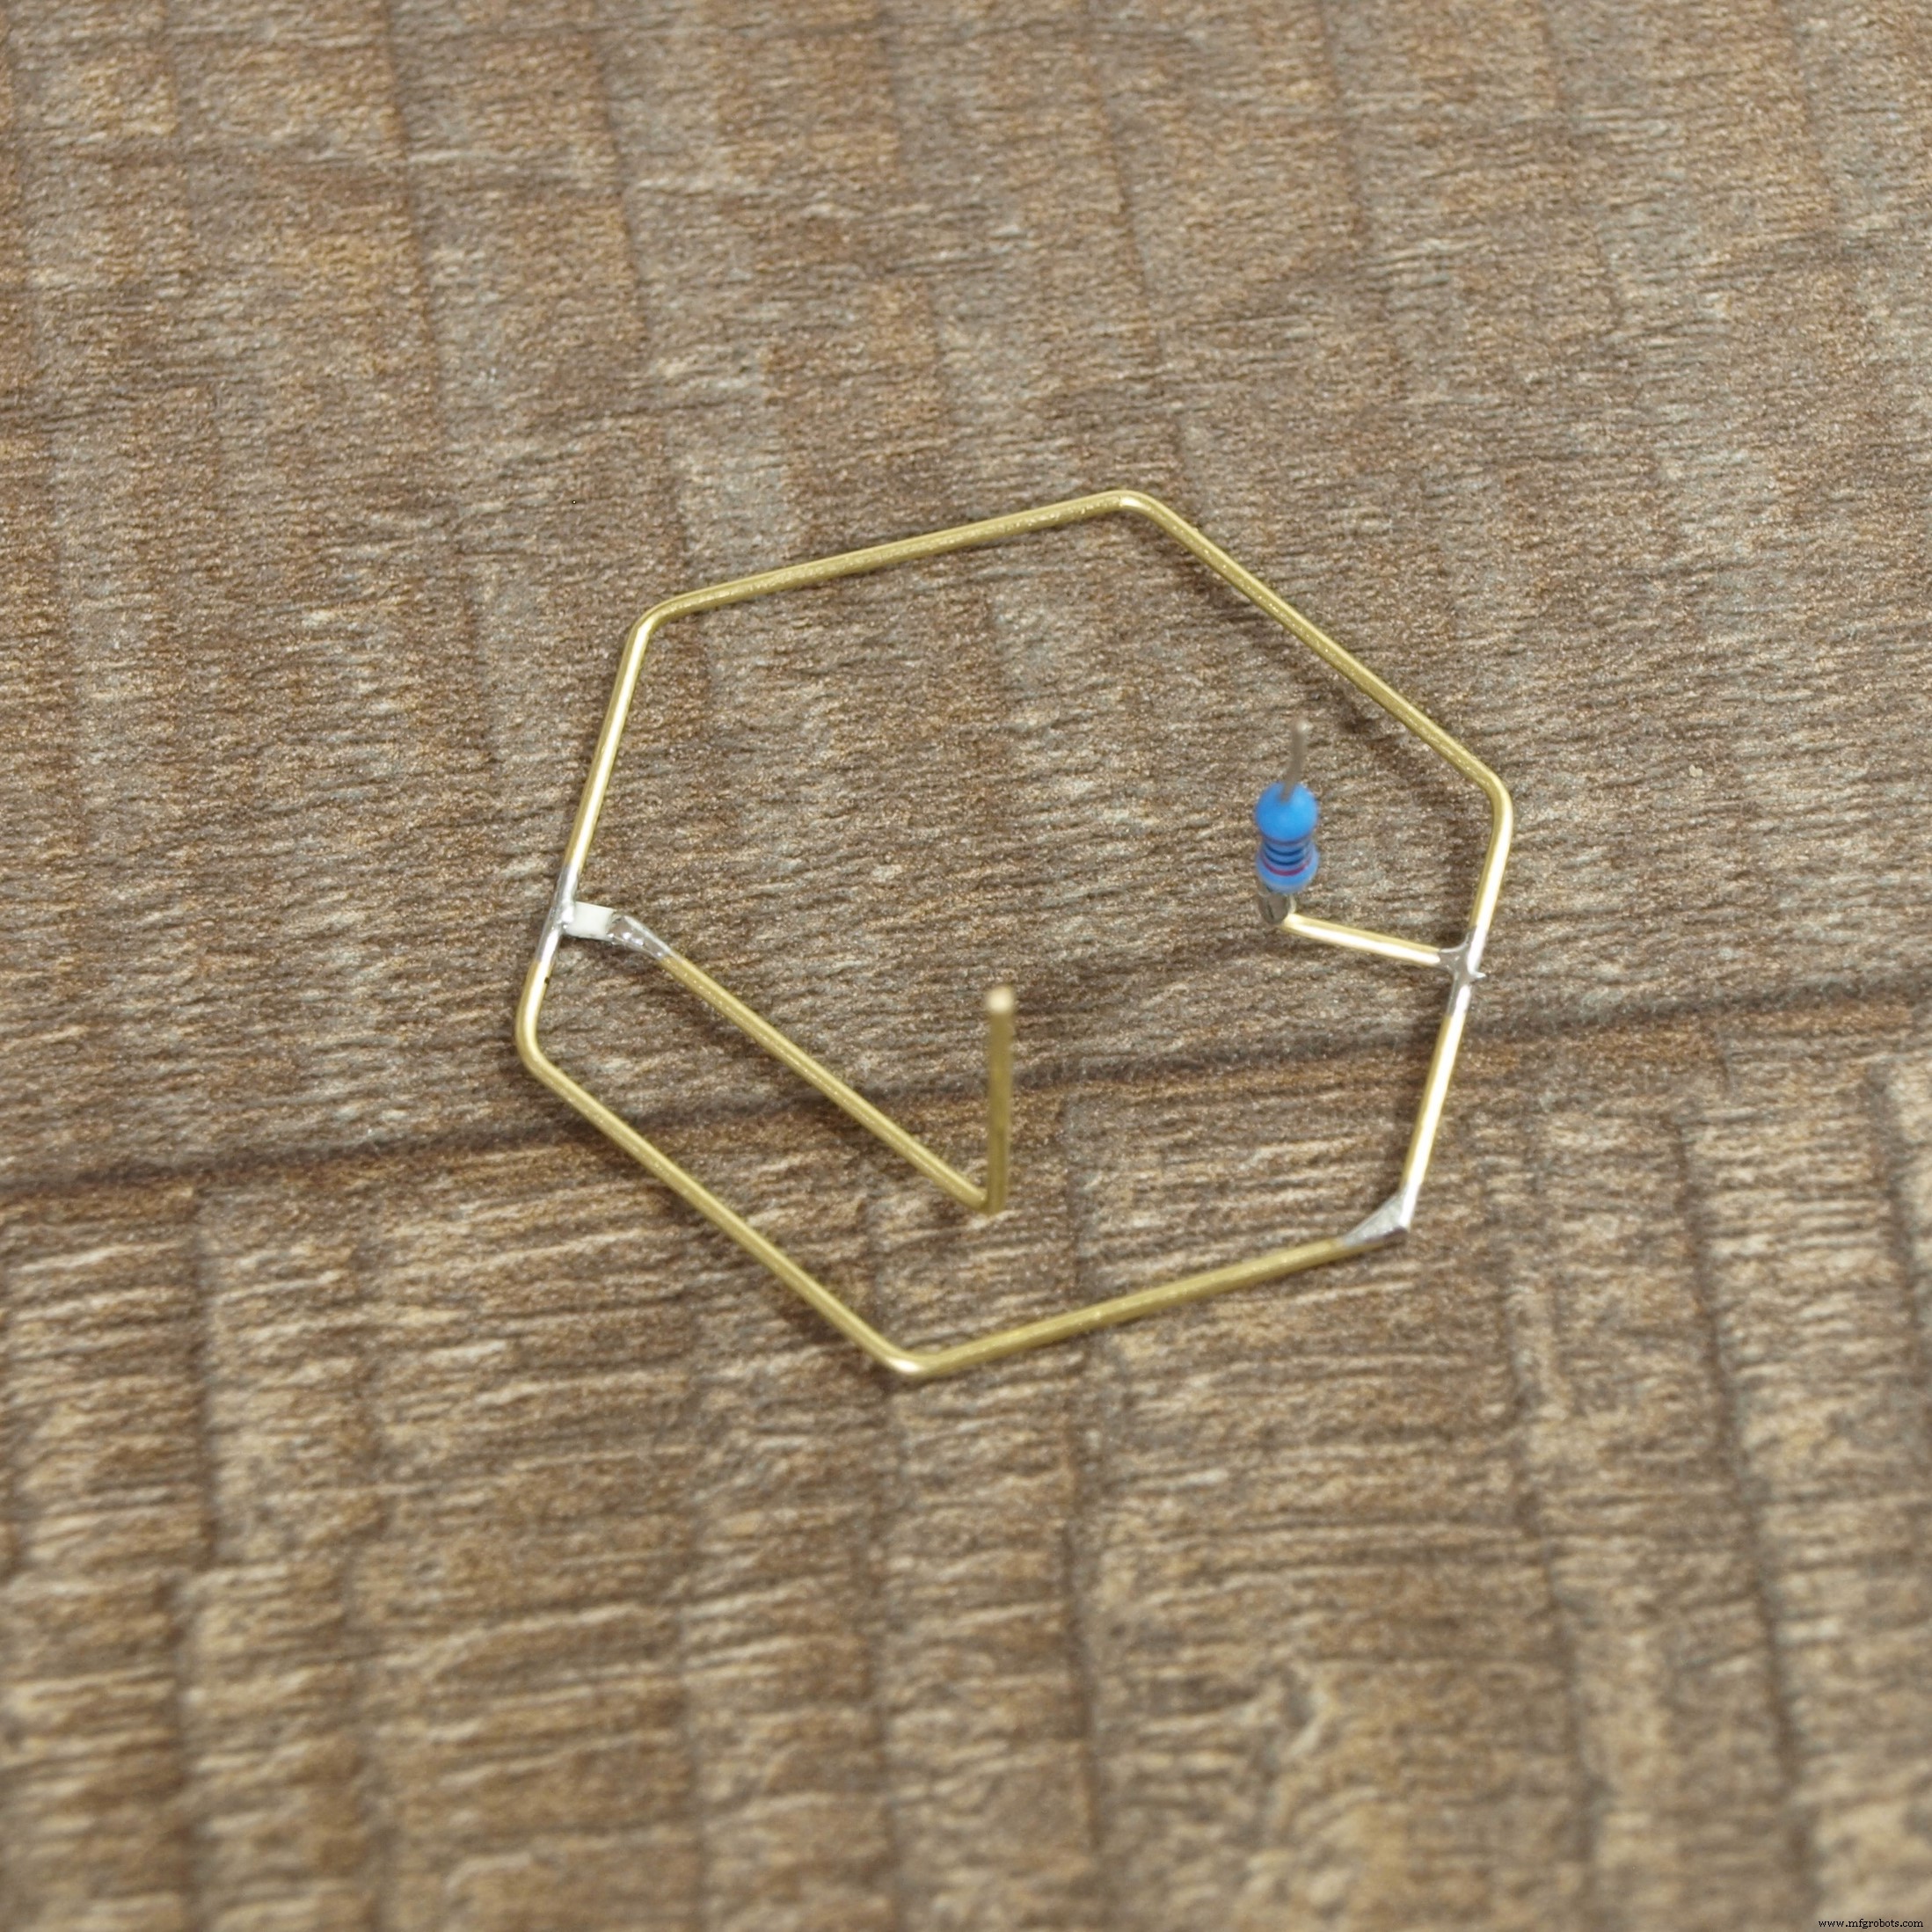
The support structure which also acts as a wiring is created from 0.8mm brass rods soldered together with tin. I've used 2m of the rod in total. Why freeform? Because I always wanted to try that and it's a test of your patience and skill.
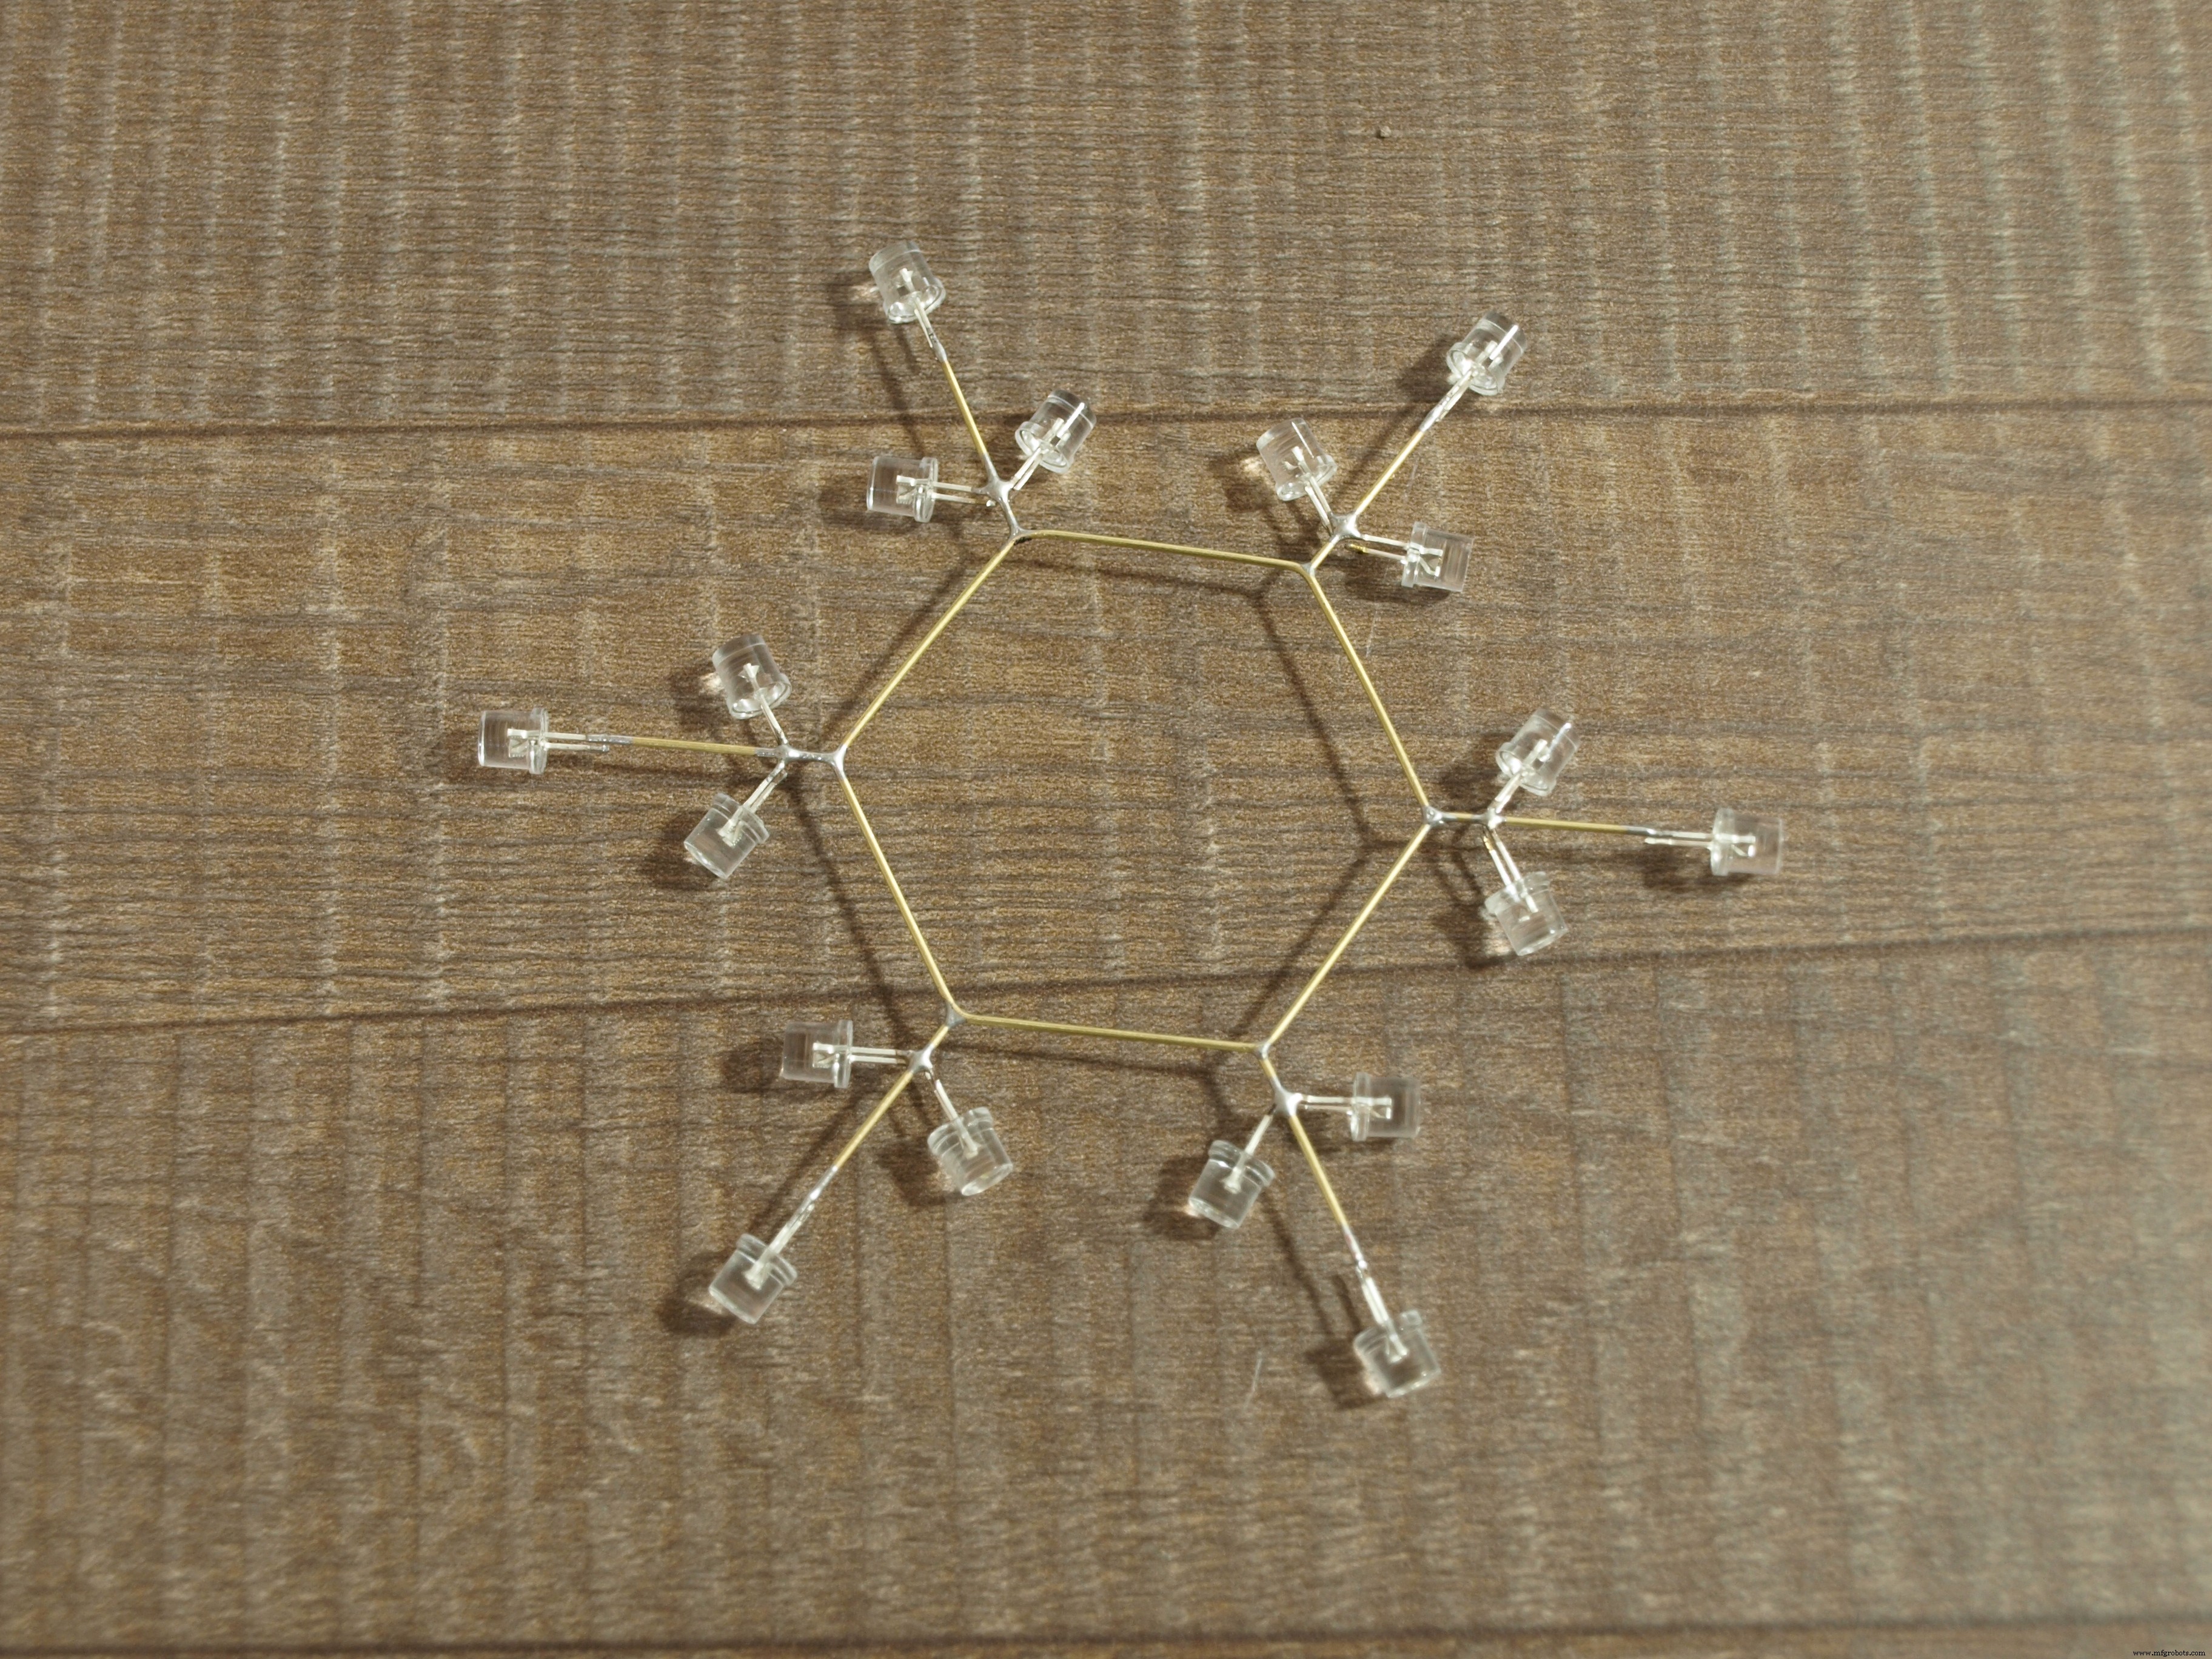
First I created a core hexagon by bending a single rod and soldered the ends together. By adding another 6 rods to the tops of the hexagon the ground wiring is complete, all cathode leads of LEDs now need to be soldered to it to create a snowflake pattern. The tricky part was adding the SMD LEDs but I helped myself with a jig created from a cardboard and a double-sided tape.
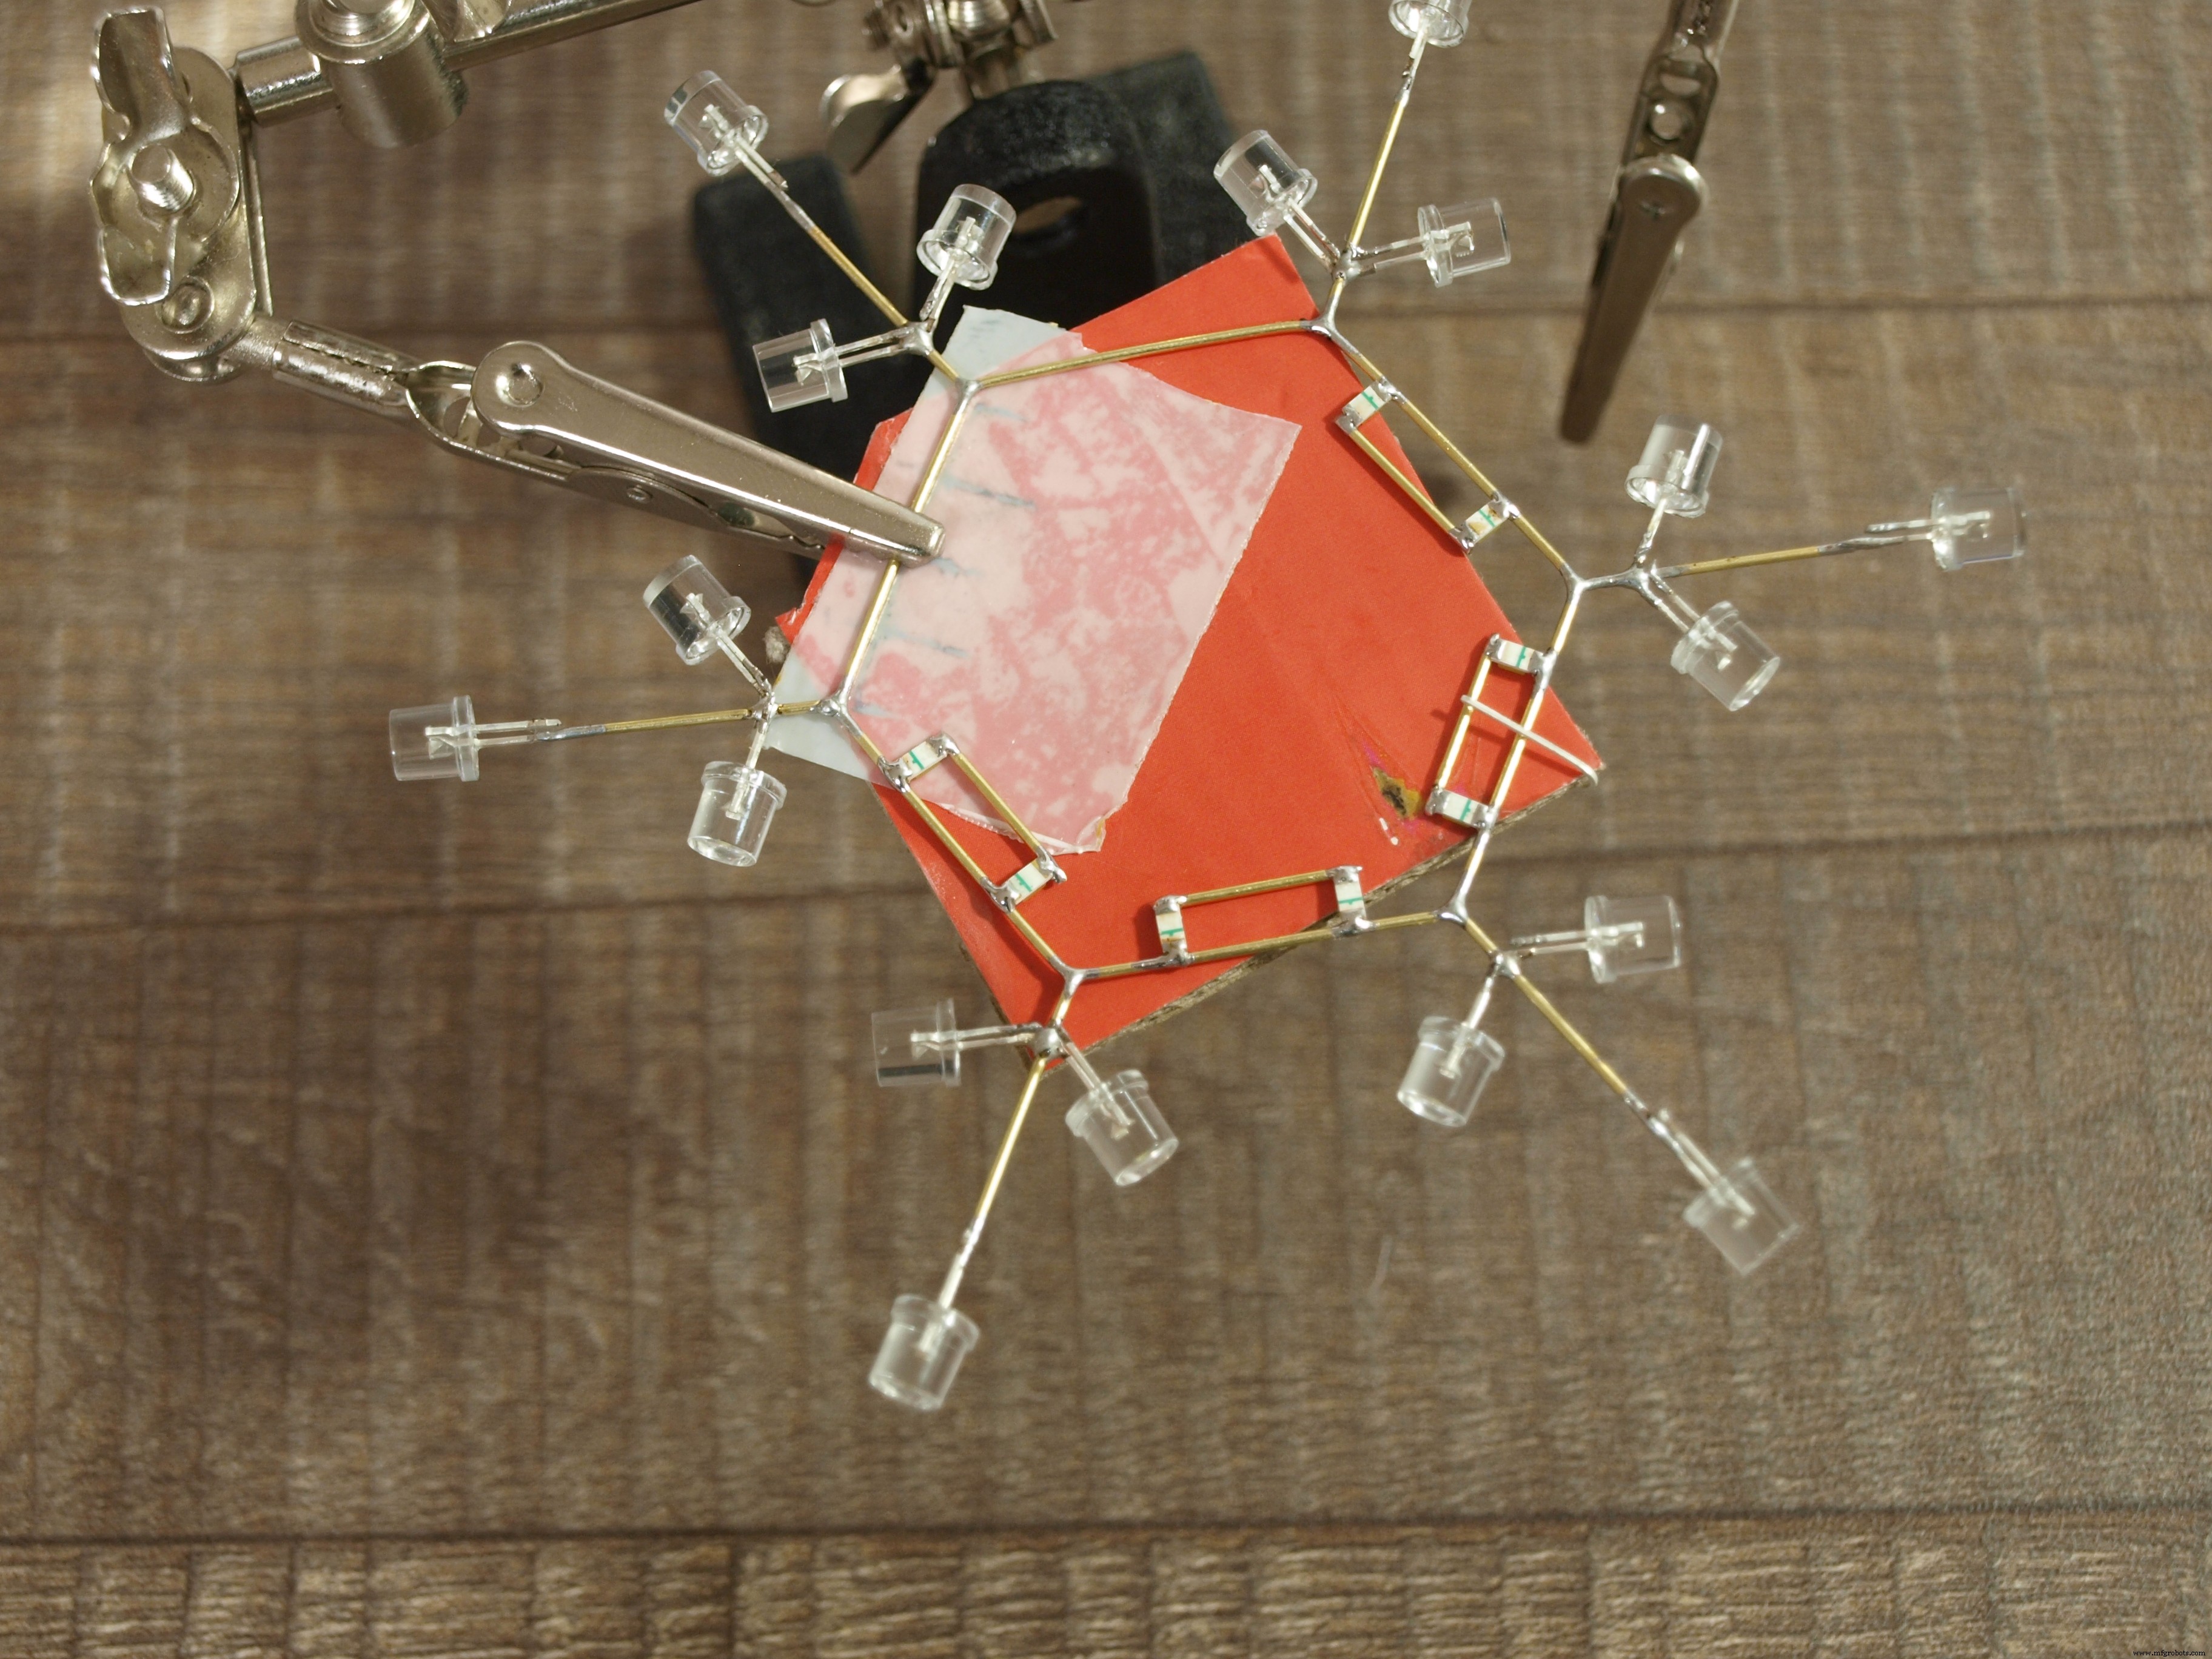
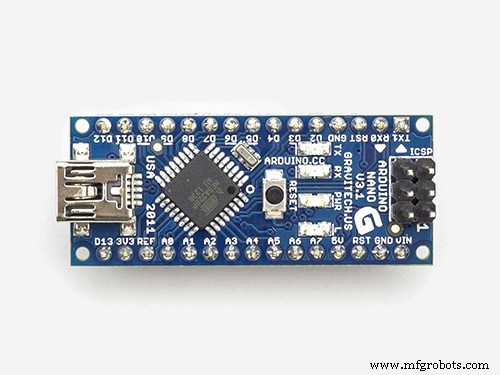
Next it was time to add the Arduino Nano microcontroller under the core structure leaving enough space in between to fit 3 layers of brass rod wirings which will connect microcontroller pins to all the LED anode leads. This required a tremendous amount of patience. Not only you need to avoid a short circuit between the wires but also add a current limiting resistor and make it look nice.

Leaf LEDs are connected separately each to the nearest Arduino's output pin. Branch LEDs are grouped by two and connected to PWM pins. Core LEDs are also grouped by two and connected to the rest of the pins. Arduino NANO has only 18 output pins (A6 and A7 are input only) and I need one pin for the touch sensor, that left me with only 17 pins so the two pairs of core LEDs are connected together to create a group of 4. I am using 220Ω resistors to limit the current flowing thru each pin to around 8mA. That means 240mA in total which is little high for ATmega328 chip but it works - safe maximum is said to be 200mA.
Touch sensorTo be able to interact with a snowflake I added another brass rod to create a capacitive touch sensor. I found a great library and tutorial by Paul Stoffregen. The touch sensor is used to interact with the arduinoflake - change animation, turn on/off, sparkle when touched, you name it...
Don't forget to check all the diodes before soldering, it will be pretty hard to exchange them if broken or connected in reversed polarity.
Originally I thought I will be able to only dim the branch LEDs which are connected to hardware PWM pins. But luckily there exists an awesome software PWM library which allowed me to use all the pins as if they were hardware PWM. This setup created endless possibilities for animations! Check out the code attached below with some of the first animations.
Code
- snowflake.ino
snowflake.inoArduino
Source code#include "SoftPWM.h"
#include <ADCTouchSensor.h>
byte edgeLedPins[] = {13, A4, A5, 2, 8, 12};
byte middleLedPins[] = {10, 6, 3, 5, 9, 11};
byte innerLedPins[] = {A2, A3, A1, 4, 7, A1};
ADCTouchSensor touchSensor = ADCTouchSensor(A0, 1);
void setup() {
Serial.begin(115200);
SoftPWMBegin();
}
byte animation = 0;
long touchAt = 0;
void loop() {
switch (animation) {
case 0:
_fill(100);
break;
case 1:
shinyAnimation();
//fadingAnimation();
break;
case 2:
circleAnimation();
break;
case 3:
loopAnimation();
break;
case 4:
fireworkAnimation();
fireworkAnimation();
fireworkAnimation();
fireworkAnimation();
fireworkAnimation();
fireworkAnimation();
animation ++;
break;
case 5:
smileAnimation();
break;
default:
animation = 0;
break;
}
int touchValue = touchSensor.read();
if (touchAt + 2000 < millis() && touchValue > 1000) {
touchAt = millis(); // touch down, cold down timeout is 2s
animation ++;
_fill(0);
}
}
void fireworkAnimation() {
for (int i = 0; i < 4; i++) {
SoftPWMSet(innerLedPins[i], 100);
delay(100);
}
SoftPWMSet(innerLedPins[4], 100);
for (int i = 0; i < 6; i++) {
SoftPWMSet(middleLedPins[i], 255);
}
delay(50);
for (int i = 0; i < 6; i++) {
SoftPWMSet(innerLedPins[i], 0);
SoftPWMSet(edgeLedPins[i], 255);
}
delay(50);
for (int i = 0; i < 6; i++) {
SoftPWMSet(middleLedPins[i], 0);
}
delay(50);
_fill(0);
}
void smileAnimation() {
SoftPWMSet(innerLedPins[1], 100);
SoftPWMSet(innerLedPins[3], 100);
SoftPWMSet(middleLedPins[0], 255);
SoftPWMSet(middleLedPins[5], 255);
SoftPWMSet(edgeLedPins[2], 255);
SoftPWMSet(edgeLedPins[3], 255);
delay(2000);
SoftPWMSet(innerLedPins[1], 0);
SoftPWMSet(innerLedPins[3], 0);
delay(100);
SoftPWMSet(innerLedPins[1], 100);
SoftPWMSet(innerLedPins[3], 100);
delay(100);
SoftPWMSet(innerLedPins[1], 0);
SoftPWMSet(innerLedPins[3], 0);
delay(100);
}
byte circleState[] = {100, 55, 10};
byte circleStateAnimation[] = {1, 1, 1};
void circleAnimation() {
for (int i = 0; i < 3; i++) {
if (circleState[i] >= 100) {
circleStateAnimation[i] = -1; // dim
}
else if (circleState[i] <= 10) {
circleStateAnimation[i] = 1; // bright
}
circleState[i] += circleStateAnimation[i];
}
for (int i = 0; i < 6; i++) {
SoftPWMSet(innerLedPins[i], circleState[0]);
SoftPWMSet(middleLedPins[i], circleState[1]);
SoftPWMSet(edgeLedPins[i], circleState[2]);
}
delay(5);
}
byte waveState[] = {100, 55, 10, 10, 55, 100};
byte waveStateAnimation[] = {1, 1, 1, -1, -1, -1};
void waveAnimation() {
for (int i = 0; i < 6; i++) {
if (waveState[i] >= 100) {
waveStateAnimation[i] = -1; // dim
}
else if (waveState[i] <= 10) {
waveStateAnimation[i] = 1; // bright
}
waveState[i] += waveStateAnimation[i];
}
for (int i = 0; i < 6; i+=2) {
SoftPWMSet(innerLedPins[i], waveState[0]);
SoftPWMSet(middleLedPins[i], waveState[1]);
SoftPWMSet(edgeLedPins[i], waveState[2]);
SoftPWMSet(innerLedPins[i + 1], waveState[3]);
SoftPWMSet(middleLedPins[i + 1], waveState[4]);
SoftPWMSet(edgeLedPins[i + 1], waveState[5]);
}
delay(10);
}
byte loopCounter = 0;
byte loopState = 150;
void loopAnimation() {
SoftPWMSet(innerLedPins[loopCounter], loopState);
SoftPWMSet(middleLedPins[loopCounter], loopState);
SoftPWMSet(edgeLedPins[loopCounter], loopState);
loopCounter = _nextIndex(loopCounter, 1);
if (loopCounter == 0) {
loopState = (loopState == 150 ? 0 : 150);
}
delay(100);
}
byte slowOnCounter = 0;
byte slowOnState = 150;
void slowOnAnimation() {
byte randomLed = random(0, 18);
if (randomLed < 6) {
SoftPWMSet(innerLedPins[randomLed], slowOnState);
}
else if (randomLed < 12) {
SoftPWMSet(middleLedPins[randomLed - 6], slowOnState);
}
else {
SoftPWMSet(edgeLedPins[randomLed - 12], slowOnState);
}
slowOnCounter ++;
if (slowOnCounter >= 50) {
slowOnCounter = 0;
slowOnState = (slowOnState == 150 ? 0 : 150);
}
delay(50);
}
byte shinyState[] = {0, 100, 0, 100, 0, 100};
byte shinyStateAnimation[] = {1, 1, 1, 1, 1, 1};
byte shinyCounter = 0;
void shinyAnimation() {
for (int i = 0; i < 6; i++) {
if (shinyState[i] >= 100) {
shinyStateAnimation[i] = -1; // dim
}
else if (shinyState[i] <= 0) {
shinyStateAnimation[i] = 1; // bright
}
shinyState[i] += shinyStateAnimation[i];
SoftPWMSet(edgeLedPins[i], shinyState[i]);
}
shinyCounter ++;
if (shinyCounter > 10) {
shinyCounter = 0;
for (byte r = random(1, 3); r > 0; r--) {
byte randomLed = random(0, 12);
if (randomLed < 6) {
SoftPWMSet(innerLedPins[random(0, 6)], 255);
}
else {
SoftPWMSet(middleLedPins[random(0, 6)], 255);
}
}
}
else {
for (int i = 0; i < 6; i++) {
SoftPWMSet(innerLedPins[i], 20);
SoftPWMSet(middleLedPins[i], 20);
}
}
delay(30);
}
byte fadingState[] = {0, 100, 0, 100, 0, 100};
byte fadingStateAnimation[] = {1, 1, 1, 1, 1, 1};
void fadingAnimation() {
for (int i = 0; i < 6; i++) {
if (fadingState[i] >= 100) {
fadingStateAnimation[i] = -1; // dim
}
else if (fadingState[i] <= 0) {
fadingStateAnimation[i] = 1; // bright
}
fadingState[i] += fadingStateAnimation[i];
SoftPWMSet(edgeLedPins[i], fadingState[i]);
SoftPWMSet(middleLedPins[_nextIndex(i, 1)], fadingState[i]);
SoftPWMSet(innerLedPins[i], 50);
}
delay(20);
}
void _fill(byte value) {
for (int i = 0; i < 6; i++) {
SoftPWMSet(edgeLedPins[i], value);
SoftPWMSet(middleLedPins[i], value);
SoftPWMSet(innerLedPins[i], value);
}
}
byte _prevIndex(short index, byte step) {
index -= step;
while (index < 0) {
index += 6;
}
return index;
}
byte _nextIndex(short index, byte step) {
index += step;
while (index > 5) {
index -= 6;
}
return index;
}
Schematics
Manufacturing process
- The Rolling Pin: From Etruscan Origins to Modern Craftsmanship
- The Evolution and Craftsmanship of Modern Bowling Pins
- From Ancient Fibulae to Modern Manufacturing: The Safety Pin Explained
- Dynamic LED Triangle Art: Build a 45-LED RGB Display with Arduino UNO
- Turn Your MIDI Keyboard into a Smart Piano Tutor with Arduino, LEDs, and MuseScore
- Control LEDs with Alexa via Raspberry Pi – Easy Step‑by‑Step Guide
- DIY Hot Glue LED Matrix Lamp – Build Your Own Colorful Display
- Control LED Lights with Alexa via Arduino Yun – A Smart Home Tutorial
- Controlling 32 LEDs with Arduino Nano and 4x 74HC595 Shift Registers – A Beginner’s Guide
- Efficient 3‑Pin Wireless Sensor Transmission with nRF24L01+ and ATtiny85