Code
- 4-digit 7-segment display countdown timer
4-digit 7-segment display countdown timerC/C++
The code contains the countdown timer function that initiates the countdown shown in the 4-digit 7-segment display. It also has a useful function PrintNumber that shows a given 4-digit number on the display for a given amount of time. It can be used in other projects.#include <math.h>
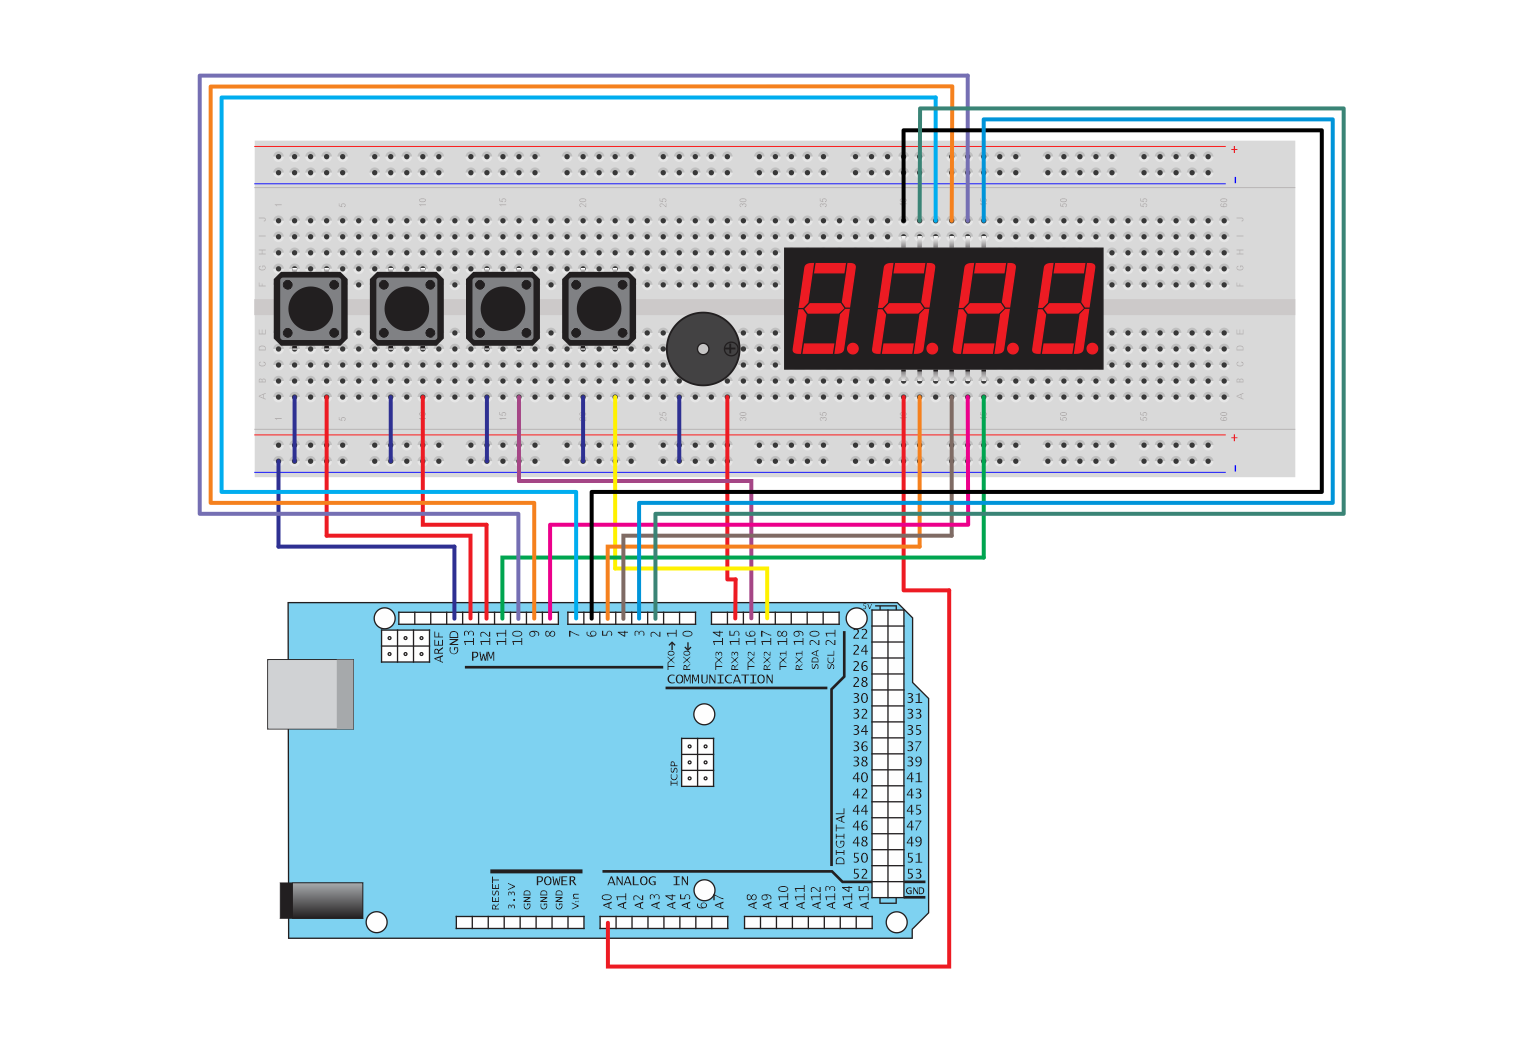
int digit_pin[] = {6, 9, 10, 11}; // PWM Display digit pins from left to right
int speakerPin = 15;
#define DIGIT_ON LOW
#define DIGIT_OFF HIGH
int segA = 2;
int segB = 3;
int segC = 4;
int segD = 5;
int segE = A0; //pin 6 is used bij display 1 for its pwm function
int segF = 7;
int segG = 8;
//int segPD = ;
int button1=13;
int button2=12;
int button3=16;
int button4=17;
int countdown_time = 60;
struct struct_digits {
int digit[4];
};
void setup() {
pinMode(segA, OUTPUT);
pinMode(segB, OUTPUT);
pinMode(segC, OUTPUT);
pinMode(segD, OUTPUT);
pinMode(segE, OUTPUT);
pinMode(segF, OUTPUT);
pinMode(segG, OUTPUT);
for (int i=0; i<4; i++) {
pinMode(digit_pin[i], OUTPUT);
}
pinMode(speakerPin, OUTPUT);
pinMode(button1,INPUT_PULLUP);
pinMode(button2,INPUT_PULLUP);
pinMode(button3,INPUT_PULLUP);
pinMode(button4,INPUT_PULLUP);
}
void playTone(int tone, int duration) {
for (long k = 0; k < duration * 1000L; k += tone * 2) {
digitalWrite(speakerPin, HIGH);
delayMicroseconds(tone);
digitalWrite(speakerPin, LOW);
delayMicroseconds(tone);
}
}
void lightNumber(int numberToDisplay) {
#define SEGMENT_ON HIGH
#define SEGMENT_OFF LOW
switch (numberToDisplay){
case 0:
digitalWrite(segA, SEGMENT_ON);
digitalWrite(segB, SEGMENT_ON);
digitalWrite(segC, SEGMENT_ON);
digitalWrite(segD, SEGMENT_ON);
digitalWrite(segE, SEGMENT_ON);
digitalWrite(segF, SEGMENT_ON);
digitalWrite(segG, SEGMENT_OFF);
break;
case 1:
digitalWrite(segA, SEGMENT_OFF);
digitalWrite(segB, SEGMENT_ON);
digitalWrite(segC, SEGMENT_ON);
digitalWrite(segD, SEGMENT_OFF);
digitalWrite(segE, SEGMENT_OFF);
digitalWrite(segF, SEGMENT_OFF);
digitalWrite(segG, SEGMENT_OFF);
break;
case 2:
digitalWrite(segA, SEGMENT_ON);
digitalWrite(segB, SEGMENT_ON);
digitalWrite(segC, SEGMENT_OFF);
digitalWrite(segD, SEGMENT_ON);
digitalWrite(segE, SEGMENT_ON);
digitalWrite(segF, SEGMENT_OFF);
digitalWrite(segG, SEGMENT_ON);
break;
case 3:
digitalWrite(segA, SEGMENT_ON);
digitalWrite(segB, SEGMENT_ON);
digitalWrite(segC, SEGMENT_ON);
digitalWrite(segD, SEGMENT_ON);
digitalWrite(segE, SEGMENT_OFF);
digitalWrite(segF, SEGMENT_OFF);
digitalWrite(segG, SEGMENT_ON);
break;
case 4:
digitalWrite(segA, SEGMENT_OFF);
digitalWrite(segB, SEGMENT_ON);
digitalWrite(segC, SEGMENT_ON);
digitalWrite(segD, SEGMENT_OFF);
digitalWrite(segE, SEGMENT_OFF);
digitalWrite(segF, SEGMENT_ON);
digitalWrite(segG, SEGMENT_ON);
break;
case 5:
digitalWrite(segA, SEGMENT_ON);
digitalWrite(segB, SEGMENT_OFF);
digitalWrite(segC, SEGMENT_ON);
digitalWrite(segD, SEGMENT_ON);
digitalWrite(segE, SEGMENT_OFF);
digitalWrite(segF, SEGMENT_ON);
digitalWrite(segG, SEGMENT_ON);
break;
case 6:
digitalWrite(segA, SEGMENT_ON);
digitalWrite(segB, SEGMENT_OFF);
digitalWrite(segC, SEGMENT_ON);
digitalWrite(segD, SEGMENT_ON);
digitalWrite(segE, SEGMENT_ON);
digitalWrite(segF, SEGMENT_ON);
digitalWrite(segG, SEGMENT_ON);
break;
case 7:
digitalWrite(segA, SEGMENT_ON);
digitalWrite(segB, SEGMENT_ON);
digitalWrite(segC, SEGMENT_ON);
digitalWrite(segD, SEGMENT_OFF);
digitalWrite(segE, SEGMENT_OFF);
digitalWrite(segF, SEGMENT_OFF);
digitalWrite(segG, SEGMENT_OFF);
break;
case 8:
digitalWrite(segA, SEGMENT_ON);
digitalWrite(segB, SEGMENT_ON);
digitalWrite(segC, SEGMENT_ON);
digitalWrite(segD, SEGMENT_ON);
digitalWrite(segE, SEGMENT_ON);
digitalWrite(segF, SEGMENT_ON);
digitalWrite(segG, SEGMENT_ON);
break;
case 9:
digitalWrite(segA, SEGMENT_ON);
digitalWrite(segB, SEGMENT_ON);
digitalWrite(segC, SEGMENT_ON);
digitalWrite(segD, SEGMENT_ON);
digitalWrite(segE, SEGMENT_OFF);
digitalWrite(segF, SEGMENT_ON);
digitalWrite(segG, SEGMENT_ON);
break;
case 10:
digitalWrite(segA, SEGMENT_OFF);
digitalWrite(segB, SEGMENT_OFF);
digitalWrite(segC, SEGMENT_OFF);
digitalWrite(segD, SEGMENT_OFF);
digitalWrite(segE, SEGMENT_OFF);
digitalWrite(segF, SEGMENT_OFF);
digitalWrite(segG, SEGMENT_OFF);
break;
}
}
void SwitchDigit(int digit) {
for (int i=0; i<4; i++) {
if (i == digit) {
digitalWrite(digit_pin[i], DIGIT_ON);
} else {
digitalWrite(digit_pin[i], DIGIT_OFF);
}
}
}
struct struct_digits IntToDigits(int n){
struct struct_digits dig;
int zeros=0;
int d;
for (int i=0; i<4; i++) {
d=n/pow(10,3-i);
zeros += d;
n = n - d*pow(10,3-i);
if (zeros!=0 || i==3) {
dig.digit[i]=d;
} else {
dig.digit[i]=10;
}
}
return dig;
}
void PrintNumber(int n, int time) {
struct struct_digits dig;
dig = IntToDigits(n);
for (int i=0; i<= time/20; i++) {
if (digitalRead(button2)==LOW) {
return;
}
for (int j=0; j<4; j++) {
SwitchDigit(j);
lightNumber(dig.digit[j]);
delay(5);
}
}
}
bool Countdown(int n, int del){
for (int q=n; q>0; q--){
PrintNumber(q,del);
if (digitalRead(button2)==LOW) {
return false;
}
}
PrintNumber(0,0);
playTone(1519,1000);
return true;
}
void reset() {
int m, zeros, d, pressed3 = 0, pressed4 = 0;
m=countdown_time;
struct struct_digits dig;
dig = IntToDigits(countdown_time);
while (digitalRead(button1)==HIGH) {
for (int j=0; j<4; j++) {
SwitchDigit(j);
lightNumber(dig.digit[j]);
delay(5);
}
if (digitalRead(button3)==LOW) {
if (pressed3 == 0 || pressed3 > 30) {
if (countdown_time > 0) {
countdown_time -= 1 ;
}
dig = IntToDigits(countdown_time);
}
pressed3 += 1;
}
else if (digitalRead(button4)==LOW) {
if (pressed4 == 0 || pressed4 > 30) {
if (countdown_time <9999) {
countdown_time += 1 ;
}
dig = IntToDigits(countdown_time);
}
pressed4 += 1;
}
if (digitalRead(button3)==HIGH) {
pressed3=0;
}
if (digitalRead(button4)==HIGH) {
pressed4=0;
}
}
}
void loop(){
reset();
while (!Countdown(countdown_time,962)) {
reset();
}
while (digitalRead(button2)==1){};
}