


Control LED Brightness with PWM via Push‑Button on Arduino Mega
Components and supplies
 |
| × | 1 | |||
 |
| × | 1 | |||
 |
| × | 11 | |||
 |
| × | 3 | |||
 |
| × | 1 | |||
 |
| × | 4 |
Apps and online services
 |
|
About this project
This project shows you how to fade LEDs (Light-emitting diodes) using Arduino. It is split into 3 sections:
- Fade Lights
- Fade Lights with Push Button
- Fade Lights with button ( improvement to delay )
At the end of this section, your project should look like this.
As you can see, the lights glow brighter, then it gradually goes dimmer again in the order of a traffic light. Now, lets start.
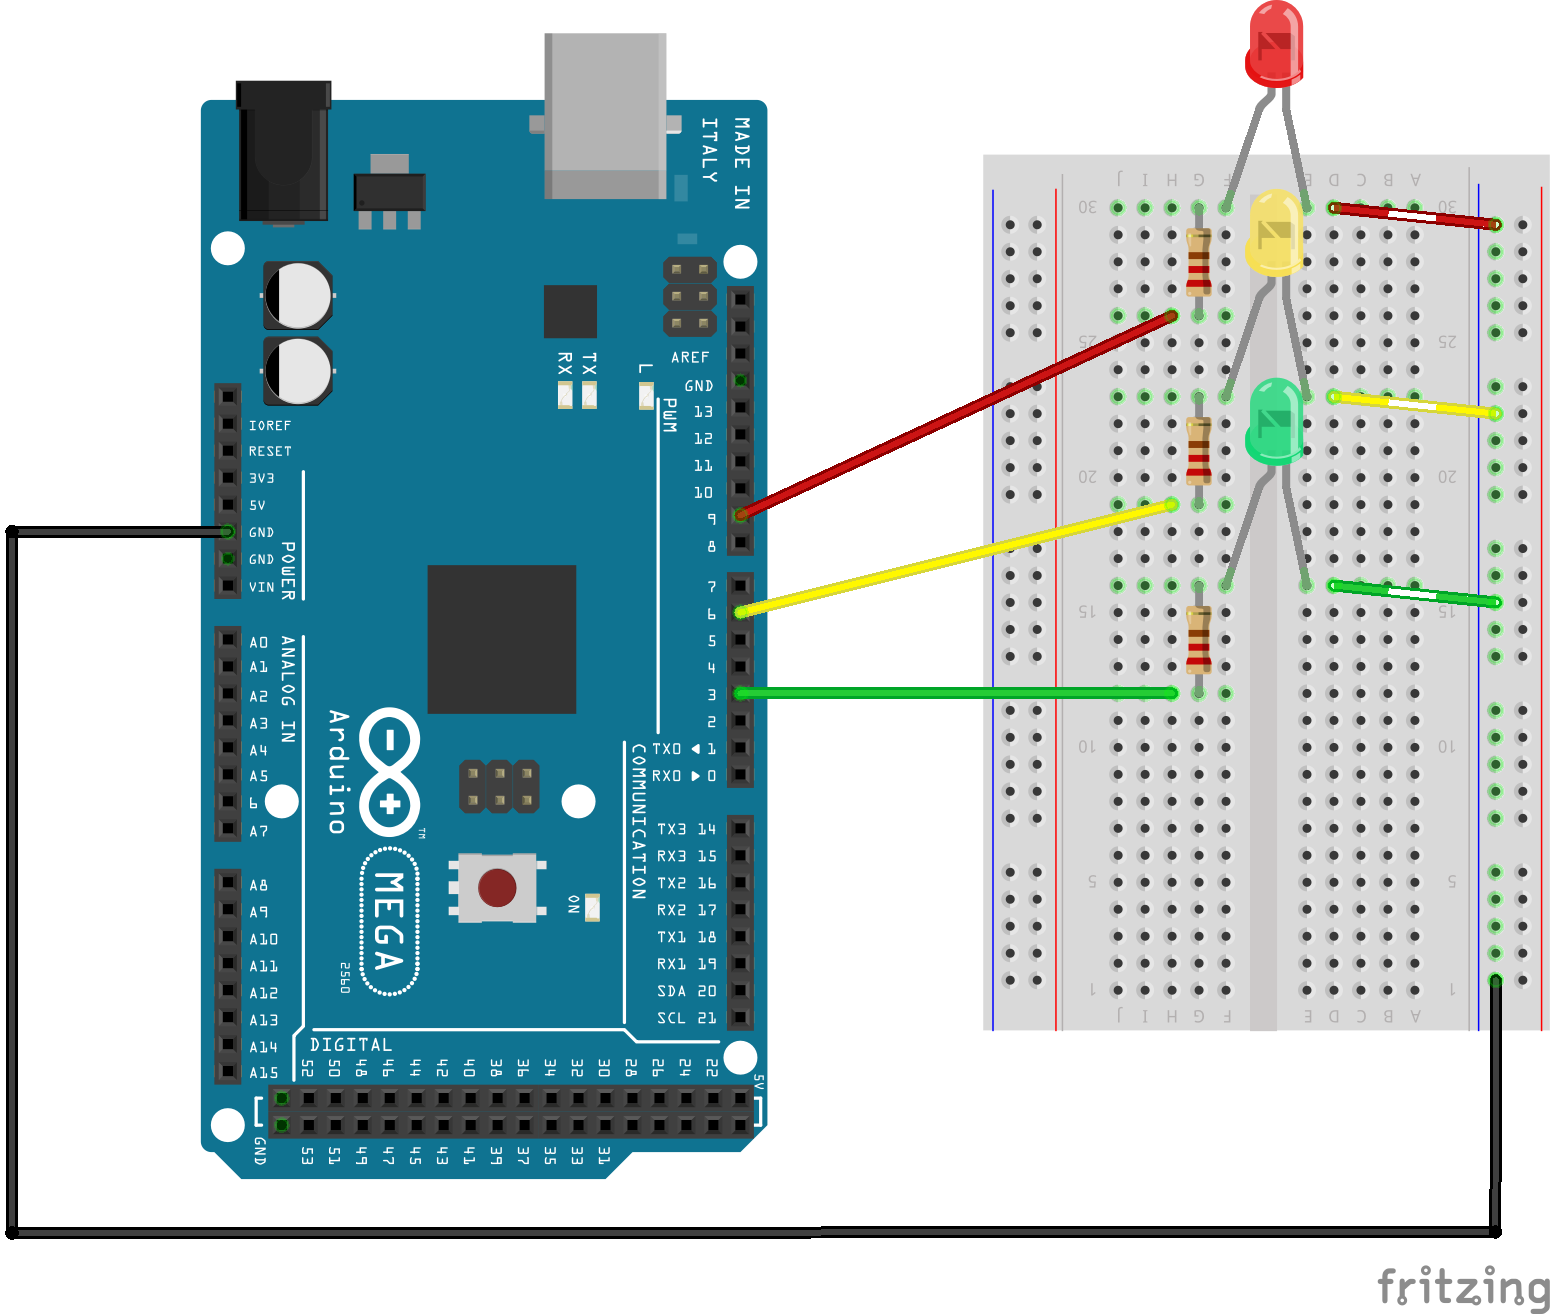
The Schematic:
As you can see, the LEDs are connected into pins 3, 6 and 9. You can connect the LEDs into which ever pin you like but you must remember to change it in the code afterwards.
The Code:To start, add this to your code. It indicates which components, in this case, which LEDs go into which pins.
int ledRed = 9;
int ledYellow = 6;
int ledGreen = 3;
Now, in the void setup() function, state whether the pins are Input or Output.
void setup() {
 pinMode(ledRed, OUTPUT);
 pinMode(ledYellow, OUTPUT);
 pinMode(ledGreen, OUTPUT);
}
Finally, add the following to the void loop() function. It tells the MCU what to do.
void loop() { // This is only fading the red light - ledRed
 //ledRed
 for (int i=0; i<=255; i++) {
   analogWrite(ledRed, i);
   delay (30);
 }
 for (int i=255; i>=0; i--) {
   analogWrite(ledRed, i);
   delay (30);
 }
}
What's happening here, is the MCU is checking if the integer 'i' is lower than 255 or not. If it is, the value of 'i' is increased by one. The process is delayed 30 milliseconds, then, it restarts. Once the value of 'i' is equal to or higher than 255, it is subtracted by one each time it has been checked. When the value has reached 0, the process is done all over again.
However, if you wanted to change the time it takes to fade, you would have to change all of the delay() functions to the amount you want. That isn't very efficient. To make things easier and quicker when wanting to change the delay() times, add this to the start of your code.
const int fade = 30;
What it does is set a default value, in this case, it's a default time. Now, change every delay() value into (fade). You can name it something else if you wish. As a result your delay() functions should look like this.
delay (fade);
And the code should look like:
int ledRed = 9;
int ledYellow = 6;
int ledGreen = 3;
const int fade = 10;
void setup() {
 pinMode(ledRed, OUTPUT);
 pinMode(ledYellow, OUTPUT);
 pinMode(ledGreen, OUTPUT);
}
void loop() {
 //ledRed
 for (int i = 0; i <= 255; i++) {
   analogWrite(ledRed, i);
   delay (fade);
 }
 for (int i = 255; i >= 0; i--) {
   analogWrite(ledRed, i);
   delay (fade);
 }
 //ledYellow
 for (int i = 0; i <= 255; i++) {
   analogWrite(ledYellow, i);
   delay (fade);
 }
 for (int i = 255; i >= 0; i--) {
   analogWrite(ledYellow, i);
   delay (fade);
 }
 //ledGreen
 for (int i = 0; i <= 255; i++) {
   analogWrite(ledGreen, i);
   delay (fade);
 }
 for (int i = 255; i >= 0; i--) {
   analogWrite(ledGreen, i);
   delay (fade);
 }
 //ledYellow
 for (int i = 0; i <= 255; i++) {
   analogWrite(ledYellow, i);
   delay (fade);
 }
 for (int i = 255; i >= 0; i--) {
   analogWrite(ledYellow, i);
   delay (fade);
 }
}
After this section, you will be able to add a button to your project.
As you can see, the LEDs only change after I press the button. Now, lets get started.
The Schematic: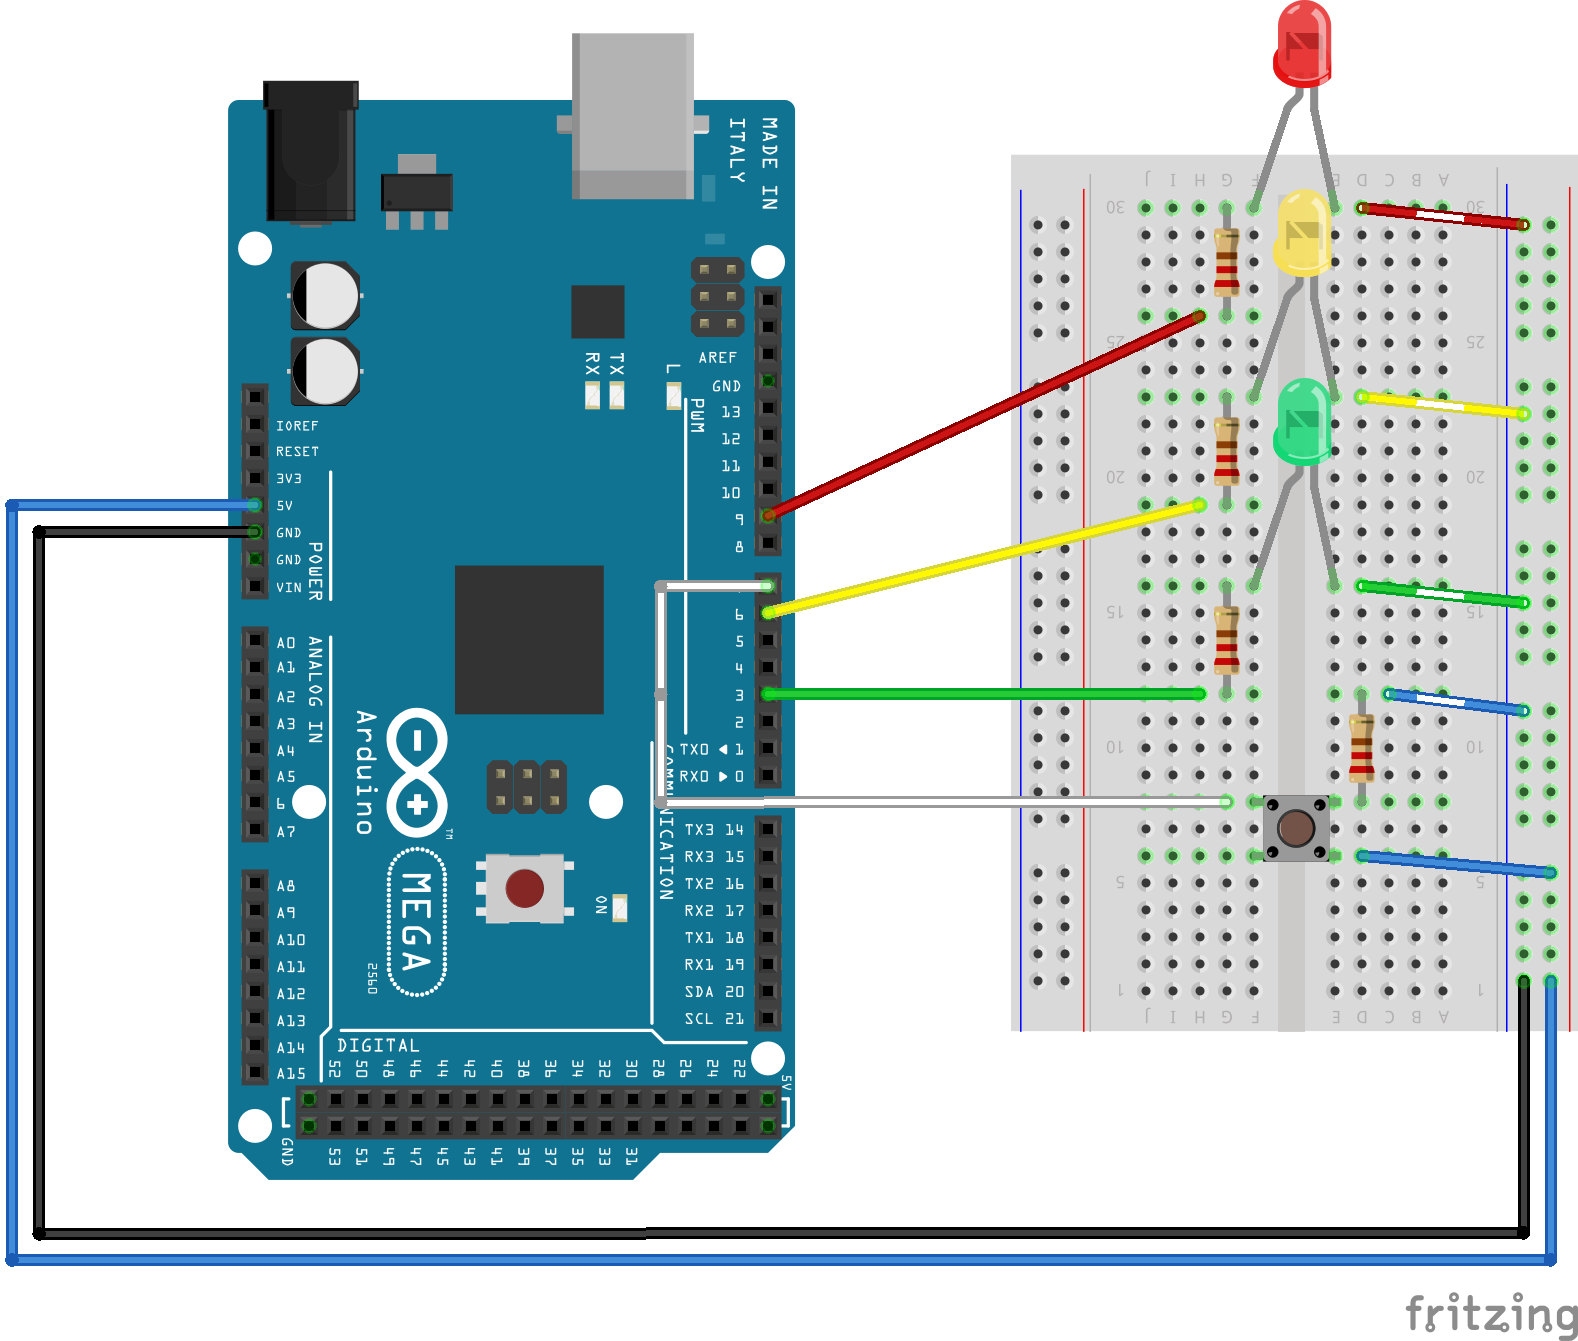
You may have noticed that all the LEDs are kept in the same place, but there is an addition of a push button.
The Code:Firstly, we need to tell the MCU what pin the button has been connected to. To do that, add this to the start of your code.
int button = 7;
Now, in the void setup() function, add this to tell the MCU whether the button is Input of Output.
pinMode(button, INPUT);
Also add this to the function.
 digitalWrite(ledRed, LOW);
 digitalWrite(ledYellow, LOW);
 digitalWrite(ledGreen, HIGH);
It sets a starting light. This time, the starting LED is green but you can change it to red or yellow if you want.
Now, there is a big change in the void loop() function. Everything that was in the loop() has now been replaced by a function named fadeLights() (the name can be if different if you want it to be). In the loop() it should now be:
void loop() {
 if(digitalRead(button) == HIGH) {
   delay(15);                         // software debounce
   if(digitalRead(button) == HIGH){   // if the button is pressed, the function
     fadeLights();                    // fadeLights is called
   }
 } else {
   digitalWrite(ledRed, LOW);         // if the button isn't pressed, the green LED is
   digitalWrite(ledYellow, LOW);      // going to be on and the others are not.
   digitalWrite(ledGreen, HIGH);
  }
}
As mentioned before, the void fadeLights() function is going to have what was in the loop.
void fadeLights(){
 for (int i = 255; i >= 0; i--) { //starts on green so needs to make green fade
   analogWrite(ledGreen, i);
   delay (fade);
 }
 //ledYellow
 for (int i = 0; i <= 255; i++) {
   analogWrite(ledYellow, i);
   delay (fade);
 }
 for (int i = 255; i >= 0; i--) {
   analogWrite(ledYellow, i);
   delay (fade);
 }
 //ledRed
 for (int i = 0; i <= 255; i++) {
   analogWrite(ledRed, i);
   delay (fade);
 }
 for (int i = 255; i >= 0; i--) {
   analogWrite(ledRed, i);
   delay (fade);
 }
 //ledYellow
 for (int i = 0; i <= 255; i++) {
   analogWrite(ledYellow, i);
   delay (fade);
 }
 for (int i = 255; i >= 0; i--) {
   analogWrite(ledYellow, i);
   delay (fade);
 }
 //ledGreen
 for (int i = 0; i <= 255; i++) {
   analogWrite(ledGreen, i);
   delay (fade);
 }
 }
If your project works like the one in the video, you've done it correctly. If the sequence isn't right, check:
- if your code has been written correctly
- if you have connected the LEDs into the correct pins
And if your lights don't turn on, check
- if you have connected the LEDs into the correct pins
- if you have connected the wires properly
- if you have written the formula correctly
As you might have noticed, when I release the button, the lights keep on fading. After this section, you will be able to edit your code so that the LEDs only fade when the button is being pushed.
As you can see here, when I let go of the button, the LEDs go back to the default order of :
Red - OFF
Yellow - OFF
Green - ON
The Schematic:The schematic is kept the same, since we're not adding anymore components or wanting it to do anything different - w're still wanting the LEDs to fade.

We are not adding anymore things so there are no need to add anything to the start. However, since we are changing the delay, we need to delete this.
const int fade = 10; // no need for this anymore
There is nothing to change for the setup() function. In the void loop(), we need to add an else statement.
void loop() {
 if(digitalRead(button) == HIGH) {
   delay(15);
   if(digitalRead(button) == HIGH){
     fadeLights();
   }
 } else { // add it here
   digitalWrite(ledRed, LOW);
   digitalWrite(ledYellow, LOW);
   digitalWrite(ledGreen, HIGH);
  }
}
This means when the button is not pressed, the program exits fadeLights() and goes to the else statement which has the default LED order. Different to earlier - earlier, the button was not checked once fadeLights() has been called.
Now, change all the delay() functions to this:
for( int y = 0; y < 1000; y++){
     // if button is released
     if (digitalRead(button) == LOW) {
     return;
     }
In each loop, the microprocessor will check the button. If it's released, the return command will be called to stop fadeLights(). From my estimation, when each for loop is executed, it probably takes about 10 microseconds meaning we need to do it a lot of times to make it the speed we want.
Hope you enjoyed this tutorial and good luck with your project.
Code
- Fade Lights
- Fade Lights with Push Button
- Fade Lights with Push Button (improvement to delay)
Fade LightsArduino
int ledRed = 9;
int ledYellow = 6;
int ledGreen = 3;
const int fade = 10;

void setup() {
  pinMode(ledRed, OUTPUT);
  pinMode(ledYellow, OUTPUT);
  pinMode(ledGreen, OUTPUT);

}

void loop() {
  //ledRed
  for (int i = 0; i <= 255; i++) {
    analogWrite(ledRed, i);
    delay (fade);
  }
  for (int i = 255; i >= 0; i--) {
    analogWrite(ledRed, i);
    delay (fade);
  }

  //ledYellow
  for (int i = 0; i <= 255; i++) {
    analogWrite(ledYellow, i);
    delay (fade);
  }
  for (int i = 255; i >= 0; i--) {
    analogWrite(ledYellow, i);
    delay (fade);
  }

  //ledGreen
  for (int i = 0; i <= 255; i++) {
    analogWrite(ledGreen, i);
    delay (fade);
  }
  for (int i = 255; i >= 0; i--) {
    analogWrite(ledGreen, i);
    delay (fade);
  }

  //ledYellow
  for (int i = 0; i <= 255; i++) {
    analogWrite(ledYellow, i);
    delay (fade);
  }
  for (int i = 255; i >= 0; i--) {
    analogWrite(ledYellow, i);
    delay (fade);
  }

}
Fade Lights with Push ButtonArduino
int ledRed = 9;
int ledYellow = 6;
int ledGreen = 3;
int button = 7;
const int fade = 10;


void setup() {
  pinMode(ledRed, OUTPUT);
  pinMode(ledYellow, OUTPUT);
  pinMode(ledGreen, OUTPUT);
  pinMode(button, INPUT);
  digitalWrite(ledRed, LOW);
  digitalWrite(ledYellow, LOW);
  digitalWrite(ledGreen, HIGH);
}


void loop() {

  if (digitalRead(button) == HIGH) {
    delay(15);
    if (digitalRead(button) == HIGH) {
      fadeLights();
    }
  } else {
    digitalWrite(ledRed, LOW);
    digitalWrite(ledYellow, LOW);
    digitalWrite(ledGreen, HIGH);
  }
}

void fadeLights() {

  for (int i = 255; i >= 0; i--) {
    analogWrite(ledGreen, i);
    delay (fade);
  }
  //ledYellow
  for (int i = 0; i <= 255; i++) {
    analogWrite(ledYellow, i);
    delay (fade);
  }
  for (int i = 255; i >= 0; i--) {
    analogWrite(ledYellow, i);
    delay (fade);
  }

  //ledRed
  for (int i = 0; i <= 255; i++) {
    analogWrite(ledRed, i);
    delay (fade);
  }
  for (int i = 255; i >= 0; i--) {
    analogWrite(ledRed, i);
    delay (fade);
  }

  //ledYellow
  for (int i = 0; i <= 255; i++) {
    analogWrite(ledYellow, i);
    delay (fade);
  }
  for (int i = 255; i >= 0; i--) {
    analogWrite(ledYellow, i);
    delay (fade);
  }


  //ledGreen
  for (int i = 0; i <= 255; i++) {
    analogWrite(ledGreen, i);
    delay (fade);
  }

}
Fade Lights with Push Button (improvement to delay)Arduino
int ledRed = 9;
int ledYellow = 6;
int ledGreen = 3;
int button = 7;
const int fade = 10;

void setup() {
  pinMode(ledRed, OUTPUT);
  pinMode(ledYellow, OUTPUT);
  pinMode(ledGreen, OUTPUT);
  pinMode(button, INPUT);
  digitalWrite(ledRed, LOW);
  digitalWrite(ledYellow, LOW);
  digitalWrite(ledGreen, HIGH);

}

void loop() {
  if(digitalRead(button) == HIGH) {
    delay(15);
    if(digitalRead(button) == HIGH){
      fadeLights();
    }
  } else {
    digitalWrite(ledRed, LOW);
    digitalWrite(ledYellow, LOW);
    digitalWrite(ledGreen, HIGH);
   }
}


void fadeLights(){

    for( int i=255; i>=0; i--) {
    analogWrite(ledGreen, i);
    for( int y = 0; y < 1000; y++){
      // if button is released
      if (digitalRead(button) == LOW) {
      return;
      }
    }
  }

   //ledYellow
  for( int i=0; i<=255; i++) {
    analogWrite(ledYellow, i);
    for( int y = 0; y < 400; y++){
      // if button is released
      if (digitalRead(button) == LOW) {
      return;
      }
    }
  }

  for( int i=255; i>=0; i--) {
    analogWrite(ledYellow, i);
    for( int y = 0; y < 400; y++){
      // if button is released
      if (digitalRead(button) == LOW) {
      return;
      }
    }
  }

  //ledRed
  for( int i=0; i<=255; i++) {
    analogWrite(ledRed, i);
    for( int y = 0; y < 1000; y++){
      // if button is released
      if (digitalRead(button) == LOW) {
      return;
      }
    }
  }
  for( int i=255; i>=0; i--) {
    analogWrite(ledRed, i);
    for( int y = 0; y < 1000; y++){
      // if button is released
      if (digitalRead(button) == LOW) {
      return;
      }
    }
  }

  //ledYellow
  for( int i=0; i<=255; i++) {
    analogWrite(ledYellow, i);
    for( int y = 0; y < 400; y++){
      // if button is released
      if (digitalRead(button) == LOW) {
      return;
      }
    }
  }

  for( int i=255; i>=0; i--) {
    analogWrite(ledYellow, i);
    for( int y = 0; y < 400; y++){
      // if button is released
      if (digitalRead(button) == LOW) {
      return;
      }
    }
  }

  //ledGreen
  for( int i=0; i<=255; i++) {
    analogWrite(ledGreen, i);
    for( int y = 0; y < 1000; y++){
      // if button is released
      if (digitalRead(button) == LOW) {
      return;
      }
    }
  }
}
Schematics

Manufacturing process
- Build a Real-Time Gyroscope Game with Arduino Nano & MPU-6050 Sensor
- Build an Ultrasonic Levitation Device with Arduino – Step‑by‑Step Guide
- Unopad: Seamless Arduino MIDI Controller for Ableton Live
- Build a Simple Obstacle Sensor with Arduino – Easy IR LED & Photodiode Tutorial
- Smart Parking Counter: Real‑Time Vehicle Tracking with Arduino, Processing, and PHP
- Build a 4-Wheel Arduino Robot Controlled via Dabble App
- Master Modbus on Arduino: Step‑by‑Step Guide
- Build a Morse Code Transmitter with Arduino – Easy DIY Guide
- Configure NeoPixels with Vixen Lights & Arduino: A Step‑by‑Step Guide
- Integrating a Wii Nunchuk with Arduino: A Step‑by‑Step Guide