


Integrating the MAX30100 Pulse Sensor with Arduino: A Step-by-Step Guide
Components and supplies
| × | 1 | ||||
 |
| × | 1 |
Apps and online services
 |
| |||
|
About this project
Wiring the Breakout to your Arduino
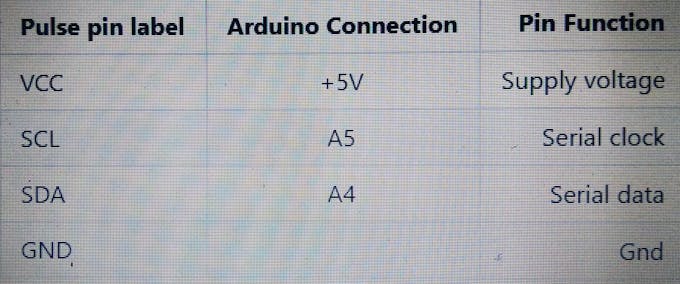
Connection with the Arduino board is as follows:
Processing is a data visualization software, in existence since 2001, used by artists and scientists alike. It’s an open source coding framework based on Java. If you are familiar with the Arduino environment, the Processing IDE is similar and you won’t have much of a learning curve to climb!
The following are the steps to run the code:
1. Download Processing for your operating systemDownload the Processing IDE latest version from the link
- MAC
- Linux 32-bit
- Linux 64-bit
- Windows 32-bit
- Windows 64-bit
Once downloaded, unzip the archive and install the app as per your OS.
2. Download the Processing code for Pulse Oximeter visualizationa. Download the necessary files & directories or clone to your desktop from GitHub.
b. Unzipping the archive should make a folder by name Pulse that contains the visualization code.
c. Locate the Processing sketchbook directory on your computer. This should have been created automatically when you installed processing. Depending on your operating system, the path will be as follows:
- On Windows: C:/My Documents/Processing/
- On MAC: /Users/your_user_name/Documents/Processing/
- On Linux: /Home/your_user_name/sketchbook/
Note: This directory appears as "Processing" on Windows/Mac, and goes by the name "Sketchbook" on Linux. Create a subdirectory by name "libraries" if one doesn't exist already.
d. From the above mentioned "Pulse" directory Copy/Move the contents of the Pulse-master/Processing/ces_view_oximeter folder to the Processing sketchbook directory which is also mentioned above (Locate the Processing sketchbook)
e. Finally, copy the G4P directories from Pulse-master\Processing\libraries and paste them into the libraries directory of your Processing sketchbook.
f. You are all set now to get your first PPG wave form and SpO2 reading visualized from the Pulse!
3. Open Processing & launch the ces_view_oximetera. If Processing IDE was open, close it and reopen to refresh the libraries and sketches. The repositories are not refreshed if the IDE was open while the Sketches and Libraries were being updated.
b. Double-click any of the .pde files in the ces_view_oximeter directory to open all of the pulse oximeter code in the Processing IDE.
c. If everything done so far was good, clicking the "run" button on the top left corner of the IDE, should run the code! If it does not, make sure you installed your libraries correctly.
d. Once the GUI is running, select the port connect with pulse oximeter shield from the "SELECT PORT" dropdown as shown in the figure below

e. Once the port selection is appropriate the START button gets enabled. Click "START" to initiate visualization
f. You should see the PPG ( RED and IR) waves generated with the values obtained from the Pulse as shown below.

Code
Arduino library
https://github.com/Protocentral/PulseSchematics
Schematics and design files
https://github.com/Protocentral/PulseManufacturing process
- Connecting an HC‑SR04 Ultrasonic Sensor to a Raspberry Pi – A Practical Guide
- Integrating the Acconeer A111 Pulsed Radar with a Raspberry Pi: A Practical Guide
- K30 CO2 Sensor: Real‑Time Indoor Air Quality Monitoring
- Integrating a DFRobot Capacitive Fingerprint Sensor with Arduino or ESP8266
- Step-by-Step Guide: Connecting YL-39/YL-69 Soil Moisture Sensor to Arduino UNO
- Compact Arduino Radar System with HC‑SR04 Ultrasonic Sensor & 1.8" Display
- Capacitive Touch LED Switch with Arduino UNO – Easy DIY Project
- Build an Ultrasonic Range Detector Using Arduino UNO and SR04 Sensor
- Build an IR Sensor Project with Arduino UNO – Simple Guide
- Integrating a Wii Nunchuk with Arduino: A Step‑by‑Step Guide