Arduino Uno-Based Human Detection Robot: Step‑by‑Step Sensor Integration
Components and supplies
Arduino UNO
×
1
Development Board, Motor Control Shield
×
1
SG90 Micro-servo motor
×
1
DC Motor, 12 V
×
4
Ultrasonic Sensor - HC-SR04 (Generic)
×
1
DHT11 Temperature & Humidity Sensor (4 pins)
×
1
9V battery (generic)
×
1
Jumper wires (generic)
×
1
PIR Sensor, 7 m
×
1
Necessary tools and machines
Multitool, Screwdriver
Soldering iron (generic)
Solder Flux, Soldering
Solder Wire, Lead Free
Hot glue gun (generic)
Apps and online services
Arduino IDE
Microsoft Windows 10
Control Center Android App
About this project
This System design a mobile rescue robotic Vehicle system based on Arduino to help the people on time which are trapped in natural calamity like disaster, earthquake, floods etc.It gives timely & accurately reflect dynamic situation of human in disaster region like in the underground regions to control room, so that rescue team of Experts & doctors can be sending to the victim’s location for primary treatment and can be sent to the safe place or hospital. The entire process takes place within a few seconds as the system is controlled by a Arduino unit. PIR sensors are passive infrared sensors which detects movement of people with the help of changes in the infrared (heat) levels emitted by surrounding objects. The human body emits thermal radiation at a wavelength of about 10 microns. It is received and manipulated by the PIR sensor to detect human beings. It operates at 5V DC. The motion of the human being can be detected by checking for a sudden change in the surrounding IR patterns. Obstacle sensor detects the obstacle and sends the analog signals to the Arduino. Arduino is programmed to guide the robot automatically depending on the obstacle detected and to send the human being information to remote control place through the Bluetooth Technology. The Data is received in the Base Station(Control Center). Analyzing the data the Rescue team can take necessary steps to rescue the trapped human Beings.
Code
Human Detection.ino
Human Detection.inoArduino
#include <NewPing.h> //
#include <AFMotor.h> // You can download the code library below
#include <Servo.h> //

// Ultranic Pin Configuration

#define TRIG_PIN A0
#define ECHO_PIN A1

#define MAX_DISTANCE 400
#define MAX_SPEED 255
#define MAX_SPEED_OFFSET -8

#define COLL_DIST 20
#define TURN_DIST COLL_DIST+10
#define ACT_TIME 250
 int calibrationTime = 30;

//the time when the sensor outputs a low impulse
long unsigned int lowIn;

//the amount of milliseconds the sensor has to be low
//before we assume all motion has stopped
long unsigned int pause = 5000;

boolean lockLow = true;
boolean takeLowTime;

int pirPin = A3;    //the digital pin connected to the PIR sensor's output
int ledPin = A2;
NewPing sonar(TRIG_PIN, ECHO_PIN, MAX_DISTANCE);

AF_DCMotor motorR(1, MOTOR12_1KHZ); // Set motor #1, 1kHz PWM
AF_DCMotor motorL(4, MOTOR12_1KHZ); // Set motor #2, 1kHz PWM

Servo myservo;  // Set servo object to control a servo
String motorSet = "";

int curDist = 0, pos, speedSet = 0;
//int pos;
//int speedSet = 0;

void setup() {
  Serial.begin(9600);
  pinMode(pirPin, INPUT);
  pinMode(ledPin, OUTPUT);
  digitalWrite(pirPin, LOW);

  //give the sensor some time to calibrate
  Serial.print("calibrating sensor ");
    for(int i = 0; i < calibrationTime; i++){
      Serial.print(".");
      delay(1000);
      }
    Serial.println(" done");
    Serial.println("SENSOR ACTIVE");
    delay(50);
  myservo.attach(9);  // Set to attach the servo on pin 9
  myservo.write(90);  // Write 90 to face servo forward
  delay(2000);

  motorSet = "FORWARD";
  moveForward();

}

void loop() {

  checkPath();
  if(digitalRead(pirPin) == HIGH){
       digitalWrite(ledPin, HIGH);   //the led visualizes the sensors output pin state
       if(lockLow){
         //makes sure we wait for a transition to LOW before any further output is made:
         lockLow = false;
         Serial.println("---");
         Serial.print("motion detected at ");
         Serial.print(millis()/1000);
         Serial.println(" sec");
         delay(50);
         }
         takeLowTime = true;
       }

     if(digitalRead(pirPin) == LOW){
       digitalWrite(ledPin, LOW);  //the led visualizes the sensors output pin state

       if(takeLowTime){
        lowIn = millis();          //save the time of the transition from high to LOW
        takeLowTime = false;       //make sure this is only done at the start of a LOW phase
        }
       //if the sensor is low for more than the given pause,
       //we assume that no more motion is going to happen
       if(!lockLow && millis() - lowIn > pause){
           //makes sure this block of code is only executed again after
           //a new motion sequence has been detected
           lockLow = true;
           Serial.print("motion ended at ");      //output
           Serial.print((millis() - pause)/1000);
           Serial.println(" sec");
           delay(50);
           }
       }

}

void checkPath() {

  int curLeft = 0; int curRight = 0; int curFront = 0;
  curDist = 0;

  checkForward();
  myservo.write(135);
  delay(100);
  for (pos = 135; pos >= 45; pos -= 45) {
    myservo.write(pos);
    delay(170);
    curDist = readPing();

    if (curDist < COLL_DIST) { checkCourse(); break; }
    if (curDist < TURN_DIST) { changePath(); }

  }
}

int readPing() {
  int cm = 0;
  while (cm < 2) {int uS = sonar.ping(); cm = uS/US_ROUNDTRIP_CM;}
  return cm;
}

void checkForward() {
  if (motorSet=="FORWARD") { motorR.run(FORWARD); motorL.run(FORWARD); }
}
void changePath() {

  if (pos < 90) { veerLeft(); }
  if (pos > 90) { veerRight(); }

}

void veerRight() {
  motorR.run(BACKWARD);  motorL.run(FORWARD);
  delay(ACT_TIME);
  motorR.run(FORWARD);   motorL.run(FORWARD);
  motorSet = "FORWARD";
}

void veerLeft() {
  motorL.run(BACKWARD);  motorR.run(FORWARD);
  delay(ACT_TIME);
  motorL.run(FORWARD);   motorR.run(FORWARD);
  motorSet = "FORWARD";
}

void checkCourse() {
  moveBackward();
  delay(ACT_TIME);
  moveStop();
  setCourse();
}

void setCourse() {
  if (pos < 90) { turnRight(); }
  if (pos > 90) { turnLeft(); }
}

void moveBackward() {
  motorSet = "BACKWARD";

  motorR.run(BACKWARD); // Turn right motor backward
  motorL.run(BACKWARD);  // Turn left motor backward

  for (speedSet = 0; speedSet < MAX_SPEED; speedSet +=2)
  {
    motorL.setSpeed(speedSet);
    motorR.setSpeed(speedSet+MAX_SPEED_OFFSET);
    delay(5);
  }
}

void moveForward() {
  motorSet = "FORWARD";
  checkForward();
  for (speedSet = 0; speedSet < MAX_SPEED; speedSet +=2)  {
    motorL.setSpeed(speedSet);
    motorR.setSpeed(speedSet+MAX_SPEED_OFFSET);
    delay(4);
  }
}

void moveStop() { motorR.run(RELEASE); motorL.run(RELEASE); }

void turnRight() {
  motorSet = "RIGHT";
  motorR.run(FORWARD);      // Turn right motor forward
  motorL.run(BACKWARD);     // Turn left motor backward
  delay(ACT_TIME);
  motorSet = "FORWARD";
  checkForward();
}

void turnLeft() {
  motorSet = "LEFT";
  motorR.run(BACKWARD);     // Turn right motor backward
  motorL.run(FORWARD);      // Turn left motor forward
  delay(ACT_TIME);
  motorSet = "FORWARD";
  checkForward();
}
Schematics
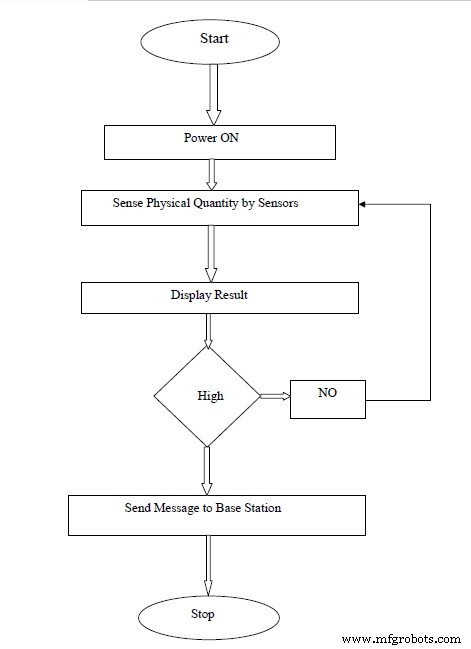
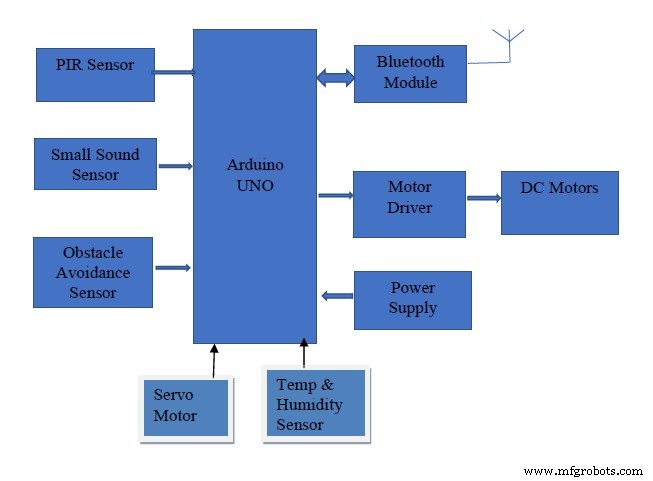
This Block Diagram shows the interfacing between the Sensors and the Arduino BoardThis Circuit Diagram shows the connection configurations between various Sensors with the Arduino Uno BoardThis Flow Chart shows how the system Works


 This Circuit Diagram shows the connection configurations between various Sensors with the Arduino Uno Board
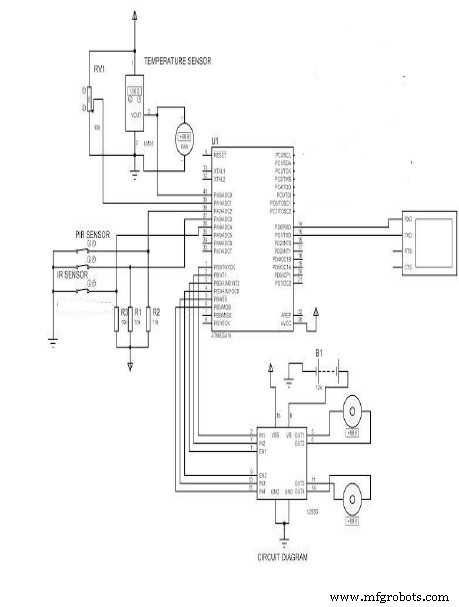 This Flow Chart shows how the system Works