


Arduino Uno WiFi Web Server: Toggle an LED via Browser
Components and supplies
 |
| × | 1 |
About this project
WebServerBlinkIn this demonstrative example it is shown how to realize a simple web server, using an Arduino UNO WiFi, to command the switch ON/OFF of a LED.
1. Hardware
- Arduino UNO WiFi
- Led
- 220Ω Resistor
- wire
- Breadboard
2.Circuit
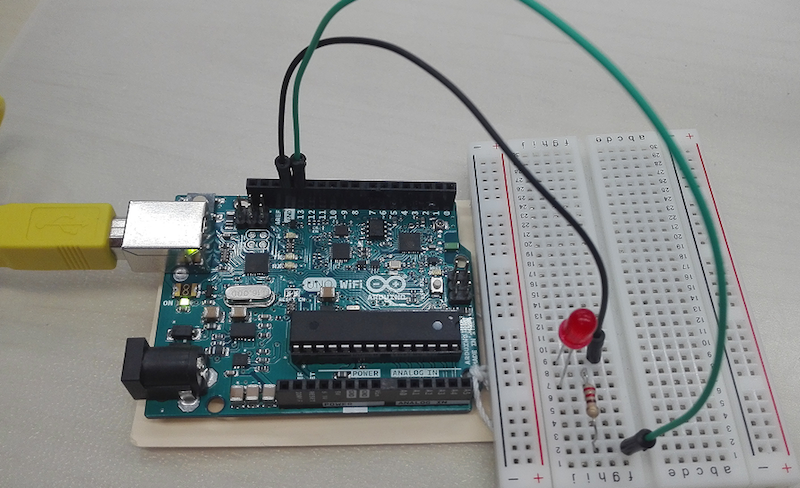
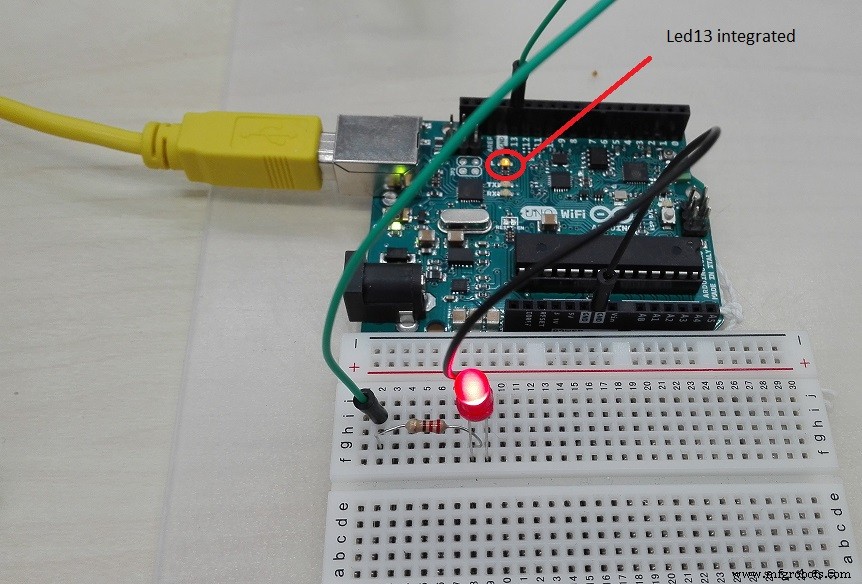
You can use the integrated L LED on pin 13 or use another one, in this case connect the LED anode (usually the longer pin) in series to a 220Ω resistor and connect it to the board pin 13.
After connect the cathode to GND, as shown in the picture.
Now plug in the board to PC and upload the sketches below.
3.Code
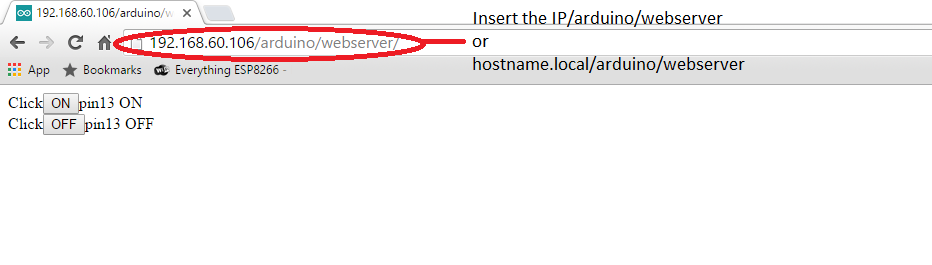
Upload the below code and access via browser to http://<IP>/arduino/webserver/ orhttp://<hostname>.local/arduino/webserver/ to read the sensors values.
#include <Wire.h>
#include <ArduinoWiFi.h>
/*
on your borwser, you type http://<IP>/arduino/webserver/ or http://<hostname>.local/arduino/webserver/
http://www.arduino.org/learning/tutorials/webserverblink
*/
void setup() {
    pinMode(13,OUTPUT);
    Wifi.begin();
    Wifi.println("WebServer Server is up");
}
void loop() {
    while(Wifi.available()){
      process(Wifi);
    }
  delay(50);
}
void process(WifiData client) {
  // read the command
  String command = client.readStringUntil('/');
  // is "digital" command?
  if (command == "webserver") {
    WebServer(client);
  }
  if (command == "digital") {
    digitalCommand(client);
  }
}
void WebServer(WifiData client) {
          client.println("HTTP/1.1 200 OK");
          client.println("Content-Type: text/html");
          client.println();
          client.println("<html>");
          client.println("<head> </head>");
          client.print("<body>");
          client.print("Click<input type=button onClick=\"var w=window.open('/arduino/digital/13/1','_parent');w.close();\"value='ON'>pin13 ON<br>");
          client.print("Click<input type=button onClick=\"var w=window.open('/arduino/digital/13/0','_parent');w.close();\"value='OFF'>pin13 OFF<br>");
          client.print("</body>");
          client.println("</html>");
          client.print(DELIMITER); // very important to end the communication !!!
}
void digitalCommand(WifiData client) {
  int pin, value;
  // Read pin number
  pin = client.parseInt();
  // If the next character is a '/' it means we have an URL
  // with a value like: "/digital/13/1"
  if (client.read() == '/') {
    value = client.parseInt();
    digitalWrite(pin, value);
  }
  // Send feedback to client
  client.println("Status: 200 OK\n");
  client.print(F("Pin D"));
  client.print(pin);
  client.print(F(" set to "));
  client.print(value);
  client.print(EOL);    //char terminator
}
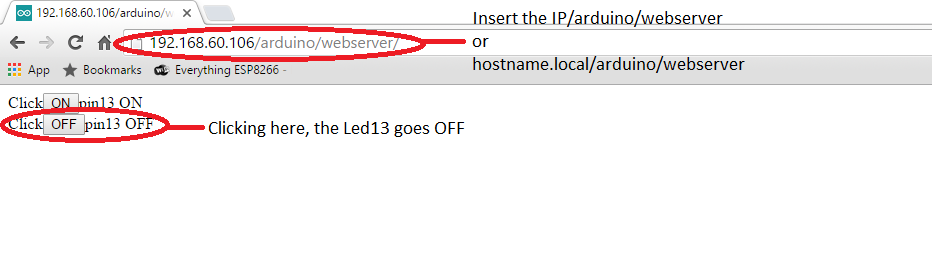
- Open a browser and type: http://<IP>/arduino/webserver/ or http://<hostname>.local/arduino/webserver/
- Click ON to go ON the LED 13:
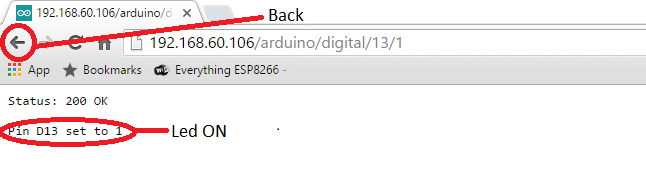
- Click OFF to go OFF the LED 13:
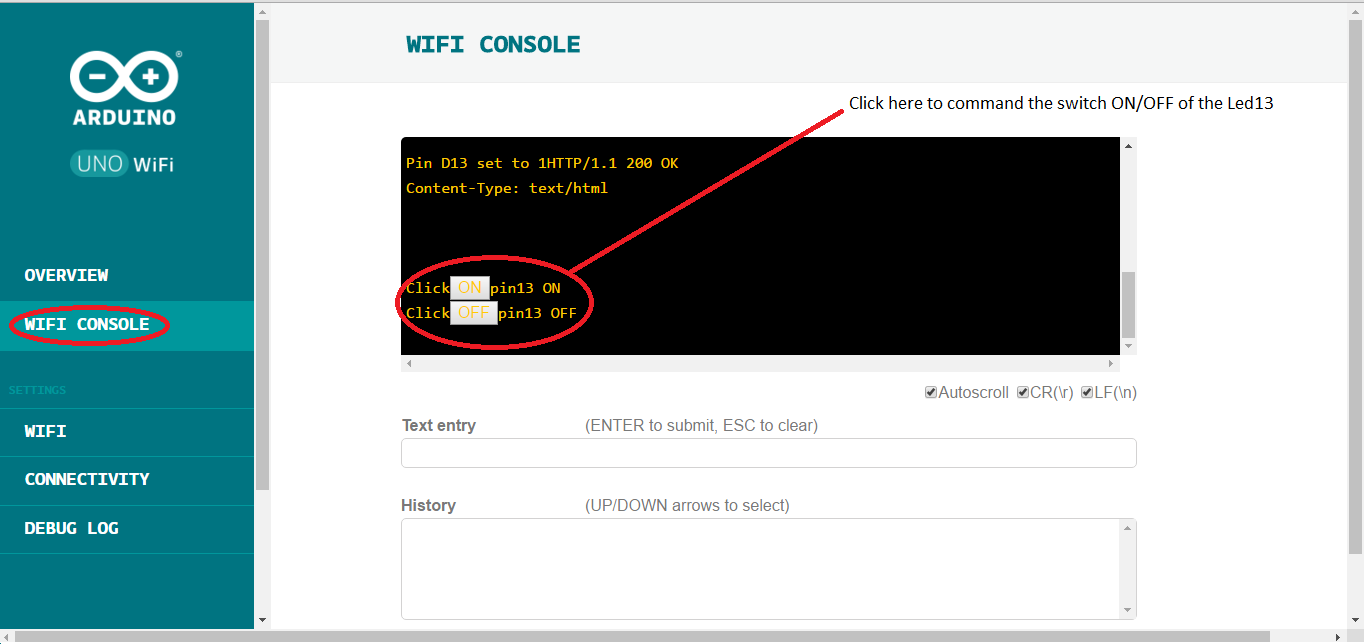
- You can command the LED also from the web panel, as shown in the below image:
Note:
Type the IP address or the hostname.local/ of your board on the browser so you will access to the Arduino UNO WiFi web panel.
Code
- WebServer
WebServerC/C++
#include <Wire.h>
#include <ArduinoWiFi.h>
/*
on your borwser, you type http://<IP>/arduino/webserver/ or http://<hostname>.local/arduino/webserver/

http://www.arduino.org/learning/tutorials/webserverblink

*/
void setup() {
    pinMode(13,OUTPUT);
    Wifi.begin();
    Wifi.println("WebServer Server is up");
}
void loop() {

    while(Wifi.available()){
      process(Wifi);
    }
  delay(50);
}

void process(WifiData client) {
  // read the command
  String command = client.readStringUntil('/');

  // is "digital" command?
  if (command == "webserver") {
    WebServer(client);
  }

  if (command == "digital") {
    digitalCommand(client);
  }
}

void WebServer(WifiData client) {

          client.println("HTTP/1.1 200 OK");
          client.println("Content-Type: text/html");
          client.println();
          client.println("<html>");

          client.println("<head> </head>");
          client.print("<body>");

          client.print("Click<input type=button onClick=\"var w=window.open('/arduino/digital/13/1','_parent');w.close();\"value='ON'>pin13 ON<br>");
          client.print("Click<input type=button onClick=\"var w=window.open('/arduino/digital/13/0','_parent');w.close();\"value='OFF'>pin13 OFF<br>");

          client.print("</body>");
          client.println("</html>");
          client.print(DELIMITER); // very important to end the communication !!!

}

void digitalCommand(WifiData client) {
  int pin, value;

  // Read pin number
  pin = client.parseInt();

  // If the next character is a '/' it means we have an URL
  // with a value like: "/digital/13/1"
  if (client.read() == '/') {
    value = client.parseInt();
    digitalWrite(pin, value);
  }

  // Send feedback to client
  client.println("Status: 200 OK\n");
  client.print(F("Pin D"));
  client.print(pin);
  client.print(F(" set to "));
  client.print(value);
  client.print(EOL);    //char terminator

}
Schematics
Manufacturing process
- Build a Wi‑Fi‑Controlled Raspberry Pi Robot with Python – Step‑by‑Step Guide
- Build a Squid Game‑Themed Interactive Doll with Arduino UNO – DIY Project
- Arduino Uno-Based Human Detection Robot: Step‑by‑Step Sensor Integration
- Build a Basic Calculator with Arduino UNO – Easy Project
- Build a Portable Persistence of Vision Display with Arduino UNO and ATtiny85
- Build a Compact FM Radio with Arduino Nano and RDA8057M
- WiFi‑Enabled Smart Door Lock with Arduino & ESP8266 – Unlock via Phone
- Arduino Laser Tripwire Project: Build a Simple Intrusion Detector
- Seamlessly Control Arduino Uno via ESP8266 WiFi Module and Blynk App
- Arduino UNO Guitar Pedal: DIY, Open‑Source, Beginner‑Friendly