


Effortless Arduino Stopwatch: Build a Button-Activated Chronometer
Components and supplies
 |
| × | 1 | |||
| × | 1 | ||||
 |
| × | 1 |
Apps and online services
 |
|
About this project
I'm on my way of doing a fun project and I needed an Arduino chronometer that works whenever I push a button. It in't a complex thing but I figured that this piece of code would be handy for other people´s projects.
I probably saved you 1h of your life coding.
EEPROM:
Memory of Arduino which doesn't loose its info when you disconnect power or reset the board.(info). I'm using #include <EEPROM.h>
library which basically does everything and it's already installed by default.

Things are happening inside our Arduino but we want it to stop doing whatever it was going on and attend to our ISR function when some pin is pulled HIGH for example. No extra library needed here:
- Defines and includes:
#include <EEPROM.h>
#define interruptPin 2
#define eeAddress 0 //ADDRESS FOR THE ARDUINO´S EEPROM (internal non volatile memory)
 float starttime = 0;  //Variables to do the math
 float endtime=0;
 float resulttime=0, oldresulttime=0;
Nothing new here we include the EEPROM library, we decide where is the button going to be attached in (pin2).
Then I decided I'm going to use the address 0 of our EEPROM memory to store our time (float=4bytes). Arduino UNO has 1024 bytes (chip ATmega328) but I choose the address 0 because I was trying to be organized for once in my life.
- setup()
void setup() {
Serial.begin(9600);
while (!Serial) {
; // wait for serial port to connect. Needed for native USB port only
}
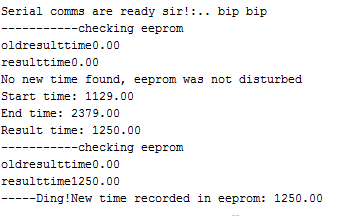
Serial.println("Serial comms are ready sir!:.. bip bip");
attachInterrupt(digitalPinToInterrupt(interruptPin), refreshTime, CHANGE);
}
Usual stuff, we initiate serial comms between the Arduino and our PC (9600 bauds):
attachInterrupt(digitalPinToInterrupt(interruptPin), refreshTime, CHANGE);
Attachinterrupt activates the function when the logic level of interruptPin changes so: (____________-HERE------------------_HERE____________).
This way it triggers two times at the beginning of our pressing and at the end. If nothing happens, our interruptPin value remains LOW because of our pulldown resistor "forcing " it to remain low.
- loop()
void loop() {
}
Nothing. Put your stuff in there!
- Other functions:
void refreshTime(){
 if(digitalRead(interruptPin)){
 starttime=millis();
 Serial.print("Start time: ");   Serial.println(starttime);
 }else
 if(digitalRead(interruptPin)==LOW){
 endtime=millis();
 resulttime=endtime-starttime;
 Serial.print("End time: ");  Serial.println(endtime);
 Serial.print("Result time: ");  Serial.println(resulttime);
WhatsNewEeprom();//stores eeprom
 }
This is the function that is going to be executed when the interruption in pin (interruptPin) happens.
The interruption is triggered every time the status in the interruptPin changes (HIGH to LOW or LOW to HIGH), those if(...) are for detecting if its the HIGH->LOW or LOW->high change.
Stores time recorded by the internal clock of Arduino millis() and does the difference for having our result time ready. At the end, it stores new info in eeprom:
void WhatsNewEeprom(){
 Serial.println("-----------checking eeprom");
 EEPROM.get( eeAddress, oldresulttime );
 Serial.print("oldresulttime");Serial.println(oldresulttime);
 Serial.print("resulttime");Serial.println(resulttime);
 if(resulttime!=oldresulttime){
 EEPROM.put( eeAddress, resulttime);
 Serial.print("-----Ding!New time recorded in eeprom: ");Serial.println(resulttime);
 }else{
   Serial.println("No new time found, eeprom was not disturbed");
 }
This one checks if the time value stored in eeprom is the same we have in our variable "resulttime", if so we didn't change it, so do nothing.
Extra! Debouncing our button: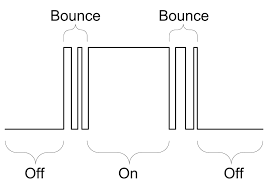
We humans are extremely slow for the Arduino processing time, one press of the button seems quick for us but for Arduino is really slow, that makes the signal "bounce" like switching highlowhighlowhighlow a couple of times before settling the true status.
If we want to (I didn't), we could fix it via hardware or software:
- Debounce via software
- Debounce via hardware, use a capacitor!!! :D

I'm just going to add a 220nF in paralel (from sensepin to GND)
The capacitor "eats" fast variation in voltage,.
Code
- arduino chronometer
arduino chronometerArduino
uses eeprom and interruptions, easily hackable//coded by Javier Muñoz 23/10/2017
//questions and singed telegrams to javimusama@gmail.com
#include <EEPROM.h>
#define interruptPin 2
#define eeAddress 0 //ADDRESS FOR THE ARDUINO´S EEPROM (internal non volatile memory)
float starttime = 0; //Variables to do the math
float endtime=0;
float resulttime=0, oldresulttime=0;
void setup() {
Serial.begin(9600);
while (!Serial) {
; // wait for serial port to connect. Needed for native USB port only
}
Serial.println("Serial comms are ready sir!:.. bip bip");
attachInterrupt(digitalPinToInterrupt(interruptPin), refreshTime, CHANGE);//activates the function when the logic level of interruptPin changes so: (__-HERE------------------_HERE____)this way it stores the time our finger was pressing the button
}
void loop() {
//your stuff here
//(eeprom stored) last time measured in miliseconds "float resulttime"
}
void refreshTime(){
if(digitalRead(interruptPin)){
starttime=millis();
Serial.print("Start time: "); Serial.println(starttime);
}else
if(digitalRead(interruptPin)==LOW){
endtime=millis();
resulttime=endtime-starttime;
Serial.print("End time: "); Serial.println(endtime);
Serial.print("Result time: "); Serial.println(resulttime);
WhatsNewEeprom();
}
}
void WhatsNewEeprom(){
Serial.println("-----------checking eeprom");
EEPROM.get( eeAddress, oldresulttime );
Serial.print("oldresulttime");Serial.println(oldresulttime);
Serial.print("resulttime");Serial.println(resulttime);
if(resulttime!=oldresulttime){
EEPROM.put( eeAddress, resulttime);
Serial.print("-----Ding!New time recorded in eeprom: ");Serial.println(resulttime);
}else{
Serial.println("No new time found, eeprom was not disturbed");
}
}
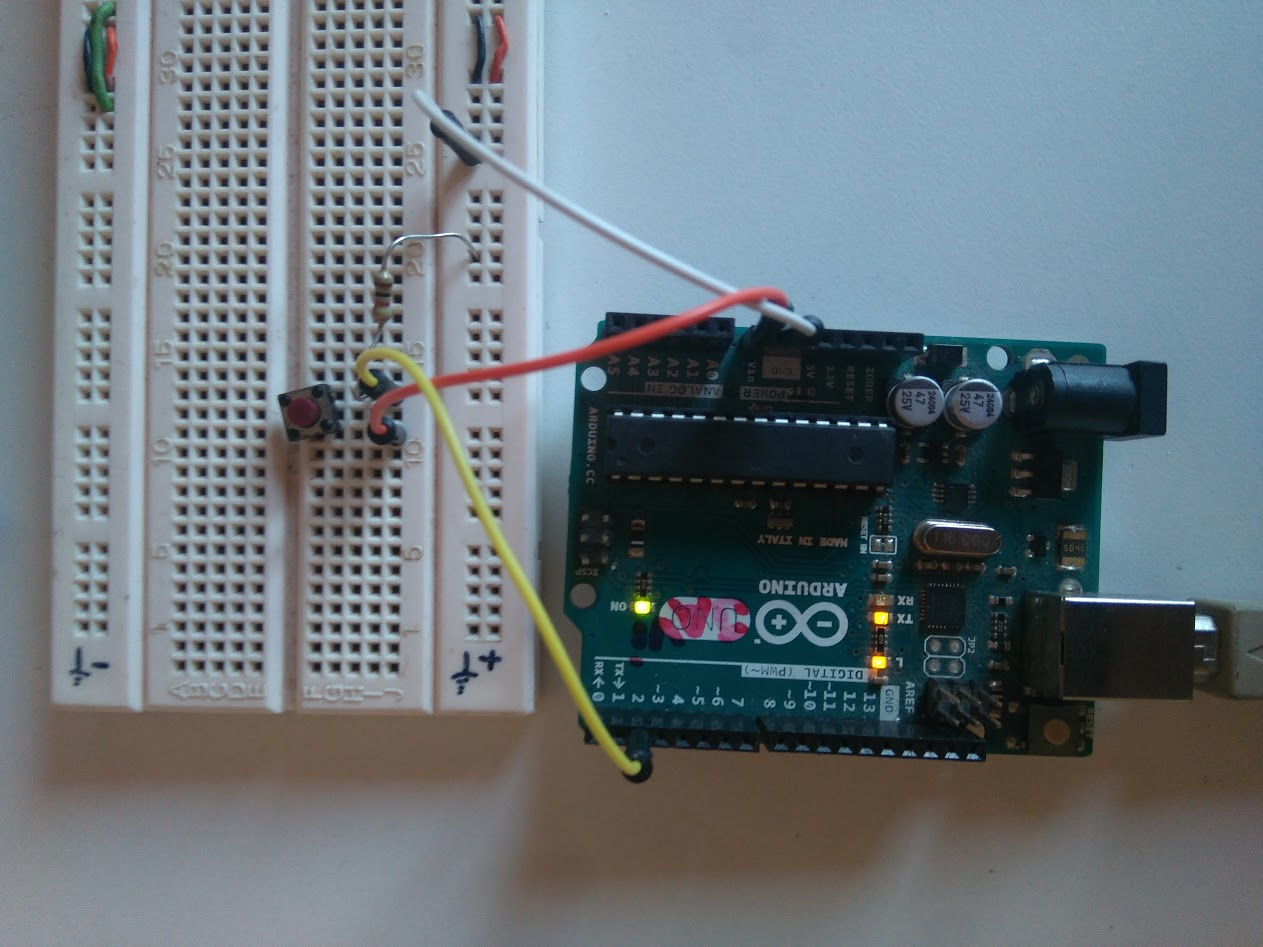
Schematics
simple conexion of a button with a pulldown resistorchronometer_APM32Y9FoM.fzz
Manufacturing process
- DIY Arduino Word Clock – Build a Sleek Real-Time Display
- Build a Simple Obstacle Sensor with Arduino – Easy IR LED & Photodiode Tutorial
- Build a Basic Calculator with Arduino UNO – Easy Project
- Build a Precise DIY Measuring Wheel with Arduino Nano & Rotary Encoder
- Build a Smart Arduino‑Controlled Robotic Arm: Easy DIY Tutorial
- Arduino Handwashing Timer: Simple DIY Tool to Fight COVID‑19
- DIY 1 MHz Square Wave Generator with Arduino Nano – Easy PWM Circuit
- Build a Reliable Alarm Clock with DS1302 RTC and Arduino UNO
- Integrating Arduino Uno with ESP8266: A Step‑by‑Step Guide
- Build a Sensitive Metal Detector with Arduino Nano – DIY Guide