


Catalex Serial MP3 Player for Arduino UNO – Easy Setup & Control
Components and supplies
 |
| × | 1 | |||
| × | 1 | ||||
| × | 1 |
Apps and online services
 |
|
About this project
- First, download the libraries as usual:
#include <SoftwareSerial.h>
- Now we choose which Arduino pins are going to be attached to the mp3 player and initialize the serial protocol.
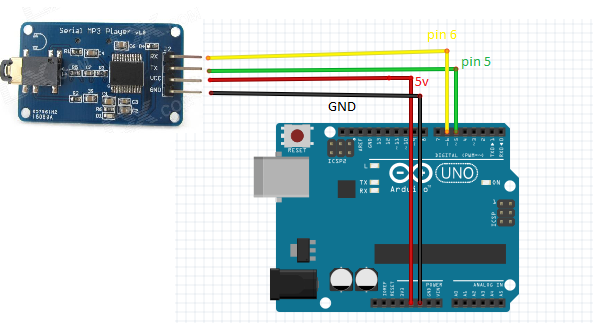
#define ARDUINO_RX 5//should connect to TX of the Serial MP3 Player module
#define ARDUINO_TX 6//connect to RX of the module
SoftwareSerial mySerial(ARDUINO_RX, ARDUINO_TX);//init the serial protocol, tell to myserial wich pins are TX and RX
- Here I just translated into
#definethe stuff from the datasheet:
////////////////////////////////////////////////////////////////////////////////////
//all the commands needed in the datasheet(http://geekmatic.in.ua/pdf/Catalex_MP3_board.pdf)
static int8_t Send_buf[8] = {0} ;//The MP3 player undestands orders in a 8 int string
                                //0X7E FF 06 command 00 00 00 EF;(if command =01 next song order)
#define NEXT_SONG 0X01
#define PREV_SONG 0X02
#define CMD_PLAY_W_INDEX 0X03 //DATA IS REQUIRED (number of song)
#define VOLUME_UP_ONE 0X04
#define VOLUME_DOWN_ONE 0X05
#define CMD_SET_VOLUME 0X06//DATA IS REQUIRED (number of volume from 0 up to 30(0x1E))
#define SET_DAC 0X17
#define CMD_PLAY_WITHVOLUME 0X22 //data is needed  0x7E 06 22 00 xx yy EF;(xx volume)(yy number of song)
#define CMD_SEL_DEV 0X09 //SELECT STORAGE DEVICE, DATA IS REQUIRED
               #define DEV_TF 0X02 //HELLO,IM THE DATA REQUIRED
#define SLEEP_MODE_START 0X0A
#define SLEEP_MODE_WAKEUP 0X0B
#define CMD_RESET 0X0C//CHIP RESET
#define CMD_PLAY 0X0D //RESUME PLAYBACK
#define CMD_PAUSE 0X0E //PLAYBACK IS PAUSED
#define CMD_PLAY_WITHFOLDER 0X0F//DATA IS NEEDED, 0x7E 06 0F 00 01 02 EF;(play the song with the directory \01\002xxxxxx.mp3
#define STOP_PLAY 0X16
#define PLAY_FOLDER 0X17// data is needed 0x7E 06 17 00 01 XX EF;(play the 01 folder)(value xx we dont care)
#define SET_CYCLEPLAY 0X19//data is needed 00 start; 01 close
#define SET_DAC 0X17//data is needed 00 start DAC OUTPUT;01 DAC no output
////////////////////////////////////////////////////////////////////////////////////
- The MP3 chip undestands orders made of int array[8] with this format
0x7E FF aa bb 00 xx yy EF
Where:
- the first and the last int are fixed with 0x7E and 0xEF values
aais the version number, just put 0x06;bbis the actual control command listed in the previous pointxxis first b int of datayyis second int of data
And this is the actual function which builds the array. We just need to choose one of the #defined commands and put the value of the data.
void sendCommand(int8_t command, int16_t dat)
{
delay(20);
Send_buf[0] = 0x7e; //starting byte
Send_buf[1] = 0xff; //version
Send_buf[2] = 0x06; //the number of bytes of the command without starting byte and ending byte
Send_buf[3] = command; //
Send_buf[4] = 0x00;//0x00 = no feedback, 0x01 = feedback
Send_buf[5] = (int8_t)(dat >> 8);//datah
Send_buf[6] = (int8_t)(dat); //datal
Send_buf[7] = 0xef; //ending byte
for(uint8_t i=0; i<8; i++)//
{
  mySerial.write(Send_buf[i]) ;
}
}
Into the setup function we need to select the proper device for TF and give it time to settle (asynchronous process magic):
void setup()
{
mySerial.begin(9600);//Start our Serial coms for our serial monitor!
delay(500);//Wait chip initialization is complete
  sendCommand(CMD_SEL_DEV, DEV_TF);//select the TF card
delay(200);//wait for 200ms
}
In the loop, I did a simple play the song labeled as 001:
void loop()
{
sendCommand(CMD_PLAY_WITHVOLUME, 0X0F01);//play the first song with volume 15 class
delay(1000000);//the programm will send the play option each 100 seconds to the catalex chip
}
As they say in the datasheet with a really bad English:
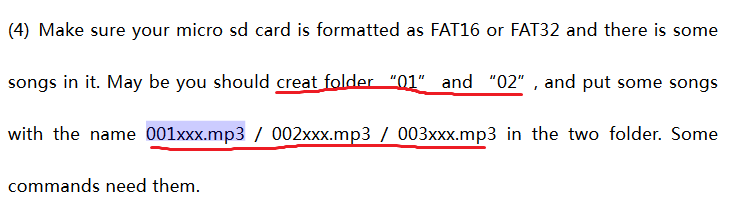
The Mp3 chip reads the .mp3 or .wav alphabetically indexed, so if we create folders with the names 01, 02. And songs with the name 001xxxxx.mp3, 002xxxx.mp3. We can be sure about the song/folder we are using.
Here you have a free sound library.
HAPPY HACKING!
EXTRA:
same code but using hardware serial (i had to for my STM32 board)
Code
- TEST the device
TEST the deviceArduino
initialice and play one song with volume 30//code rearranged by Javier Muñoz 10/11/2016 ask me at javimusama@hotmail.com
#include <SoftwareSerial.h>
#define ARDUINO_RX 5//should connect to TX of the Serial MP3 Player module
#define ARDUINO_TX 6//connect to RX of the module
SoftwareSerial mySerial(ARDUINO_RX, ARDUINO_TX);//init the serial protocol, tell to myserial wich pins are TX and RX
////////////////////////////////////////////////////////////////////////////////////
//all the commands needed in the datasheet(http://geekmatic.in.ua/pdf/Catalex_MP3_board.pdf)
static int8_t Send_buf[8] = {0} ;//The MP3 player undestands orders in a 8 int string
//0X7E FF 06 command 00 00 00 EF;(if command =01 next song order)
#define NEXT_SONG 0X01
#define PREV_SONG 0X02
#define CMD_PLAY_W_INDEX 0X03 //DATA IS REQUIRED (number of song)
#define VOLUME_UP_ONE 0X04
#define VOLUME_DOWN_ONE 0X05
#define CMD_SET_VOLUME 0X06//DATA IS REQUIRED (number of volume from 0 up to 30(0x1E))
#define SET_DAC 0X17
#define CMD_PLAY_WITHVOLUME 0X22 //data is needed 0x7E 06 22 00 xx yy EF;(xx volume)(yy number of song)
#define CMD_SEL_DEV 0X09 //SELECT STORAGE DEVICE, DATA IS REQUIRED
#define DEV_TF 0X02 //HELLO,IM THE DATA REQUIRED
#define SLEEP_MODE_START 0X0A
#define SLEEP_MODE_WAKEUP 0X0B
#define CMD_RESET 0X0C//CHIP RESET
#define CMD_PLAY 0X0D //RESUME PLAYBACK
#define CMD_PAUSE 0X0E //PLAYBACK IS PAUSED
#define CMD_PLAY_WITHFOLDER 0X0F//DATA IS NEEDED, 0x7E 06 0F 00 01 02 EF;(play the song with the directory \01\002xxxxxx.mp3
#define STOP_PLAY 0X16
#define PLAY_FOLDER 0X17// data is needed 0x7E 06 17 00 01 XX EF;(play the 01 folder)(value xx we dont care)
#define SET_CYCLEPLAY 0X19//data is needed 00 start; 01 close
#define SET_DAC 0X17//data is needed 00 start DAC OUTPUT;01 DAC no output
////////////////////////////////////////////////////////////////////////////////////
void setup()
{
Serial.begin(9600);//Start our Serial coms for serial monitor in our pc
mySerial.begin(9600);//Start our Serial coms for THE MP3
delay(500);//Wait chip initialization is complete
sendCommand(CMD_SEL_DEV, DEV_TF);//select the TF card
delay(200);//wait for 200ms
}
void loop()
{
sendCommand(CMD_PLAY_WITHVOLUME, 0X0F01);//play the first song with volume 15 class
delay(1000000);//the programm will send the play option each 100 seconds to the catalex chip
}
void sendCommand(int8_t command, int16_t dat)
{
delay(20);
Send_buf[0] = 0x7e; //starting byte
Send_buf[1] = 0xff; //version
Send_buf[2] = 0x06; //the number of bytes of the command without starting byte and ending byte
Send_buf[3] = command; //
Send_buf[4] = 0x00;//0x00 = no feedback, 0x01 = feedback
Send_buf[5] = (int8_t)(dat >> 8);//datah
Send_buf[6] = (int8_t)(dat); //datal
Send_buf[7] = 0xef; //ending byte
for(uint8_t i=0; i<8; i++)//
{
mySerial.write(Send_buf[i]) ;//send bit to serial mp3
Serial.print(Send_buf[i],HEX);//send bit to serial monitor in pc
}
Serial.println();
}
Schematics
On the datasheet we can see the power supply can vary 3,2 up to 5vwith a consuption of 200mA
Manufacturing process
- Player Piano: Merging Acoustic Tradition with Automated Precision
- Amplify the Maintenance Crisis Message: Download Blues & Reggae Versions of the ‘Maintenance Crisis Song’
- Build a Squid Game‑Themed Interactive Doll with Arduino UNO – DIY Project
- How to Play Audio with Arduino UNO and DFPlayer Mini – Step‑by‑Step Guide
- Arduino Web‑Controlled MP3 Player: Easy Audio Playback via Browser
- Arduino UNO & WiFi Shield: Real-Time Temperature Display on the Web via Serial
- Create an Interactive Arduino MP3 Player with an Ultrasonic Distance Sensor
- Master Serial Communication with Arduino – Step-by-Step Video Guide
- DIY Arduino Touch‑Screen MP3 Player & Alarm Clock – Step‑by‑Step Guide
- Arduino Serial Communication: Mastering UART Basics and Troubleshooting