


Secure Your PC with an RFID‑Enabled Door Lock – Arduino Relay Project
Components and supplies
 |
| × | 1 | |||
| × | 1 | ||||
| × | 1 | ||||
 |
| × | 12 |
About this project
This project is about adding an optional security feature besides the password on your personal computer.
I've decided to use an RFID + relay door lock code that I have found on Youtube out of curiosity and because I thought, "Hey! They both have the same modules, maybe the code can be the same, too!"
Basically, you need to get the UID's from the RFID cards or tags/keys first using the example codes from the MFRC522 Library (I used DumpInfo) [https://github.com/miguelbalboa/rfid]. Then, add the UID on the code to allow it to activate the relay and turn on the desktop PC.
The relay is enabled by the RFID card and works with delay counts that are just enough for common push button switches. (I used 500ms delay to turn the PC on). And made the RFID key to initiate the shutdown process (Like when you press the power button for about 5 secs and it will turn off.)
Just ask questions if you don't get my explanation. This is my first time here! LOL.
******************************************************************************
Social Media Links To Follow (I mean, if you want to):
Facebook - https://fb.me/HeathenHacks
Twitter - https://twitter.com/HeathenHacks
Instagram - https://instagr.am/HeathenHacks
******************************************************************************

Code
- RFID-Relay
RFID-RelayArduino
This is really an RFID Door Lock code. I just used it to power my PC on./*
* ----------------------------------------------------------------------------
* This sketch uses the MFRC522 library ; see https://github.com/miguelbalboa/rfid
* for further details and other examples.
*
* NOTE: The library file MFRC522.h has a lot of useful info. Please read it.
*
* This sketch show a simple locking mechanism using the RC522 RFID module.
* ----------------------------------------------------------------------------
* Typical pin layout used:
* -----------------------------------------------------------------------------------------
* MFRC522 Arduino Arduino Arduino Arduino Arduino
* Reader/PCD Uno Mega Nano v3 Leonardo/Micro Pro Micro
* Signal Pin Pin Pin Pin Pin Pin
* -----------------------------------------------------------------------------------------
* RST/Reset RST 9 5 D9 RESET/ICSP-5 RST
* SPI SS SDA(SS) 10 53 D10 10 10
* SPI MOSI MOSI 11 / ICSP-4 51 D11 ICSP-4 16
* SPI MISO MISO 12 / ICSP-1 50 D12 ICSP-1 14
* SPI SCK SCK 13 / ICSP-3 52 D13 ICSP-3 15
*
*/
#include <SPI.h>
#include <MFRC522.h>
#define RST_PIN 9 // Configurable, see typical pin layout above
#define SS_PIN 10 // Configurable, see typical pin layout above
MFRC522 mfrc522(SS_PIN, RST_PIN); // Create MFRC522 instance.
String read_rfid; // Add how many you need and don't forget to include the UID.
String ok_rfid_1="e199312d"; // This is for my main RFID Card. aka. The one I will be using to turn on my PC. Can also be used to shut it down if you want to.
String ok_rfid_2="fbecb673"; // This is for the RFID Keyfob. aka. Shutdown Keyfob. Not advisable tho. Just shutdown your PC normally.
int lock = 7; // For the Card.
int lock2 = 7; // For the Keyfob.
/*
* Initialize.
*/
void setup() {
Serial.begin(9600); // Initialize serial communications with the PC
while (!Serial); // Do nothing if no serial port is opened (added for Arduinos based on ATMEGA32U4)
SPI.begin(); // Init SPI bus
mfrc522.PCD_Init(); // Init MFRC522 card
//Choose which lock below:
pinMode(lock, OUTPUT);
pinMode(lock2, OUTPUT);
}
/*
* Helper routine to dump a byte array as hex values to Serial.
*/
void dump_byte_array(byte *buffer, byte bufferSize) {
read_rfid="";
for (byte i = 0; i < bufferSize; i++) {
read_rfid=read_rfid + String(buffer[i], HEX);
}
}
void open_lock() {
//Use this routine when working with Relays and Solenoids etc.
digitalWrite(lock,HIGH);
delay(500);
digitalWrite(lock,LOW);
}
void close_lock2() { // You can also just use the card to shutdown your PC. This is just for those moments that you really need to shut it down quickly.
//Use this routine when working with Relays and Solenoids etc.
digitalWrite(lock2, HIGH);
delay(5000);
digitalWrite(lock2,LOW);
}
void loop() {
// Look for new cards
if ( ! mfrc522.PICC_IsNewCardPresent())
return;
// Select one of the cards
if ( ! mfrc522.PICC_ReadCardSerial())
return;
dump_byte_array(mfrc522.uid.uidByte, mfrc522.uid.size);
Serial.println(read_rfid);
if (read_rfid==ok_rfid_1) {
//ok, open the door.
open_lock();
}
Serial.println(read_rfid);
if (read_rfid==ok_rfid_2) {
//ok, open the door.
close_lock2();
}
//Add below as many "keys" as you want
//if (read_rfid==ok_rfid_2) {
//also ok, open the door
// open_lock();
//}
// else not needed. Anything else is not ok, and will not open the door...
}
MFRC522 Library
https://github.com/miguelbalboa/rfidSchematics
I made this using Photoshop. The wires have various colors to avoid confusion.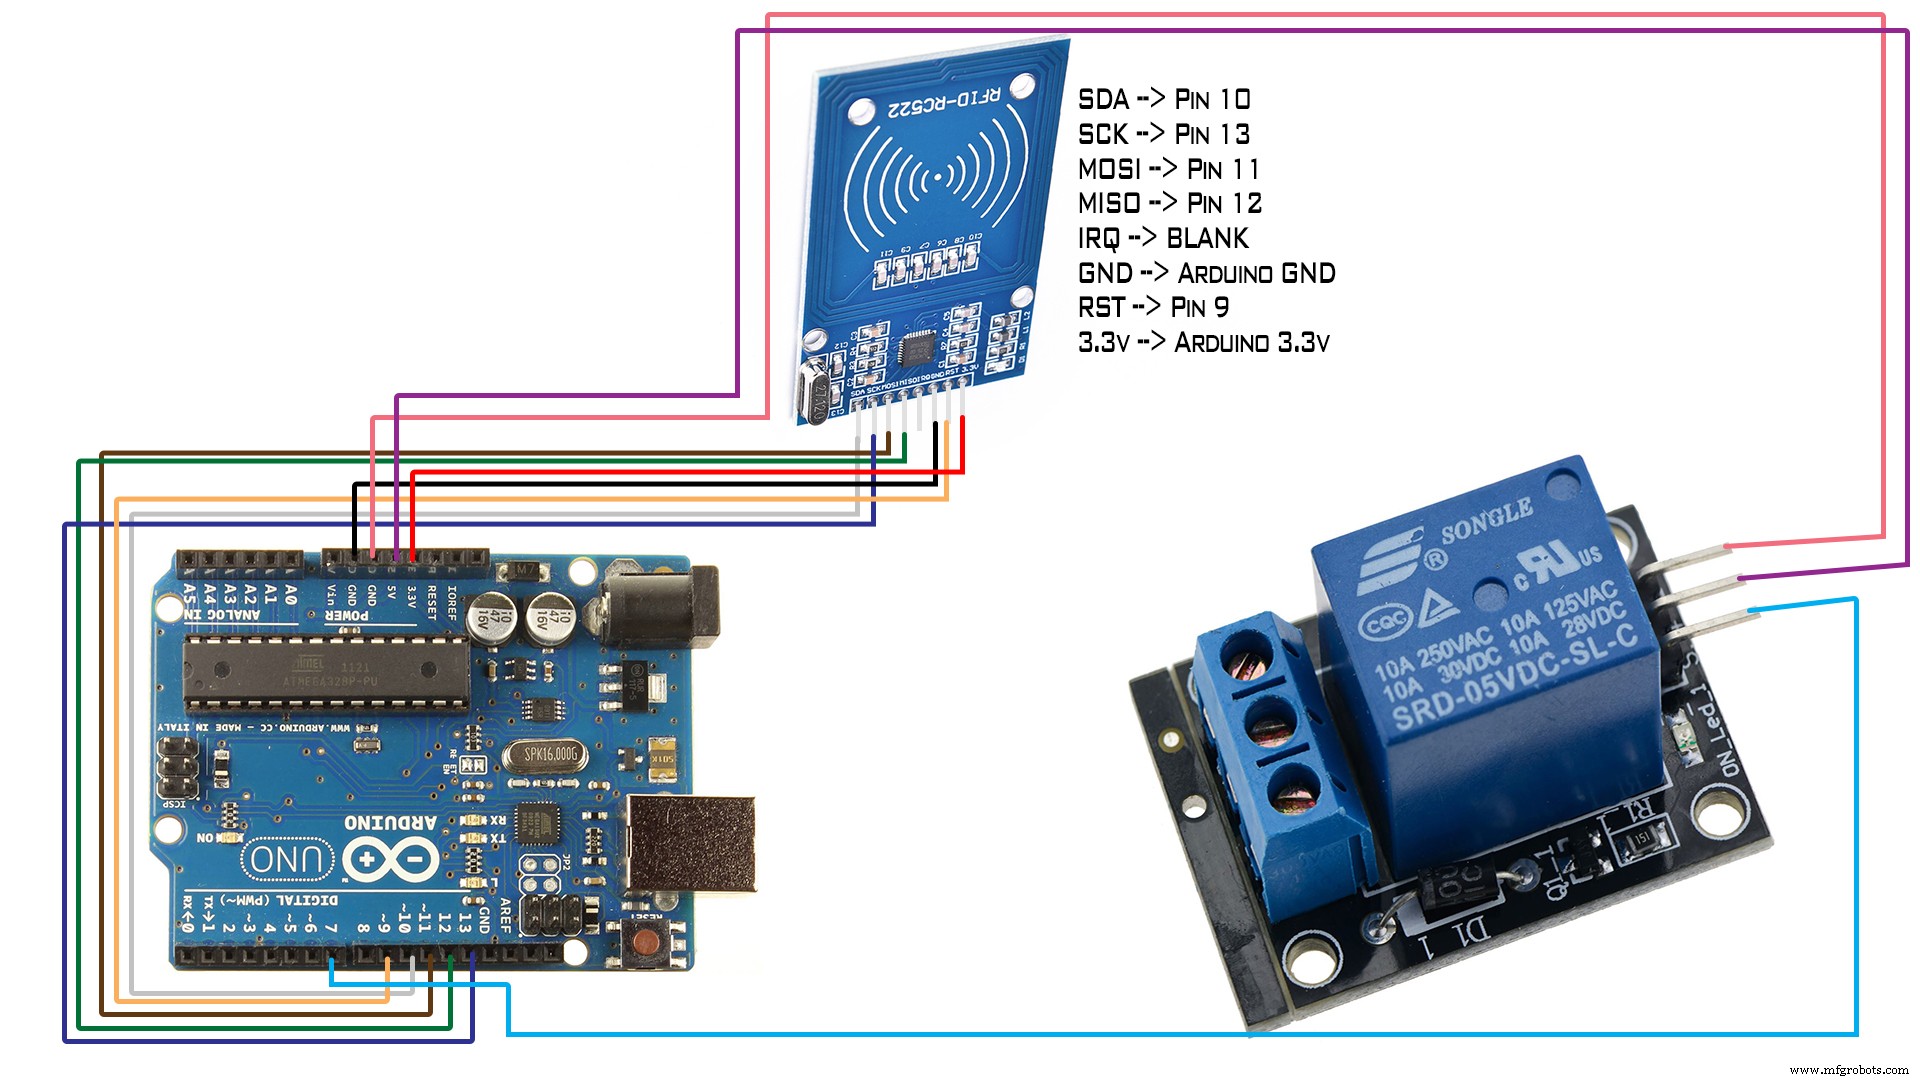
Manufacturing process
- Designing a 4‑Bit Combination Lock with XOR & NOR Gates
- Inside Bank Vaults: History, Design, and Future of Security
- Build a Secure Arduino RFID Door Lock with RC522 (MIFARE 13.56 MHz)
- Create a Secure Arduino RFID Lock – Step‑by‑Step Guide
- Secure Password-Based Door Lock with Arduino, Keypad & Linear Actuator
- Smart Keyless Door Lock – Arduino & Android Bluetooth‑Controlled Password System
- Arduino Keypad Door Lock with User-Defined Code
- Effortless Windows PC Security: RFID Lock & Unlock System
- Build an Arduino RFID Door Lock – Master RFID Technology with a Step‑by‑Step Guide
- Understanding Jamb Switches: Function, Applications, and Replacement