Dual-Axis Solar Tracker with Auto & Manual Control – Efficient Sun‑Tracking System
Components and supplies
Arduino UNO
×
1
Rotary potentiometer (generic)
×
2
LED (generic)
×
2
SparkFun Pushbutton switch 12mm
×
1
Servos (Tower Pro MG996R)
×
2
Photo resistor
×
4
Resistor 10k ohm
×
5
Resistor 221 ohm
×
2
Necessary tools and machines
Soldering iron (generic)
Apps and online services
Autodesk Tinkercad
Arduino IDE
About this project
This is a project my students implemented during the 2017-2018 evening club Young Hackers. It is a demanding project for elementary school students and it took us many meetings to accomplish. It contains a small 5V solar panel that can rotate in two axis so as to harvest maximum power from the sun. The project is based on the Dual Axis Solar Tracker Project from OpenSourceClassroom.
We wanted to implement two modes in the final product.
A manual mode – controlled by two pots.
An auto mode – controlled with four light sensors.
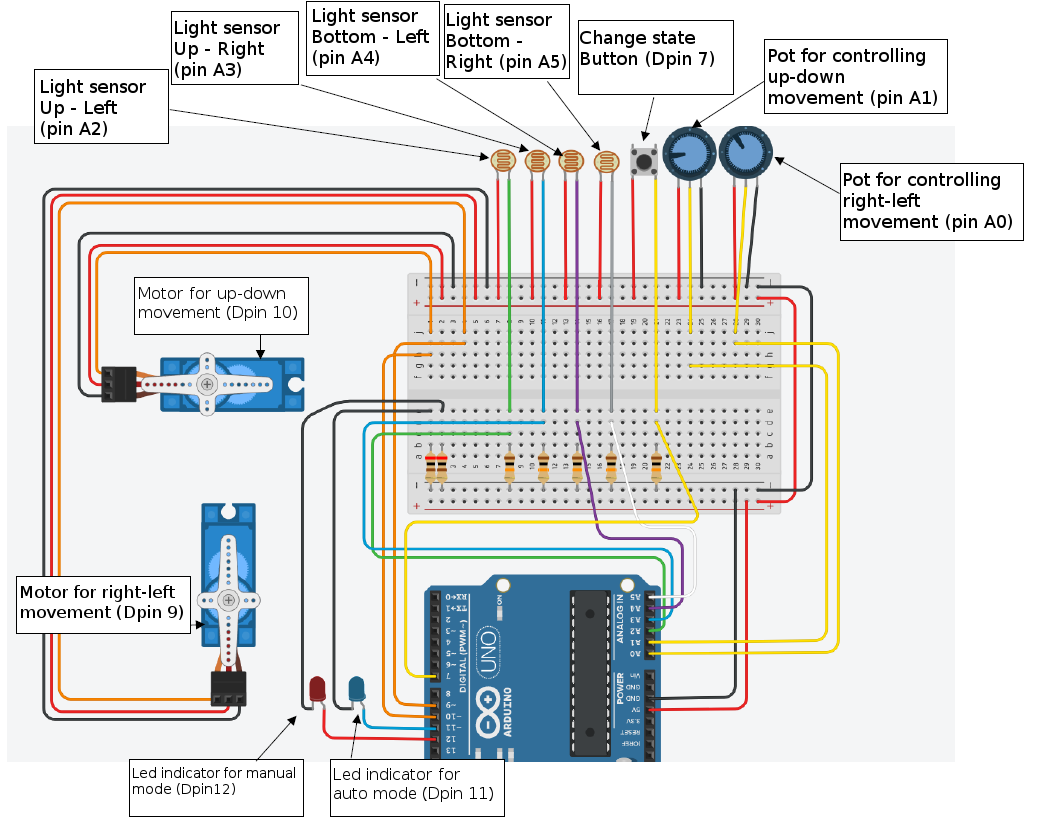
In order to achieve that we programmed the device to change between modes with the help of a push button and two indicator leds. When the device is in manual mode the red light is on and we can control the rotation of the panel in two axis with the aid of two potentiometers. When the device is in auto mode the blue light is on and the rotation of the panel is determined by the light collected from the four LDRs. The programming was done in tinkercad.
Students worked in groups in a production line style to complete the tasks. (wire soldering, wire insulating, parts screwing etc.).
Code
Rotating solar panel code
Rotating solar panel codeArduino
The final code of the dual axis solar panel
#include <Servo.h>
//Initialize variables
int mode = 0;
int buttonState = 0;
int prevButtonState = 0;
int topLeftLight = 0;
int topRightLight = 0;
int bottomLeftLight = 0;
int bottomRightLight = 0;
int LeftLight = 0;
int RightLight = 0;
int TopLight = 0;
int BottomLight = 0;
//Declare two servos
Servo servo_9;
Servo servo_10;

void setup()
{
  pinMode(7, INPUT);    //Mode Button
  pinMode(12, OUTPUT);  //Led indicator for manual mode
  pinMode(11, OUTPUT);  //Led indicator for auto mode
  pinMode(A0, INPUT);   //Potentiometer for right-left movement
  pinMode(A1, INPUT);   //Potentiometer for up-down movement
  pinMode(A2, INPUT);   //Light sensor up - left
  pinMode(A3, INPUT);   //Light sensor up - right
  pinMode(A4, INPUT);   //Light sensor bottom - left
  pinMode(A5, INPUT);   //Light sensor bottom - right
  servo_9.attach(9);    //Servo motor right - left movement
  servo_10.attach(10);  //Servo motor up - down movement
}

void loop()
{
  buttonState = digitalRead(7);
  if (buttonState != prevButtonState) {
    if (buttonState == HIGH) {
      //Change mode and ligh up the correct indicator
      if (mode == 1) {
        mode = 0;
        digitalWrite(12, HIGH);
        digitalWrite(11, LOW);
      } else {
        mode = 1;
        digitalWrite(11, HIGH);
        digitalWrite(12, LOW);
      }
    }
  }
  prevButtonState = buttonState;
  delay(50); // Wait for 50 millisecond(s)
  if (mode == 0) {
    //If mode is manual map the pot values to degrees of rotation
    servo_9.write(map(analogRead(A0), 0, 1023, 0, 180));
    servo_10.write(map(analogRead(A1), 0, 1023, 0, 180));
  } else {
    //if mode is auto map the sensor values to 0-100 ligh intensity.
    //Every light sensor has different sensitivity and must be first tested
    //for it's high and low values
    topLeftLight = map(analogRead(A2),50,980,0,100);
    topRightLight = map(analogRead(A3),200,990,0,100);
    bottomLeftLight = map(analogRead(A4),170,970,0,100);
    bottomRightLight = map(analogRead(A5),250,1000,0,100);
    //Calculate the average light conditions
    TopLight = ((topRightLight + topLeftLight) / 2);
    BottomLight = ((bottomRightLight + bottomLeftLight) / 2);
    LeftLight = ((topLeftLight + bottomLeftLight) / 2);
    RightLight = ((topRightLight + bottomRightLight) / 2);
    //Rotate the servos if needed
    if (abs((RightLight - LeftLight)) > 4) {    //Change position only if light difference is bigger then 4%
      if (RightLight < LeftLight) {
        if (servo_9.read() < 180) {
          servo_9.write((servo_9.read() + 1));
        }
      }
      if (RightLight > LeftLight) {
        if (servo_9.read() > 0) {
          servo_9.write((servo_9.read() - 1));
        }
      }
    }
    if (abs((TopLight - BottomLight)) > 4) {  //Change position only if light difference is bigger then 4%
      if (TopLight < BottomLight) {
        if (servo_10.read() < 180) {
          servo_10.write((servo_10.read() - 1));
        }
      }
      if (TopLight > BottomLight) {
        if (servo_10.read() > 0) {
          servo_10.write((servo_10.read() + 1));
        }
      }
    }
   }
}