


Building an Arduino LIDAR System with VL6180X and Servo Motor
Components and supplies
 |
| × | 1 | |||
 |
| × | 1 | |||
| × | 1 |
Apps and online services
 |
| |||
|
About this project
A few things about LiDARLIDAR (Light Detection and Ranging) is an optical remote sensing system which can measure the distance of a target by illuminating it with light. LIDAR technology is being used in Robotics for the perception of the environment as well as object classification. The ability of LIDAR technology to provide 2D elevation maps of the terrain, high precision distance to the ground, and approach velocity can enable safe landing of robotic and manned vehicles with a high degree of precision.
LIDAR consists of a transmitter which illuminates a target with a laser beam, and a receiver capable of detecting the component of light which is essentially coaxial with the transmitted beam. Receiver sensors calculate a distance, based on the time needed for the light to reach the target and return. A mechanical mechanism with a mirror sweeps the light beam to cover the required scene in a plane or even in three dimensions, using a rotating nodding mirror.
One way to measure the time of flight for the light beam is to use a pulsed laser and then measure the elapsed time directly. Electronics capable of resolving picoseconds are required in such devices and they are therefore very expensive. Another method is to measure the phase shift of the reflected light.
Collimated infrared laser is used to the phase-shift measurement. For surfaces, having a roughness greater than the wavelength of the incident light, diffuse reflection will occur. The component of the infrared light will return almost parallel to the transmitted beam for objects.
The sensor measures the phase shift between the transmitted and reflected signals. The picture shows how this technique can be used to measure distance. The wavelength of the modulating signal obeys the equation:
c = f ∙ τ
where c is the speed of light and f the modulating frequency and τ the known modulating wavelength.
The total distance D' covered by the emitted light is:
D' = B + 2A = B + (θ * τ) / 2π
where A is the measured distance. B is the distance from the phase measurement unit. The required distance D, between the beam splitter and the target, is therefore given by
D = τ * θ / 4π
where θ is the electronically measured phase difference between the transmitted and reflected light beams.
It can be shown that the range is inversely proportional to the square of the received signal amplitude, directly affecting the sensor’s accuracy.
(copied from http://home.roboticlab.eu/en/examples/sensor/lidar).
As a part of my final year project i need the 2D map of surrounding for my autonomous vehicle, so i choose LiDAR because it is so fast and accurate. Unlike sonars that bounce ultrasonic waves, the 'cone' of sensing is very narrow.
VL6180x or Vl53l0x is an optical sensor from STMicroelectronics .VL53L0x is much more precise and doesn't have linearity problems or 'double imaging' where you can't tell if an object is very far or very close.
This time of flight sensor is actually used in our mobile phone to adjust the focus of the camera.
Circuit Diagram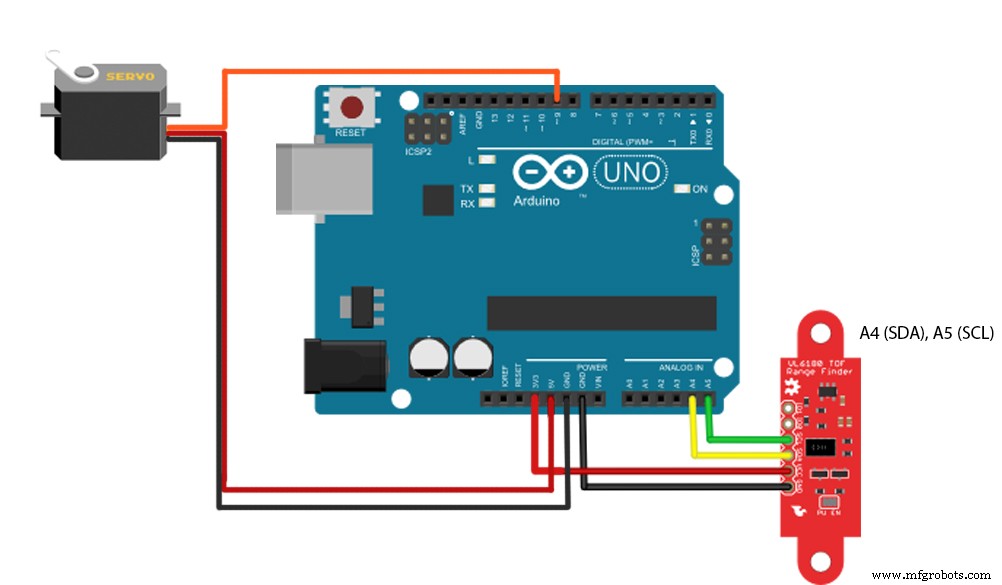
#include <Wire.h>
#include "Adafruit_VL6180X.h"
#include <Servo.h>
Adafruit_VL6180X vl = Adafruit_VL6180X();
Servo myservo;
float pos = 0;
const float Pi = 3.14159;
void setup() {
  myservo.attach(9);
 Serial.begin(115200);
 while (!Serial) {
   delay(1);
 }
if (! vl.begin()) {
   while (1);
 }
}
void loop() {
 for (pos = 0; pos <= 180; pos += .5) {
    myservo.write(pos);
    uint8_t range = vl.readRange();
    Serial.println(String(range)+"p"+String(pos*Pi/180)+"p"+String(pos));
    delay(10);
 }
 /*for (pos = 180; pos >= 0; pos -= .5) {
   myservo.write(pos);
   uint8_t range = vl.readRange();
  {
  Serial.println(String(range)+"p"+String(pos*Pi/180)+"p"+String(pos));
  delay(10);
}
 }*/
 myservo.write(0);
 delay(2000);
}
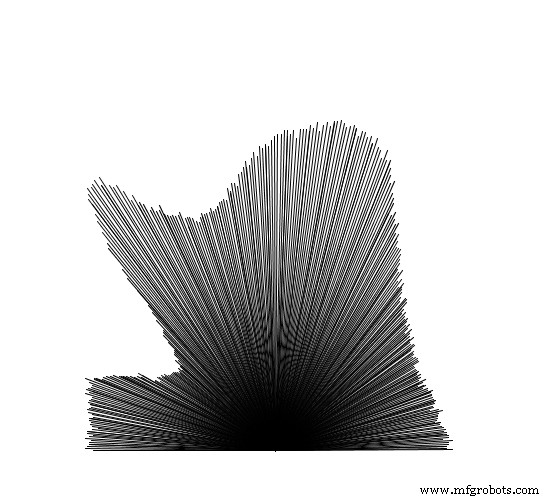
Processing code (refer other radar project if u need good radar interface) change the Arduino port number (eg "COM 3") before running.
import processing.serial.*;
Serial myPort;
String val;
int range,i=0;float pos;
void setup(){
 size(550,500);

  String portName = "COMx";//x=your arduino port number
  myPort = new Serial(this, portName, 115200);
  background(255);
}
void draw(){
 if ( myPort.available() > 0) {
  val = myPort.readStringUntil('\n');
  if(val!=null)
  {    String[] nums=split(val,"p");//splitting the recevied data searated by 'p'
          if(nums.length==3)
     {
     range=int(nums[0]); //string to integer conversion
     pos=float(nums[1]);
     i=int(nums[2]);
    if(i==180){
  background(255);
     }
      }
  }
}
translate(25,-50);
line(250,500,250-2*(range*cos(pos)),500-2*(range*sin(pos)));
}
The speed of sensor is limited to 10Hz and the response of servo is poor at higher speed. If any one planning to make high speed LIDAR use stepper motor or DC motors with feedback system. use slip rings for continuous rotation (https://www.adafruit.com/product/736).
Any questions, suggestions are welcome!
Code
- Arduino code
- processing code
Arduino codeArduino
#include <Wire.h>
#include "Adafruit_VL6180X.h"
#include <Servo.h>
Adafruit_VL6180X vl = Adafruit_VL6180X();
Servo myservo;
float pos = 0;
const float Pi = 3.14159;
void setup() {
   myservo.attach(9);
  Serial.begin(115200);
  while (!Serial) {
    delay(1);
  }

 if (! vl.begin()) {
    while (1);
  }
}

void loop() {

  for (pos = 0; pos <= 180; pos += .5) {
      myservo.write(pos);
             uint8_t range = vl.readRange();
              Serial.println(String(range)+"p"+String(pos*Pi/180)+"p"+String(pos));
              delay(10);
  }
  /*for (pos = 180; pos >= 0; pos -= .5) {
      myservo.write(pos);
       uint8_t range = vl.readRange();
   {
   Serial.println(String(range)+"p"+String(pos*Pi/180)+"p"+String(pos));
   delay(10);
 }
  }*/
  myservo.write(0);
  delay(1000);
}
processing codeProcessing
import processing.serial.*;
Serial myPort;
String val;
int range,i=0;float pos;
void setup(){
  size(550,500);
   frameRate(36);
   String portName = "COMx";//x=your arduino port number
   myPort = new Serial(this, portName, 115200);
   background(255);

}
void draw(){
  if ( myPort.available() > 0) {
   val = myPort.readStringUntil('\n');
   if(val!=null)
   {    String[] nums=split(val,"p");//splitting the recevied data searated by 'p'
           if(nums.length==3)
      {
      range=int(nums[0]); //string to integer conversion
      pos=float(nums[1]);
      i=int(nums[2]);
     if(i==180){
   background(255);
      }
       }
   }
 }
translate(25,-50);
line(250,500,250-2*(range*cos(pos)),500-2*(range*sin(pos)));
}
Manufacturing process
- The Kaleidoscope: From Brewster’s Science to Modern Design
- Gesture‑Controlled RGB Table Lamp – Interactive, Hands‑Free Lighting
- SunGlass‑BOT: Smart Sunglasses That Auto‑Adjust to Light
- Smart Wireless Light Switch Controller: Arduino‑Based Remote Switch Manipulator
- Build an Audio‑Reactive Desk Lamp with Arduino Nano
- Capacitive Touch LED Switch with Arduino UNO – Easy DIY Project
- Create an Animated Smart LED Strip Controlled by Alexa Using Arduino
- Arduino Web-Controlled Light Bulb: Step-by-Step Guide
- Build a Realistic Traffic Light Simulator with Arduino UNO
- Kodiak 3D LiDAR: Precision Spaceborne Ranging for High‑Orbit Missions