


Intelligent Disinfection Tunnel: Automated Sanitization for High‑Traffic Areas
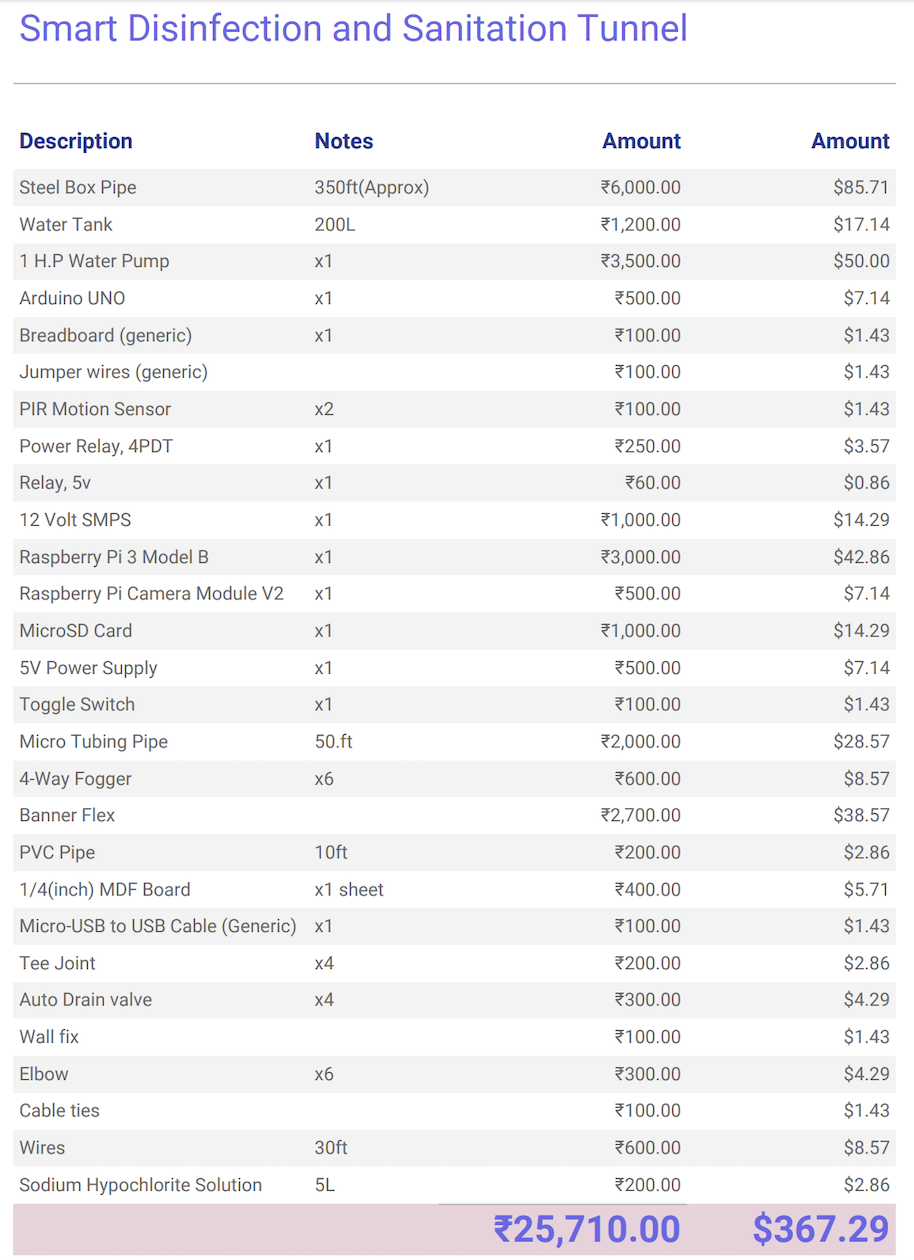
Components and supplies
 |
| × | 1 | |||
 |
| × | 1 | |||
 |
| × | 2 | |||
| × | 1 | ||||
| × | 1 | ||||
 |
| × | 1 | |||
| × | 1 | ||||
 |
| × | 1 | |||
 |
| × | 1 | |||
 |
| × | 1 | |||
| × | 1 | ||||
 |
| × | 1 | |||
| × | 1 | ||||
| × | 1 | ||||
| × | 1 | ||||
| × | 1 | ||||
| × | 1 | ||||
| × | 1 | ||||
| × | 1 | ||||
| × | 1 | ||||
| × | 1 | ||||
| × | 1 | ||||
| × | 1 | ||||
|
| × | 1 |
Necessary tools and machines
| ||||
| ||||
 |
| |||
 |
| |||
 |
|
Apps and online services
 |
| |||
 |
| |||
 |
|
About this project
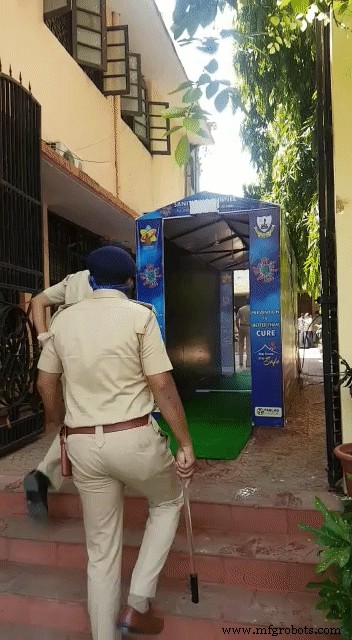
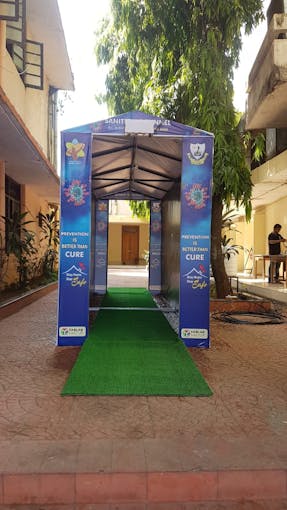
IntroductionThe Smart Disinfection and Sanitation Tunnel is a demonstration of how It has been designed to provide maximum protection to people passing through the tunnel in around 15 seconds. Which can help the community to fight against the COVID-19.
The main idea of this project is to make a tunnel that can try and prevent the spread of COVID-19.
This disinfection and sanitation tunnel is prepared in order to sanitize people within 15 seconds from any possible bacteria.
The disinfectant solution used consists of a combination of sodium hypochlorite (NaOCl) and water (H2O). The disinfectant is non-volatile, thus enabling prolonged veridical and bactericidal activity and sanitizing the surfaces.
So, I took this initiative to make this Smart Disinfection and Sanitation Tunnel. This tunnel was made in a time span of 12hrs. It can disinfect a person fully from head to toe in a time span of just 15 seconds and the solution used is completely harmless*. The total cost of the tunnel is approximately ₹30,000 or $400. (Revised cost)

- Food markets
- Offices
- Shopping malls
- Airports
- Bus stops
- Railway stations
- Police stations
- College
- Hospitals
- Colony
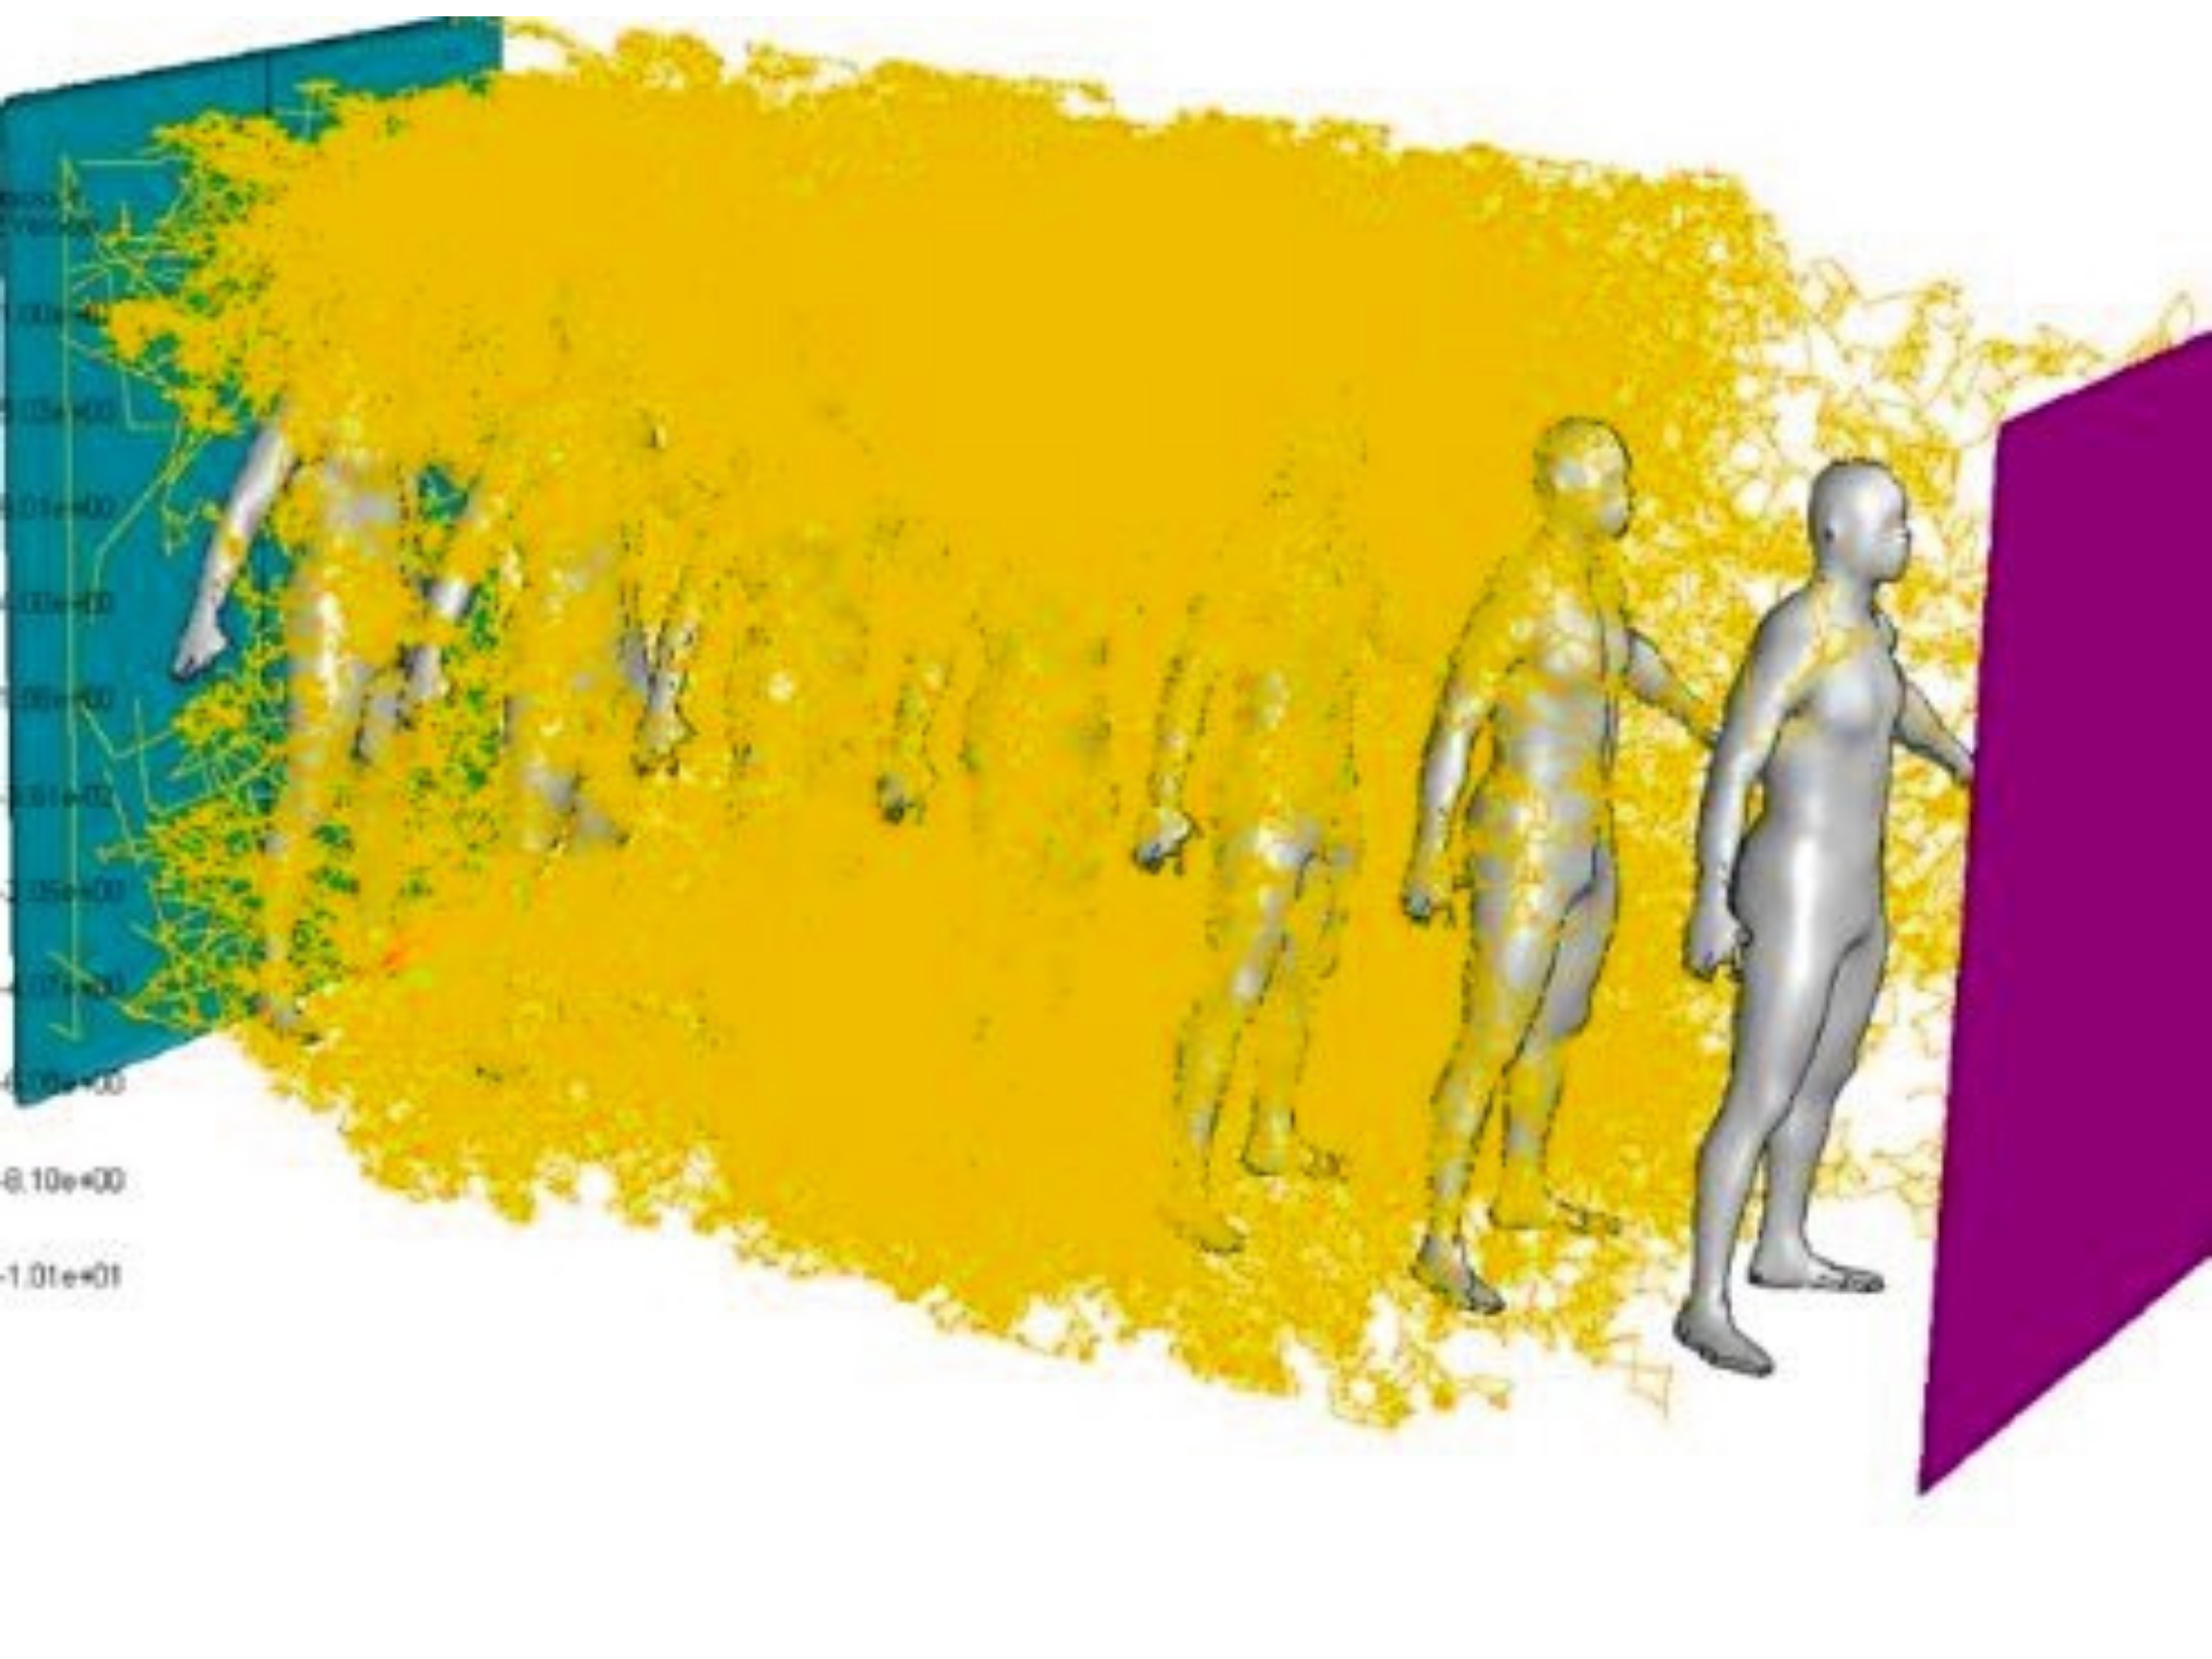
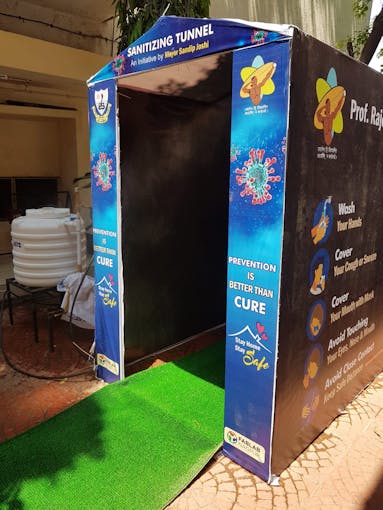
A 1HP Water Pump machine is placed on the side of each tunnel that takes the solution of 0.4% of Sodium hypochlorite solution in 100 Litre of water from the tank. As the machine is automatic it senses whether anyone is entering into the tunnel. As anyone enters into the tunnel the Water Pump gets started for 15 seconds. So that the user can pass through that tunnel and if there is no one in the tunnel the pump will be off to save the water and electricity. The misty disinfectant spray protects citizens from catching bacteria for a period of at least 60 minutes (Approx*). As it disinfects the air, exposed skin, and human clothing.
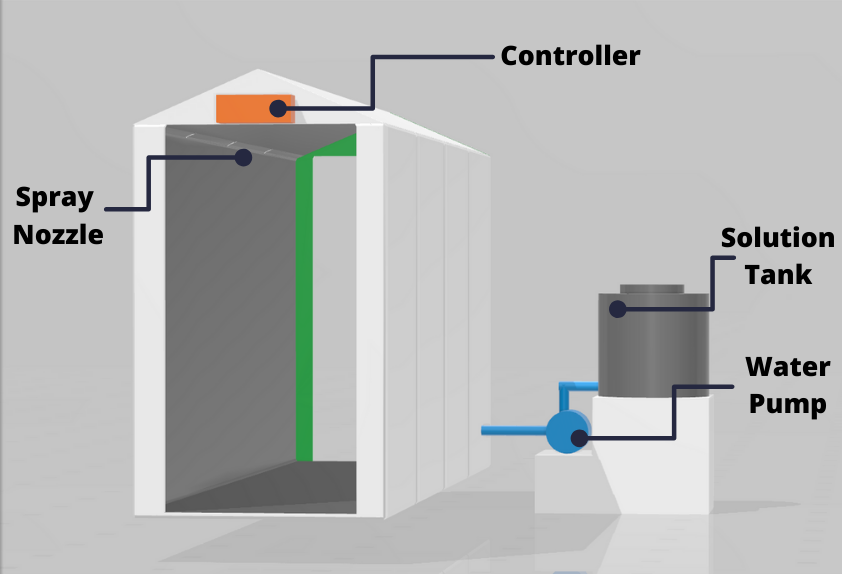
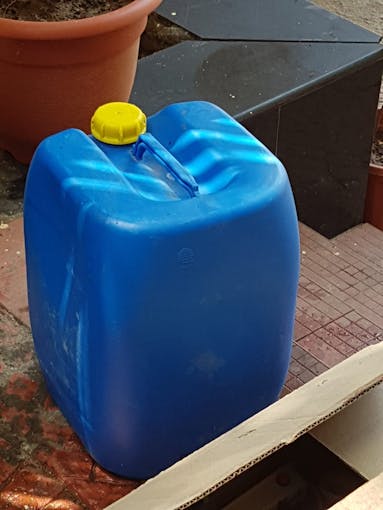
A plastic tank for 200 liters of solution and a pump for the high-pressure pipe system is located on the side of the tunnel. As per calculation the solution should be enough for 8-10 hours. Since it has a motion sensor above the entrance in order to save an antiseptic. (May varies according to the people entering into tunnel**)
Flow diagram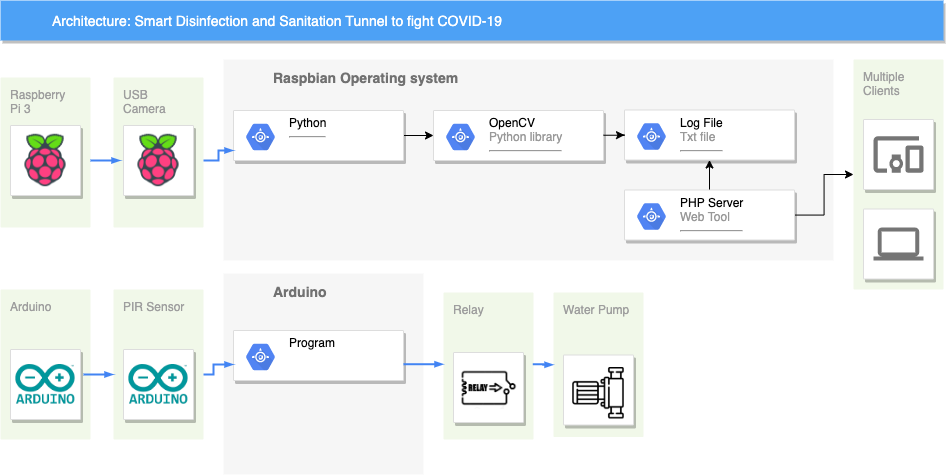
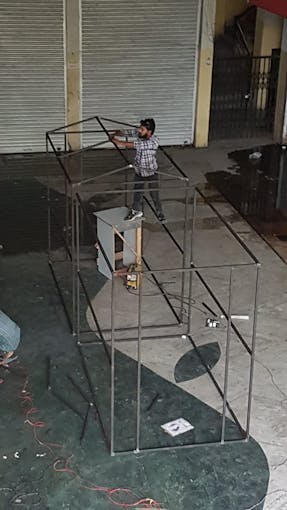
I laid the frame out of a metal profile, collapsible so that it could be transported from place to place, and when it is all over, store in case of the next apocalypse. The covering is by the banner (which is used for outdoor hoarding advertising). The banner is easy to attach with the metal profile with plastic ties. It's fast and does not require special skills.
Check out the model - https://skfb.ly/6RGvZ
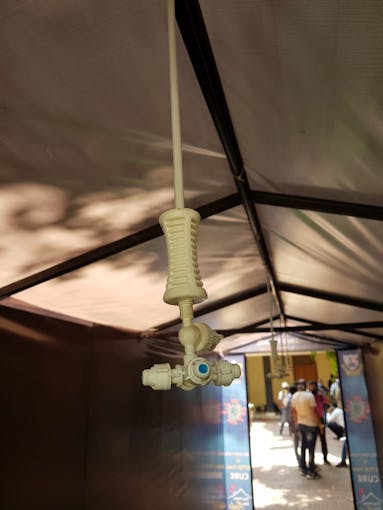
A plastic tank for 200 liters of solution and a pump for the high-pressure pipe system is located on the side of the tunnel which is connected with 4-Way Fogger Assembly.
_yOvU8LUx6F.jpeg?auto=compress%2Cformat&w=680&h=510&fit=max)
Micro tubbing pipes have been used throughout the tunnel to supply the solution to the fogger.
_bDYXyY5wFt.jpeg?auto=compress%2Cformat&w=680&h=510&fit=max)
Inside, there is a high-pressure pipeline with 4 4-Way Fogger which can be connected. The fog leaves no marks on clothes, while completely enveloping the incoming person and destroys the virus even in hard-to-reach folds of clothing and protects for some time after the exit.
As a solution, a certified solution is used in this project. (Certificate Attached below)
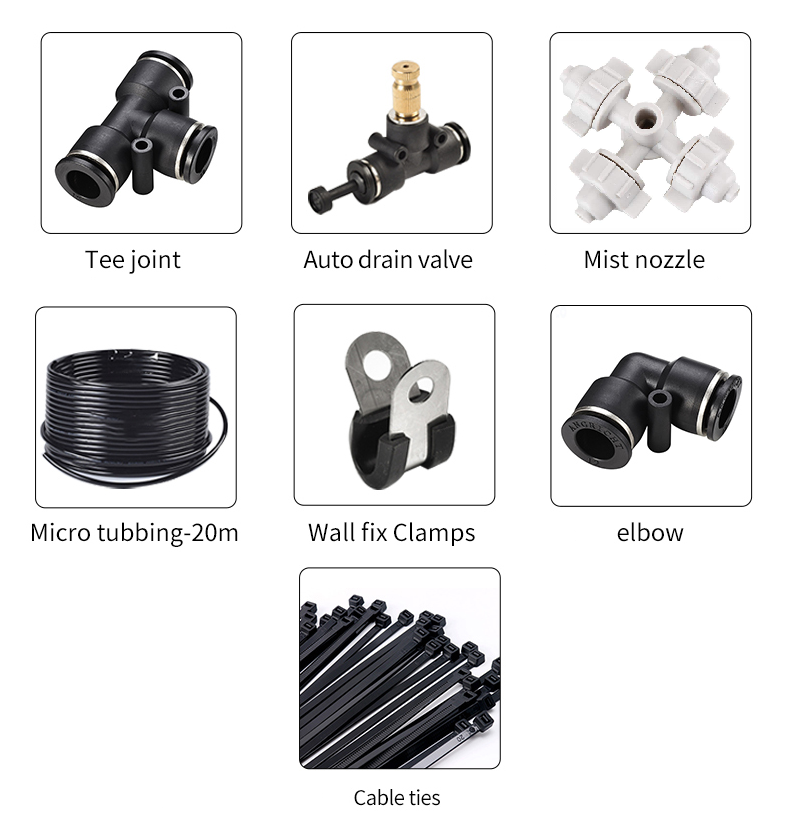
4 Way Fogger
- Discharge Rate : 30 LPH/0.5 LPM (for 1 fogger)
- Recommended Pressure: 45-60 psi
- Average Droplet Size: 65 microns (at 55-60 psi)
- Filtration Required: 130 Micron (120 mesh)
- Pump required: 40 to 45 meter Head
Other Accessories Used

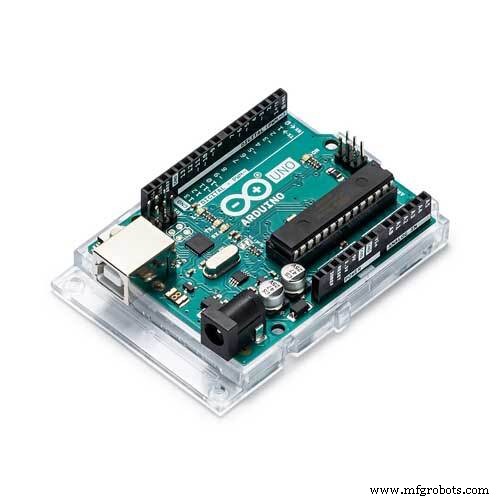
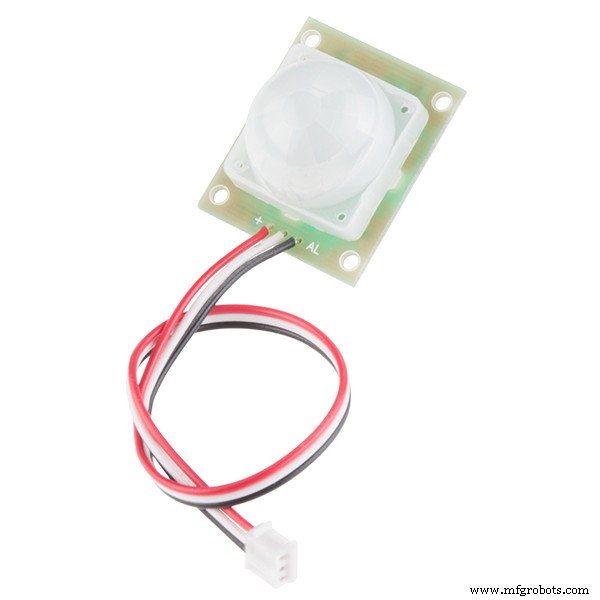
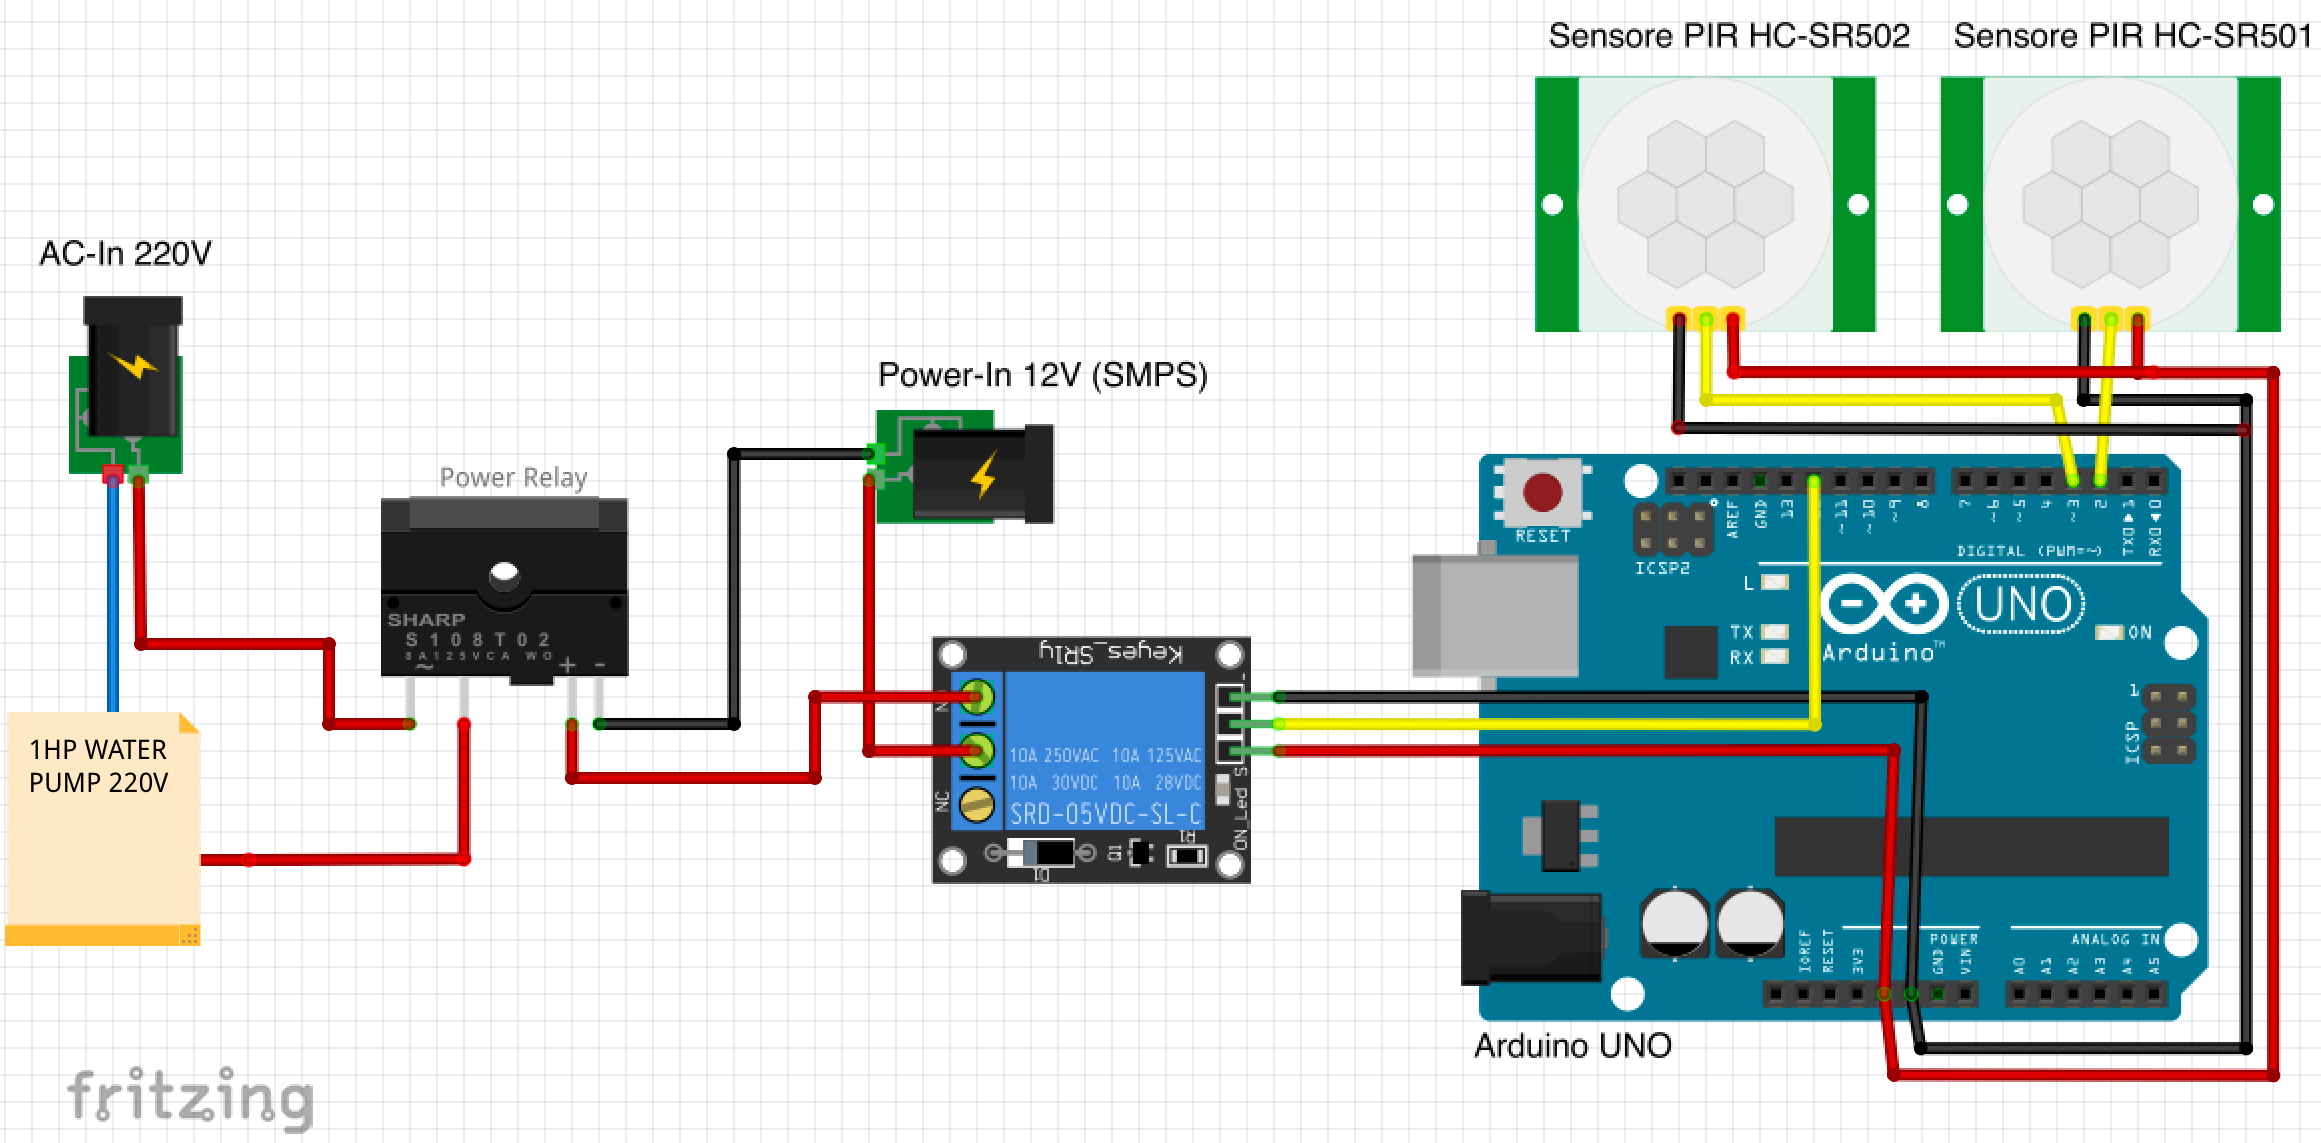
The water pump actually works by detecting the infrared rays. Whenever the human body comes near a motion sensor so as the human body reflects infrared rays, the motion sensor detects this infrared rays and it gives us a HIGH signal through the output pin. This HIGH signal is then read by the Arduino. So if Arduino reads a HIGH signal, it will give a HIGH signal to the relay module which means that the relay will turn on, and as a result the Power relay will turn on and it will turn on the Water Pump for 15 seconds (Can be changed). Similarly if the Arduino reads a LOW signal, it will make the relay pin LOW and as a result the Water Pump will remain off.
In this I had used 2 PIR sensors to make it more precise if any of them sense the motion then the relay will turn on for 15 seconds (Can be changed).
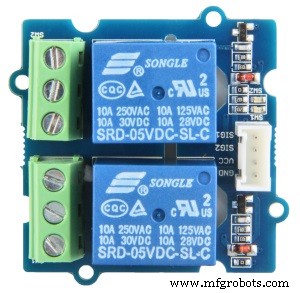
We cannot use 5V Relay directly with the Water Pump because In my case, the water pump which I had used in this project has an Ampere(A) rating of 16Ampere and the 5V Relay has a max load of 10Ampere so to control the water pump I used one more relay with 5V Relay Module. which is 12V Power Relay.
Code:
/*
 * Smart Disinfection and Sanitation Tunnel
 */

int relayPin = 12;                // choose the pin for the Relay Pin

int inputPin = 2;               // choose the input pin (for PIR sensor)
int inputPin2 = 3;               // choose the input pin (for PIR sensor 02)

int pirState = LOW;             // at start, assuming no motion detected
int val = 0;                    // variable for reading the pin status
int val2 = 0;                    // variable for reading the pin status


void setup() {
  pinMode(relayPin, OUTPUT);      // declare Relay as output
  pinMode(inputPin, INPUT);     // declare sensor as input
  pinMode(inputPin2, INPUT);
  Serial.begin(9600);
}

void loop(){
  val = digitalRead(inputPin);  // read input value
  val2 = digitalRead(inputPin2);  // read input value
  if (val == HIGH || val2 == HIGH) {            // check if the input is HIGH
    digitalWrite(relayPin, HIGH);  // turn Relay ON
    if (pirState == LOW) {
      // turned on
      Serial.println("Motion detected!");
      // 15 sec delay
      delay(15000);
      pirState = HIGH;
    }
  } else {
    digitalWrite(relayPin, 0); // turn Relay OFF
    if (pirState == HIGH){
      // turned off
      Serial.println("Motion ended!");
      pirState = LOW;
    }
  }

}
The final wiring for the project looks a bit messy but worked just fine.
_NesuSpBJwr.jpeg?auto=compress%2Cformat&w=680&h=510&fit=max)
After it was all wired up, I just test it out with basic sensing and then proceeded to check that the relay was firing.
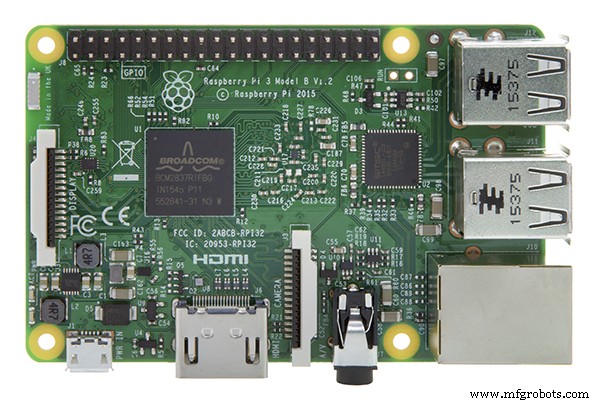
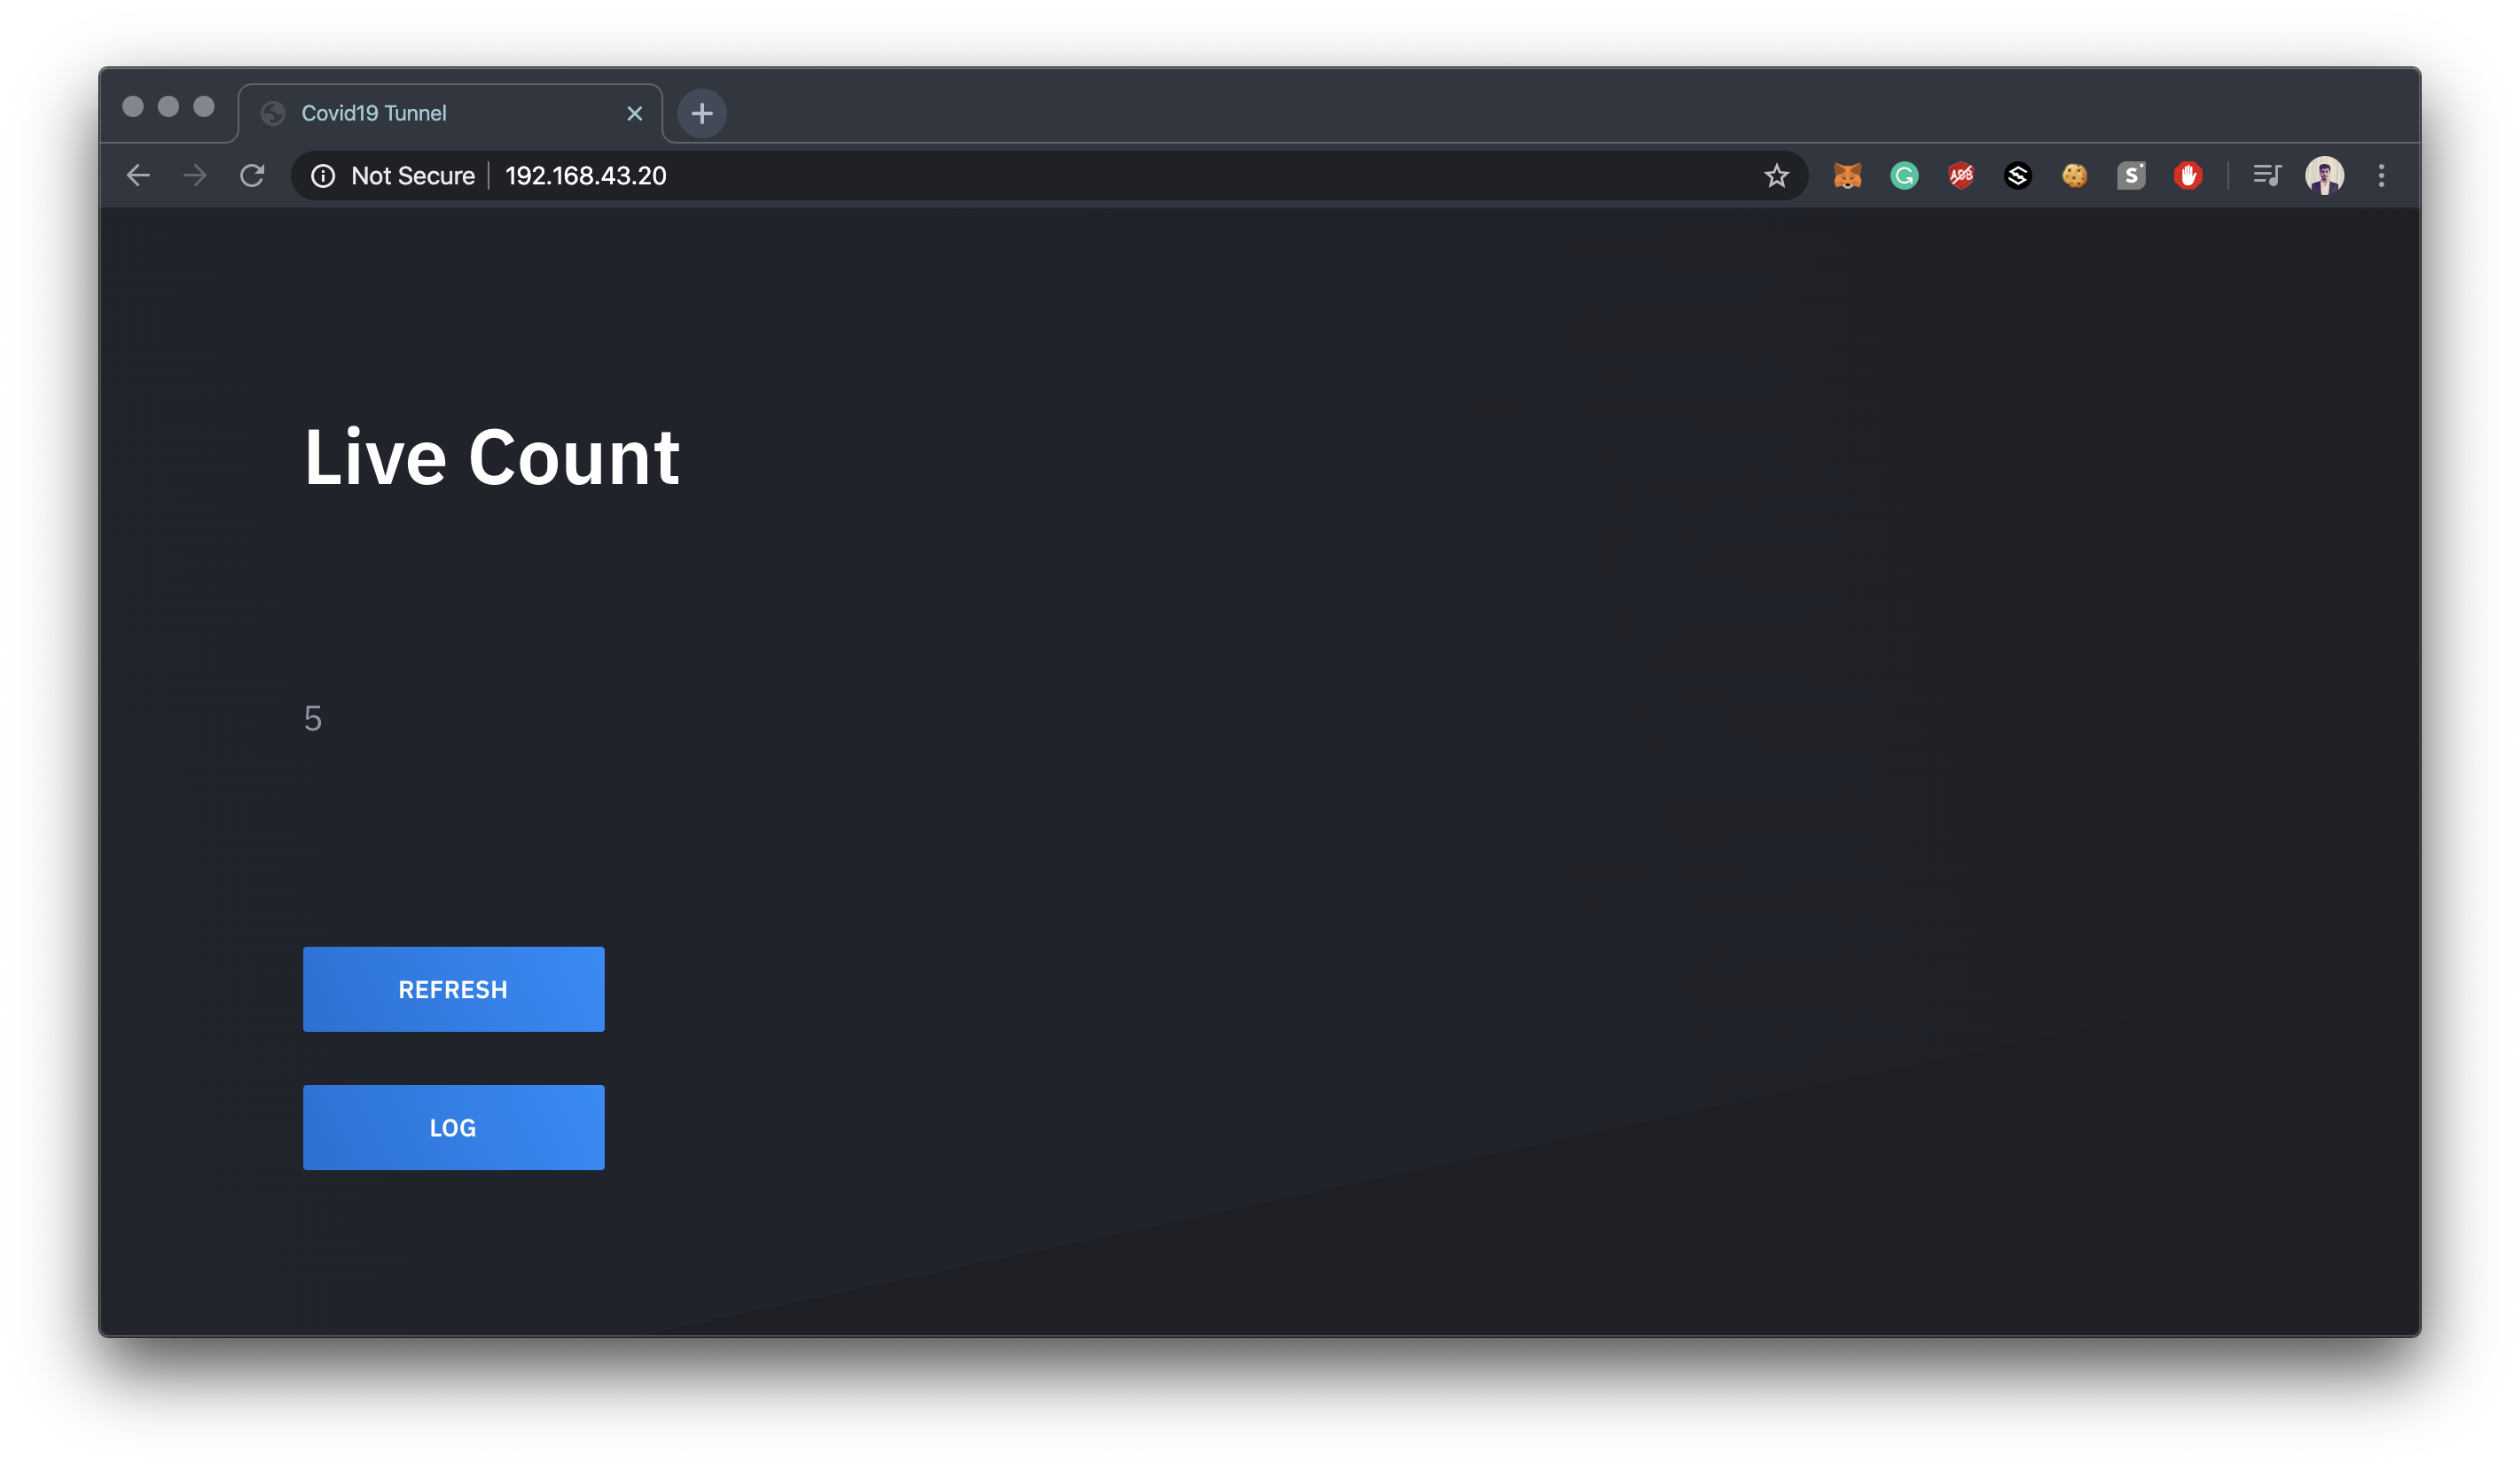
Prepare the Raspberry Pi 3 (Optional)This is optional. In case you need to do some analysis of the data and to precisely count the number of people using this tunnel. You can implement this part.
Although, there are many ways to count that with some physical sensors like PIR Sensor and Ultrasonic Sensor but I found this more precise while thinking of all Odds.
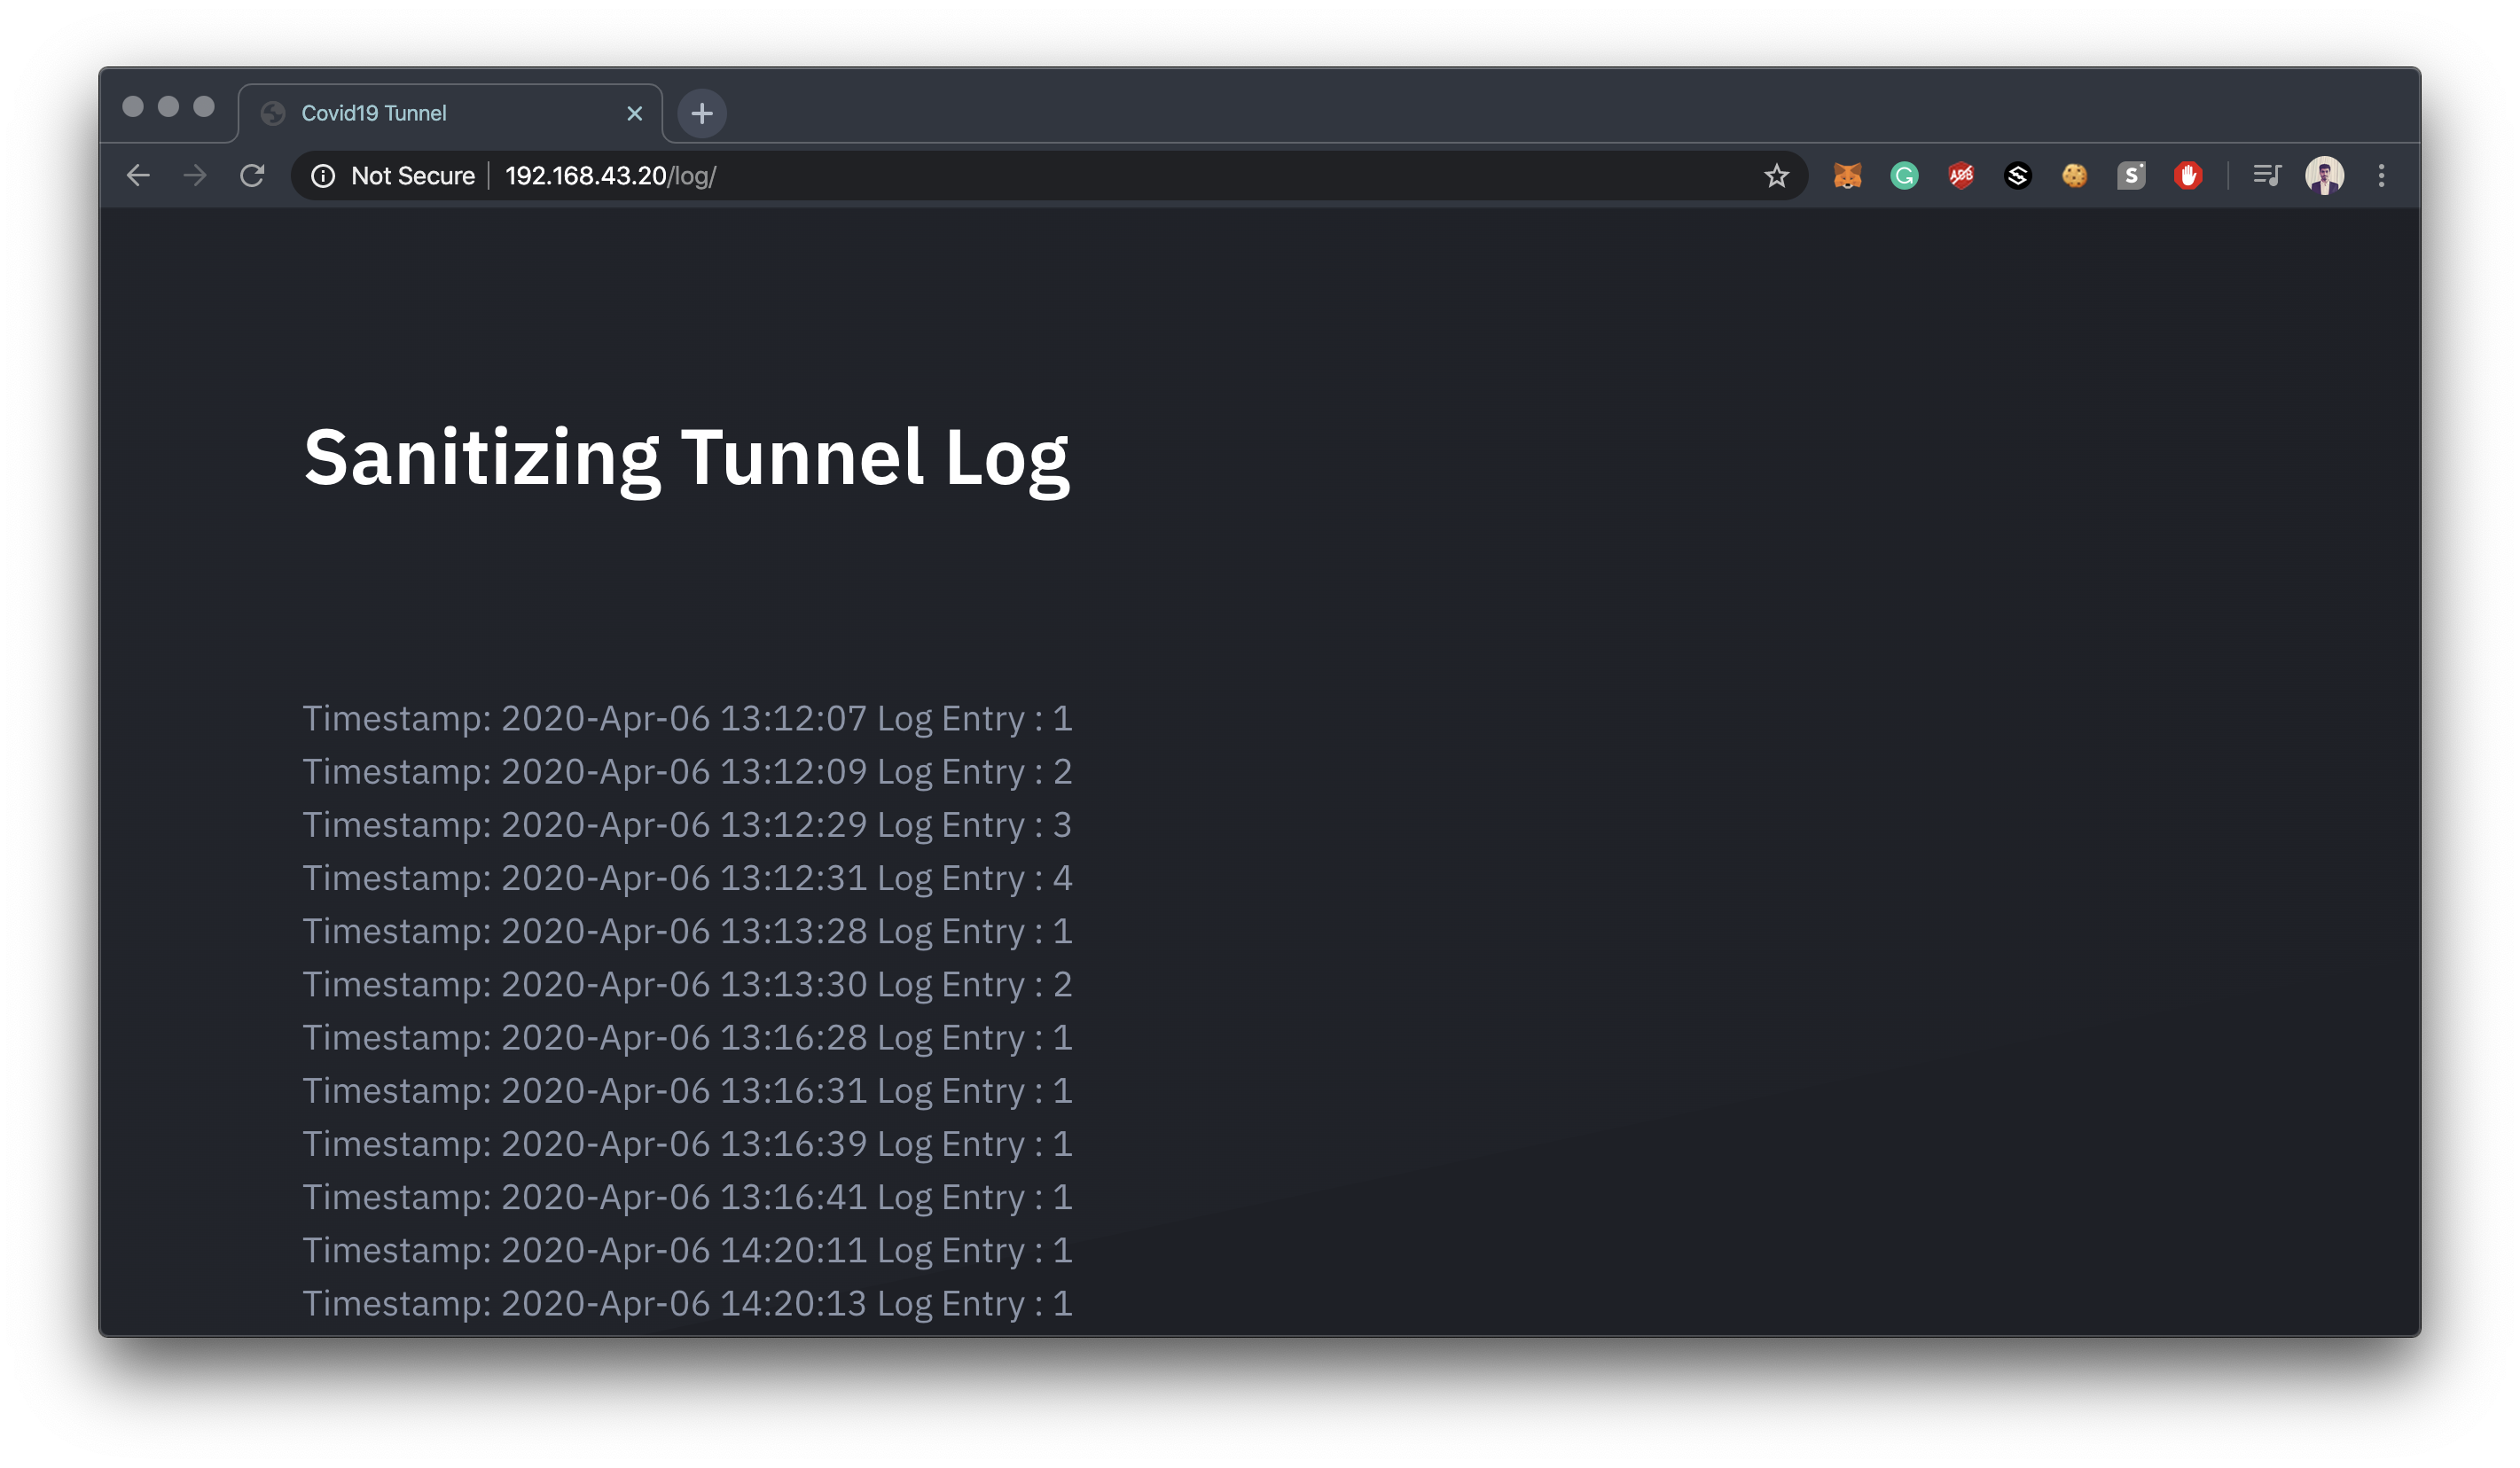
There is a machine learning model that detects the human body using OpenCV in Python and store the log in the file which can be processed to show the data in the app.
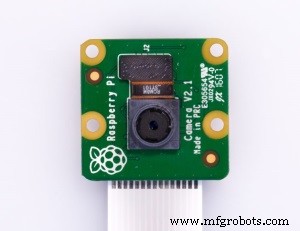
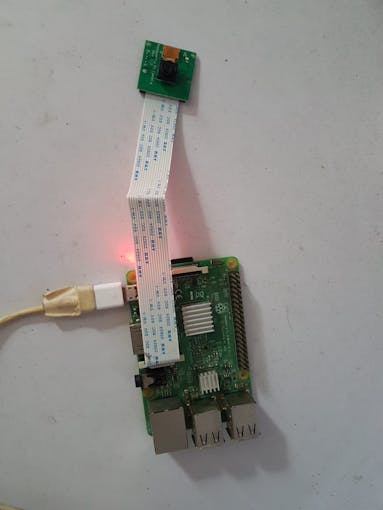
Connect the Pi Camera- Turn off the Raspberry Pi
- Locate the Camera Module, between the USB Module and HDMI modules.
- Unlock the black plastic clip by (gently) pulling upwards
- Insert the Camera Module ribbon cable (metal connectors facing away from the Ethernet / USB ports on a Raspberry Pi 4)
- Lock the black plastic clip

- Run
sudo raspi-config- Select Interfacing Options(ie 4th option) from the Raspberry Pi Software Configuration Tool’s main menu. Press ENTER.
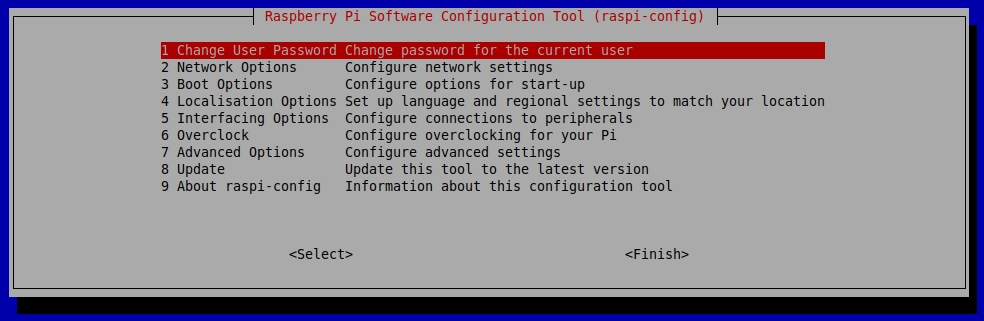
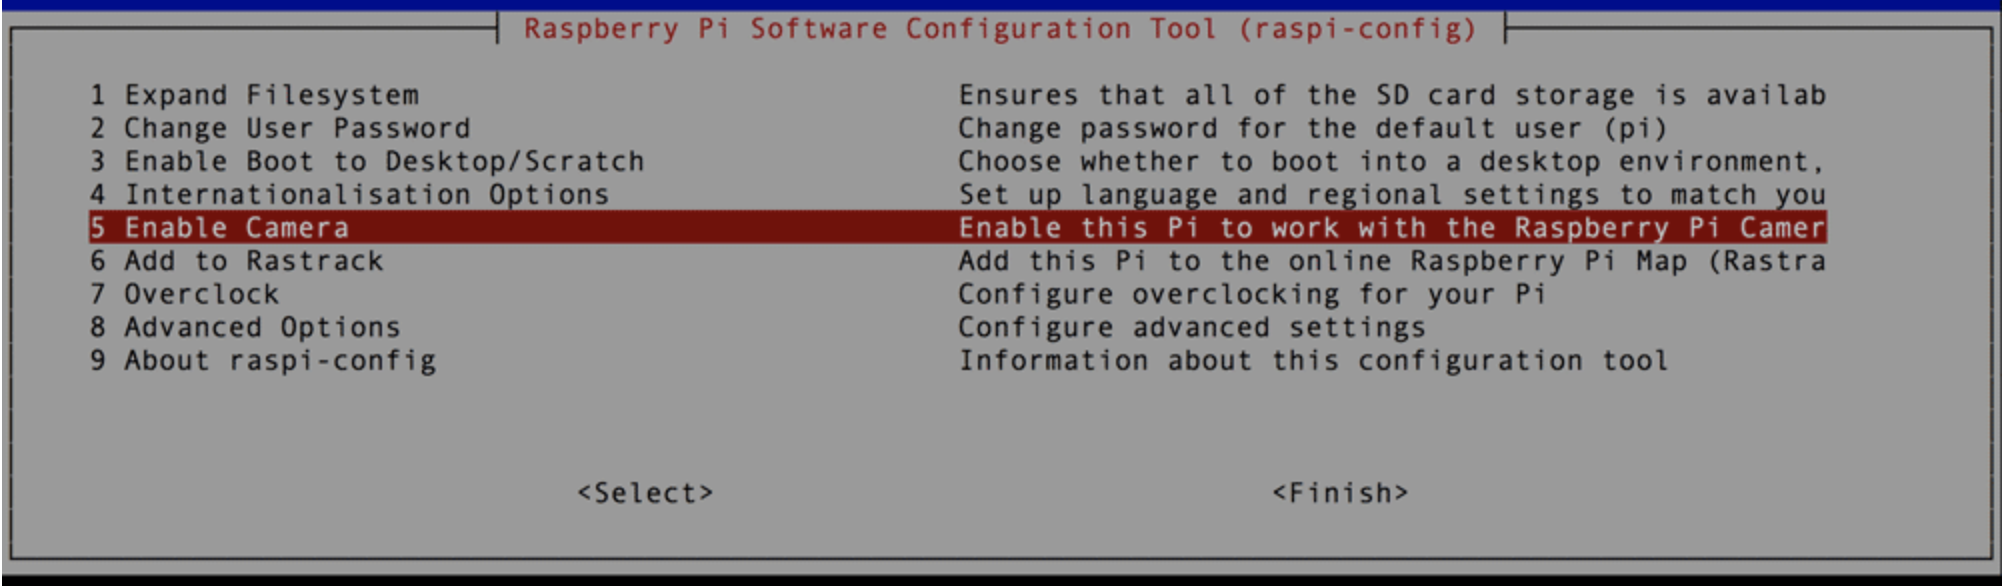
- Select the
Enable Camera(ie 5th option)menu option and press ENTER.
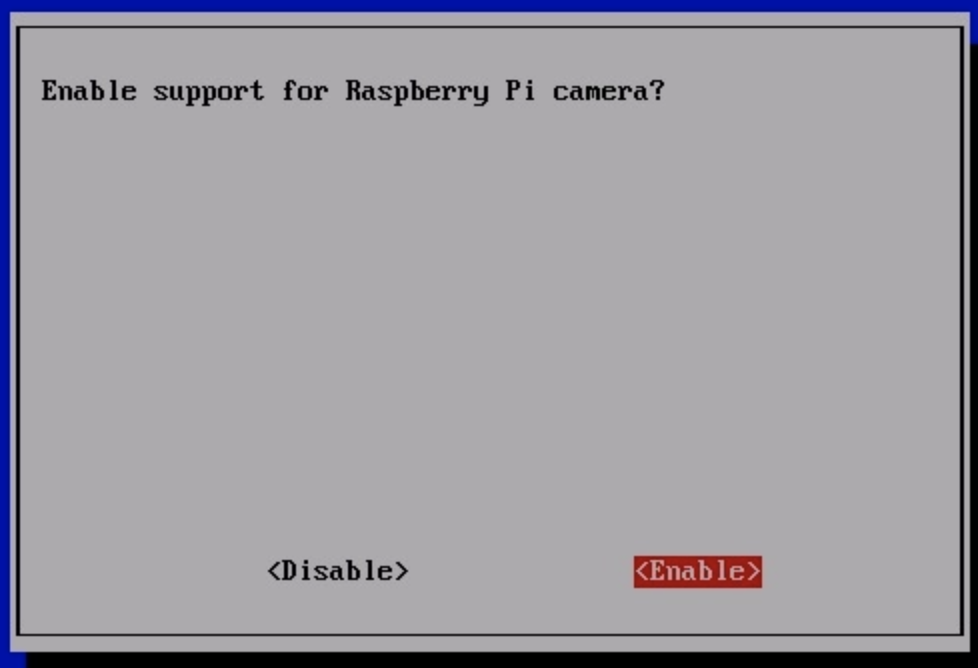
- In the next menu, use the right arrow key to highlight
ENABLEand press ENTER.
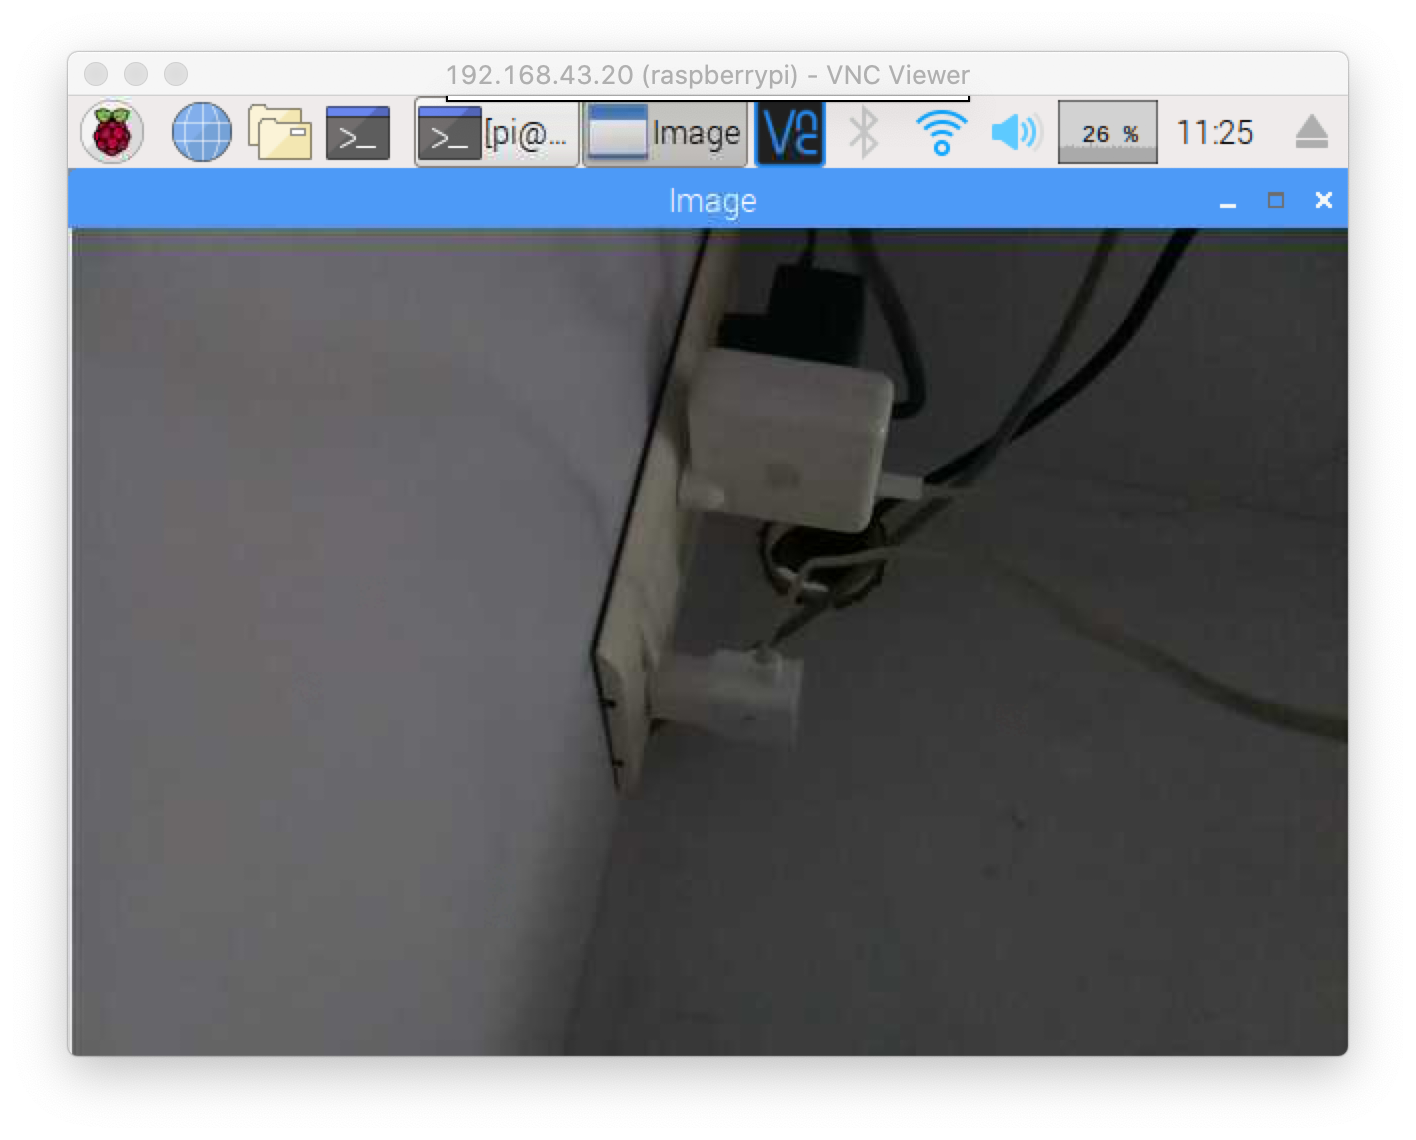
Next, verify the Pi Camera is installed correctly by starting the camera’s preview overlay. The overlay will render on the screen.
- Connect to Raspberry Pi using VNC Viewer.
- Run the following command:
raspistill -v -o test.jpgIf you installed the Pi Camera correctly, you should see footage from the camera rendered to your screen.
Please follow this link to install OpenCV
https://www.learnopencv.com/install-opencv-4-on-raspberry-pi/
Code
Run the following command to create and open a new script file:
cd Desktop
sudo nano main.py
Copy the script and then paste it in the new file you created.
import cv2.cv as cv
from datetime import datetime
import time
import sys
import datetime
count=0
class MotionDetector():
def onChange(self, val): #callback when the user change the ceil
self.ceil = val
def __init__(self,ceil=8, doRecord=True, showWindows=True):
self.writer = None
self.font = None
self.doRecord=doRecord #Either or not record the moving object
self.show = showWindows #Either or not show the 2 windows
self.frame = None
self.capture=cv.CaptureFromCAM(0)
self.frame = cv.QueryFrame(self.capture) #Take a frame to init recorder
if doRecord:
self.initRecorder()
self.frame1gray = cv.CreateMat(self.frame.height, self.frame.width, cv.CV_8U) #Gray frame at t-1
cv.CvtColor(self.frame, self.frame1gray, cv.CV_RGB2GRAY)
#Will hold the thresholded result
self.res = cv.CreateMat(self.frame.height, self.frame.width, cv.CV_8U)
self.frame2gray = cv.CreateMat(self.frame.height, self.frame.width, cv.CV_8U) #Gray frame at t
self.width = self.frame.width
self.height = self.frame.height
self.nb_pixels = self.width * self.height
self.ceil = ceil
self.isRecording = False
self.trigger_time = 0 #Hold timestamp of the last detection
if showWindows:
cv.NamedWindow("Image")
#cv.CreateTrackbar("Mytrack", "Image", self.ceil, 100, self.onChange)
def initRecorder(self): #Create the recorder
codec = cv.CV_FOURCC('D', 'I', 'V', 'X')
#codec = cv.CV_FOURCC("D", "I", "B", " ")
self.writer=cv.CreateVideoWriter(datetime.now().strftime("%b-%d_%H:%M:%S")+".avi", codec, 15, cv.GetSize(self.frame), 1)
#FPS set at 15 because it seems to be the fps of my cam but should be ajusted to your needs
self.font = cv.InitFont(cv.CV_FONT_HERSHEY_SIMPLEX, 1, 1, 0, 2, 8) #Creates a font
def run(self):
global count
started = time.time()
while True:
curframe = cv.QueryFrame(self.capture)
instant = time.time() #Get timestamp o the frame
self.processImage(curframe) #Process the image
if not self.isRecording:
if self.somethingHasMoved():
self.trigger_time = instant #Update the trigger_time
if instant > started +5:#Wait 5 second after the webcam start for luminosity adjusting etc..
print "Human Detected"
count += 1
print(count/2)
orig_stdout = sys.stdout
f = open('out.txt', 'a+')
sys.stdout = f
print(count/2)
sys.stdout = orig_stdout
f.close()
#timestamp log
orig_stdout = sys.stdout
f = open('log.txt', 'a+')
sys.stdout = f
timestampc =('Timestamp: {:%Y-%b-%d %H:%M:%S}'.format(datetime.datetime.now()))
print(timestampc+'   Log Entry : 1')
sys.stdout = orig_stdout
f.close()
if self.doRecord: #set isRecording=True only if we record a video
self.isRecording = True
else:
if instant >= self.trigger_time +10: #Record during 10 seconds
print "Stop recording"
self.isRecording = False
else:
cv.PutText(curframe,datetime.now().strftime("%b %d, %H:%M:%S"), (25,30),self.font, 0) #Put date on the frame
cv.WriteFrame(self.writer, curframe) #Write the frame
if self.show:
cv.ShowImage("Image", curframe)
#cv.ShowImage("Res", self.res)
cv.Copy(self.frame2gray, self.frame1gray)
c=cv.WaitKey(1)
if c==27 or c == 1048603: #Break if user enters 'Esc'.
break
def processImage(self, frame):
cv.CvtColor(frame, self.frame2gray, cv.CV_RGB2GRAY)
#Absdiff to get the difference between to the frames
cv.AbsDiff(self.frame1gray, self.frame2gray, self.res)
#Remove the noise and do the threshold
cv.Smooth(self.res, self.res, cv.CV_BLUR, 5,5)
element = cv.CreateStructuringElementEx(5*2+1, 5*2+1, 5, 5,  cv.CV_SHAPE_RECT)
cv.MorphologyEx(self.res, self.res, None, None, cv.CV_MOP_OPEN)
cv.MorphologyEx(self.res, self.res, None, None, cv.CV_MOP_CLOSE)
cv.Threshold(self.res, self.res, 10, 255, cv.CV_THRESH_BINARY_INV)
def somethingHasMoved(self):
nb=0 #Will hold the number of black pixels
for y in range(self.height): #Iterate the hole image
for x in range(self.width):
if self.res[y,x] == 0.0: #If the pixel is black keep it
nb += 1
avg = (nb*100.0)/self.nb_pixels #Calculate the average of black pixel in the image
#print "Average: ",avg, "%\r",
if avg > self.ceil:#If over the ceil trigger the alarm
return True
else:
return False
if __name__=="__main__":
detect = MotionDetector(doRecord=False)
detect.run()
Download - https://www.hackster.io/code_files/438321/download
Once that is done, simply save the file by typing "CTRL+X", then Y, and then ENTER. The script can be run by typing in the following command:
python main.pyYou should be able to see an image on the screen and please view the video to verify, if needed and there is the human count by the program in the terminal.

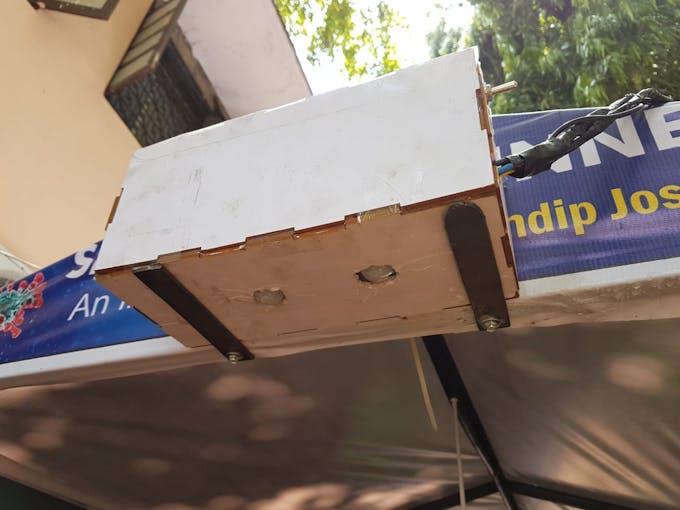
I just created an encloser with MDF sheet for the Arduino and Raspberry Pi 3
Install the apache2 package with this command:
sudo apt install apache2 -yTo allow your Apache server to process PHP files, you'll need to install the latest version of PHP and the PHP module for Apache. Type the following command to install these:
sudo apt install php libapache2-mod-php -yNow download the Dashboard.zip :
cd /var/www/html
wget "https://hacksterio.s3.amazonaws.com/uploads/attachments/1097966/Dashboard.zip"
and Install unzip:
sudo apt-get install unzipextract the files from a ZIP file:
unzip Dashboard.zipNow save and refresh your browser. You should see
Please follow this link https://www.raspberrypi.org/documentation/configuration/wireless/access-point.md
Note: Name Wireless Access Point as SanitizingTunnel
interface=wlan0
driver=nl80211
ssid=SanitizingTunnel
hw_mode=g
channel=7
wmm_enabled=0
macaddr_acl=0
auth_algs=1
ignore_broadcast_ssid=0
wpa=2
wpa_passphrase=SecretPassword
wpa_key_mgmt=WPA-PSK
wpa_pairwise=TKIP
rsn_pairwise=CCMP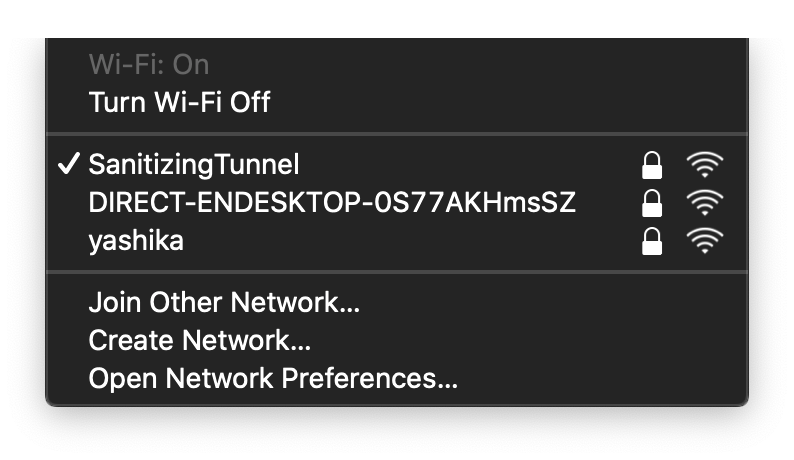
Prerequisite: Android Studio
You can simply download the code directly from here.
And change your credentials like IP Address of your raspberry pi according to your needs.

Prerequisite: XCode
You can simply download the code directly from here.
And change your credentials like IP Address of your raspberry pi according to your needs.

The disinfection tunnel has 0.4% of Sodium hypochlorite solution in 100 liters of water.
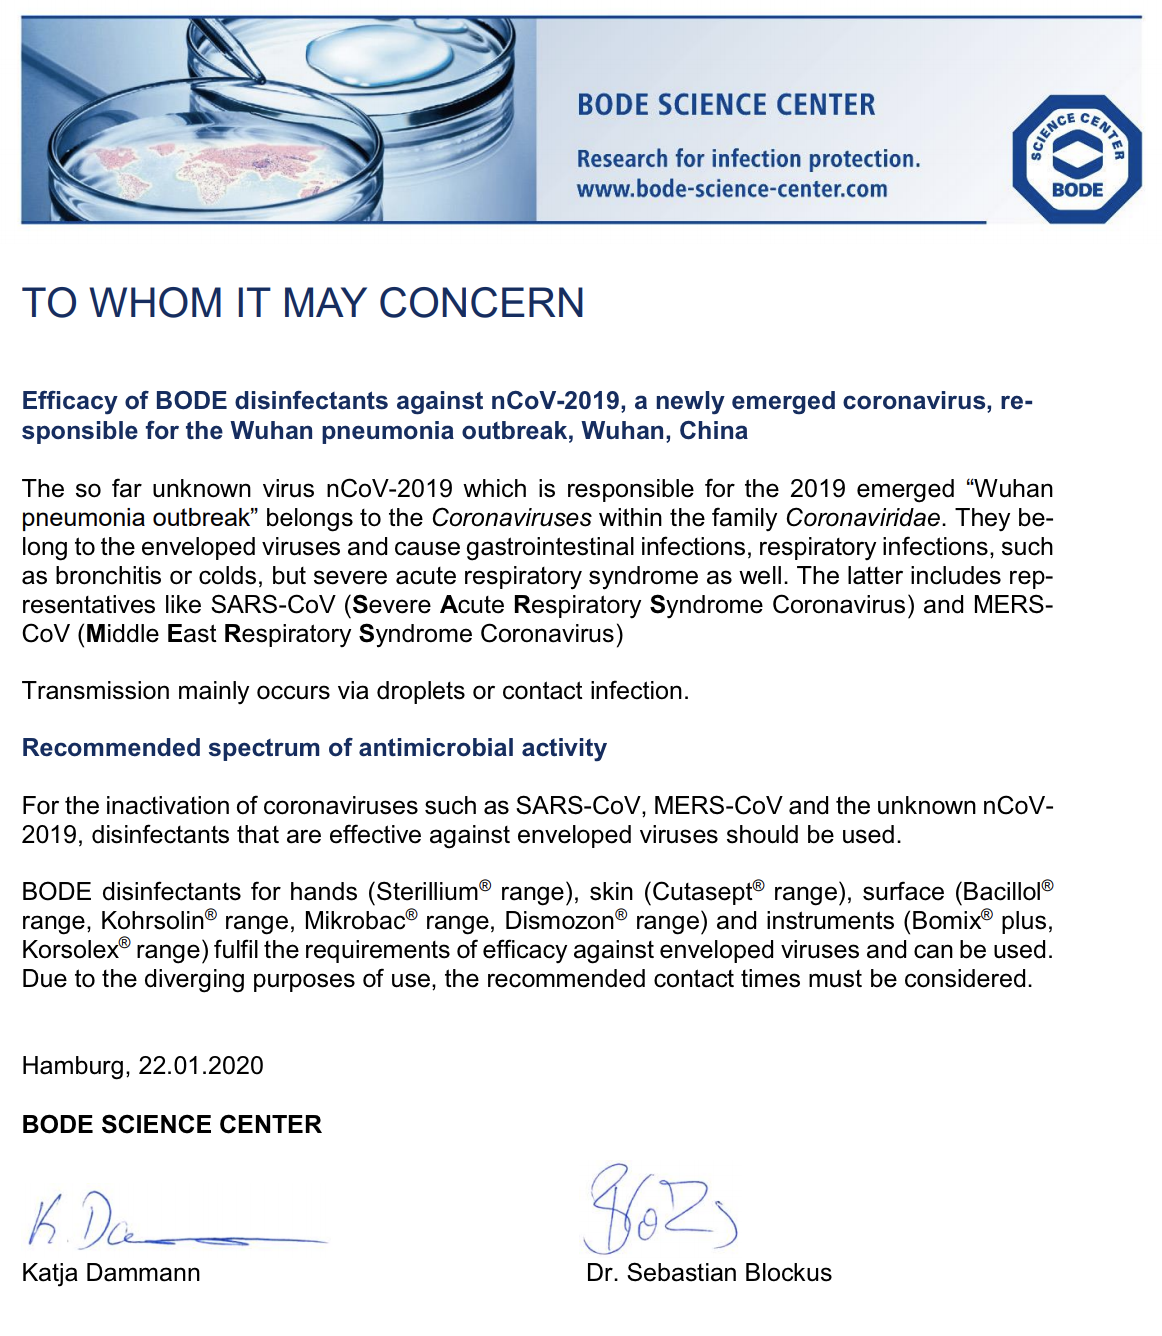
Update - I had seen lots of comments saying that You are using harmful chemicals.
So, I just collect the information from the vendor who was supplying me with this chemical. So he told me that the chemical I am using in this tunnel is from Raman & Weil Pvt. Ltd and they have "Declaration" from Bode Chemie Germany, on efficacy against COVID-19.
Official Link - http://ramanweil.com/pdf/Declaration%20from%20Bode%20Chemie%20Germany%20on%20efficacy%20against%20COVID%2019.pdf
Finally, it was time to power on the Tunnel and check all the routines and app are working as per plan.

Link - https://docs.google.com/spreadsheets/d/1jt-hy8N8IwuQnaLYt-25BywdlREkEhp5zjAfYC6eGqw/edit?usp=sharing
Code
- Arduino Code Tunnel
- main.py
- Dashboard Files
- Sanitation-Tunnel Android Source Code
- Sanitation-Tunnel Android App
- Sanitation-Tunnel iOS Source Code
Arduino Code TunnelC/C++
/*
 * Smart Disinfection and Sanitation Tunnel
 */

int relayPin = 12;                // choose the pin for the Relay Pin

int inputPin = 2;               // choose the input pin (for PIR sensor)
int inputPin2 = 3;               // choose the input pin (for PIR sensor 02)

int pirState = LOW;             // we start, assuming no motion detected
int val = 0;                    // variable for reading the pin status
int val2 = 0;                    // variable for reading the pin status


void setup() {
  pinMode(relayPin, OUTPUT);      // declare Relay as output
  pinMode(inputPin, INPUT);     // declare PIR sensor as input
  pinMode(inputPin2, INPUT);
  Serial.begin(9600);
}

void loop(){
  val = digitalRead(inputPin);  // read input value
  val2 = digitalRead(inputPin2);  // read input value
  if (val == HIGH || val2 == HIGH) {            // check if the input is HIGH
    digitalWrite(relayPin, HIGH);  // turn Relay ON
    if (pirState == LOW) {
      // we have just turned on
      Serial.println("Motion detected!");
      // 15 sec delay
      delay(15000);
      // We only want to print on the output change, not state
      pirState = HIGH;
    }
  } else {
    digitalWrite(relayPin, 0); // turn Relay OFF
    if (pirState == HIGH){
      // we have just turned of
      Serial.println("Motion ended!");
      // We only want to print on the output change, not state
      pirState = LOW;
    }
  }

}
main.pyPython
import cv2.cv as cv
from datetime import datetime
import time
import sys
import datetime


count=0

class MotionDetector():

    def onChange(self, val): #callback when the user change the ceil
        self.ceil = val

    def __init__(self,ceil=8, doRecord=True, showWindows=True):
        self.writer = None
        self.font = None
        self.doRecord=doRecord #Either or not record the moving object
        self.show = showWindows #Either or not show the 2 windows
        self.frame = None

        self.capture=cv.CaptureFromCAM(0)
        self.frame = cv.QueryFrame(self.capture) #Take a frame to init recorder
        if doRecord:
            self.initRecorder()

        self.frame1gray = cv.CreateMat(self.frame.height, self.frame.width, cv.CV_8U) #Gray frame at t-1
        cv.CvtColor(self.frame, self.frame1gray, cv.CV_RGB2GRAY)

        #Will hold the thresholded result
        self.res = cv.CreateMat(self.frame.height, self.frame.width, cv.CV_8U)

        self.frame2gray = cv.CreateMat(self.frame.height, self.frame.width, cv.CV_8U) #Gray frame at t

        self.width = self.frame.width
        self.height = self.frame.height
        self.nb_pixels = self.width * self.height
        self.ceil = ceil
        self.isRecording = False
        self.trigger_time = 0 #Hold timestamp of the last detection

        if showWindows:
            cv.NamedWindow("Image")
            #cv.CreateTrackbar("Mytrack", "Image", self.ceil, 100, self.onChange)

    def initRecorder(self): #Create the recorder
        codec = cv.CV_FOURCC('D', 'I', 'V', 'X')
        #codec = cv.CV_FOURCC("D", "I", "B", " ")
        self.writer=cv.CreateVideoWriter(datetime.now().strftime("%b-%d_%H:%M:%S")+".avi", codec, 15, cv.GetSize(self.frame), 1)
        #FPS set at 15 because it seems to be the fps of my cam but should be ajusted to your needs
        self.font = cv.InitFont(cv.CV_FONT_HERSHEY_SIMPLEX, 1, 1, 0, 2, 8) #Creates a font

    def run(self):
	global count
        started = time.time()
        while True:

            curframe = cv.QueryFrame(self.capture)
            instant = time.time() #Get timestamp o the frame

            self.processImage(curframe) #Process the image

            if not self.isRecording:
                if self.somethingHasMoved():
                    self.trigger_time = instant #Update the trigger_time
                    if instant > started +5:#Wait 5 second after the webcam start for luminosity adjusting etc..
                        print "Human Detected"


    			count += 1
			print(count/2)


			orig_stdout = sys.stdout
			f = open('out.txt', 'a+')
			sys.stdout = f


			print(count/2)

			sys.stdout = orig_stdout
			f.close()

			#timestamp log
			orig_stdout = sys.stdout
			f = open('log.txt', 'a+')
			sys.stdout = f


			timestampc =('Timestamp: {:%Y-%b-%d %H:%M:%S}'.format(datetime.datetime.now()))

			print(timestampc+'   Log Entry : 1')

			sys.stdout = orig_stdout
			f.close()


                        if self.doRecord: #set isRecording=True only if we record a video
                            self.isRecording = True
            else:
                if instant >= self.trigger_time +10: #Record during 10 seconds
                    print "Stop recording"
                    self.isRecording = False
                else:
                    cv.PutText(curframe,datetime.now().strftime("%b %d, %H:%M:%S"), (25,30),self.font, 0) #Put date on the frame
                    cv.WriteFrame(self.writer, curframe) #Write the frame

            if self.show:
                cv.ShowImage("Image", curframe)
                #cv.ShowImage("Res", self.res)

            cv.Copy(self.frame2gray, self.frame1gray)
            c=cv.WaitKey(1)
            if c==27 or c == 1048603: #Break if user enters 'Esc'.
                break

    def processImage(self, frame):
        cv.CvtColor(frame, self.frame2gray, cv.CV_RGB2GRAY)

        #Absdiff to get the difference between to the frames
        cv.AbsDiff(self.frame1gray, self.frame2gray, self.res)

        #Remove the noise and do the threshold
        cv.Smooth(self.res, self.res, cv.CV_BLUR, 5,5)
        element = cv.CreateStructuringElementEx(5*2+1, 5*2+1, 5, 5,  cv.CV_SHAPE_RECT)
        cv.MorphologyEx(self.res, self.res, None, None, cv.CV_MOP_OPEN)
        cv.MorphologyEx(self.res, self.res, None, None, cv.CV_MOP_CLOSE)
        cv.Threshold(self.res, self.res, 10, 255, cv.CV_THRESH_BINARY_INV)

    def somethingHasMoved(self):
        nb=0 #Will hold the number of black pixels

        for y in range(self.height): #Iterate the hole image
            for x in range(self.width):
                if self.res[y,x] == 0.0: #If the pixel is black keep it
                    nb += 1
        avg = (nb*100.0)/self.nb_pixels #Calculate the average of black pixel in the image
        #print "Average: ",avg, "%\r",
        if avg > self.ceil:#If over the ceil trigger the alarm
            return True
        else:
            return False

if __name__=="__main__":
    detect = MotionDetector(doRecord=False)
    detect.run()
Dashboard FilesPHP
No preview (download only).
Sanitation-Tunnel Android Source CodeJava
No preview (download only).
Sanitation-Tunnel Android AppJava
Demo AppNo preview (download only).
Sanitation-Tunnel iOS Source CodeSwift
No preview (download only).
Smart Disinfection and Sanitation Tunnel
https://github.com/yugn27/Smart-Disinfection-and-Sanitation-TunnelCustom parts and enclosures
smart_disinfection_and_sanitation_tunnel_prlFu8ZRXO.3mfSchematics
Circuit Diagram - fritzing filesmart_disinfection_and_sanitation_tunnel_Zkb20Q5S2B.fzzManufacturing process
- Arduino Temperature & Humidity Logger Using DHT11 and Ethernet Shield
- Build a Smart IoT Jar with ESP8266, Arduino & Ultrasonic Sensor – Real‑Time Monitoring
- Build a Smart Home Automation & Security System with 1Sheeld
- Celebrate with Light & Sound: DIY Birthday Arduino Project
- Autonomous Face‑Tracking Robot Car with Arduino Nano & OpenCV
- Build a WiFi Weather Station with ESP8266 and DHT22 Temperature Sensor
- Smart Plug: 120V Arduino‑Based Smart Outlet with Real‑Time Clock
- Control Lights & Fan with a TV Remote: A Simple DIY IR Project
- Smart Home Automation Powered by Raspberry Pi 2 & Windows 10 IoT
- Industrial IoT & Smart Manufacturing: Transforming Plant Operations