


Decode RC Receiver PPM Signals with Arduino: A Step‑by‑Step Guide
Components and supplies
 |
| × | 1 |
Apps and online services
 |
|
About this project
RC transmitter is very well suitable for the projects requires a wireless link as it has encrypted links with a good range.
All RC receiver is made to drive servo motors. so there are 3 pins for each channel: ground, Vcc, and signal. here a special kind of signal is used. It sends pulses at some interval. When servo receives 1.5ms pulse it sets to 90 degrees and by varying this value from 1-2ms servo goes to minimum and maximum value. (In the above photo a 6 channel receiver is shown with PPM pin)
So easy method is to measuring pulse width on each pin and map that data as per requirement. but here the problem is that:
- For each channel of the receiver, we need to connect a wire to the Arduino pin. This not only requires lots of connection but also consume lots of pins on an Arduino.
- Most of Arduino just has 2 interrupt pin so if we use more than 2 channels read it to add some delay to our code which may be problematic for some application.
To solve this problem many receivers come with an extra pin called PPM. this PPM pin transmits data of all channels in a single signal.
How PPM Pin Signal Composed?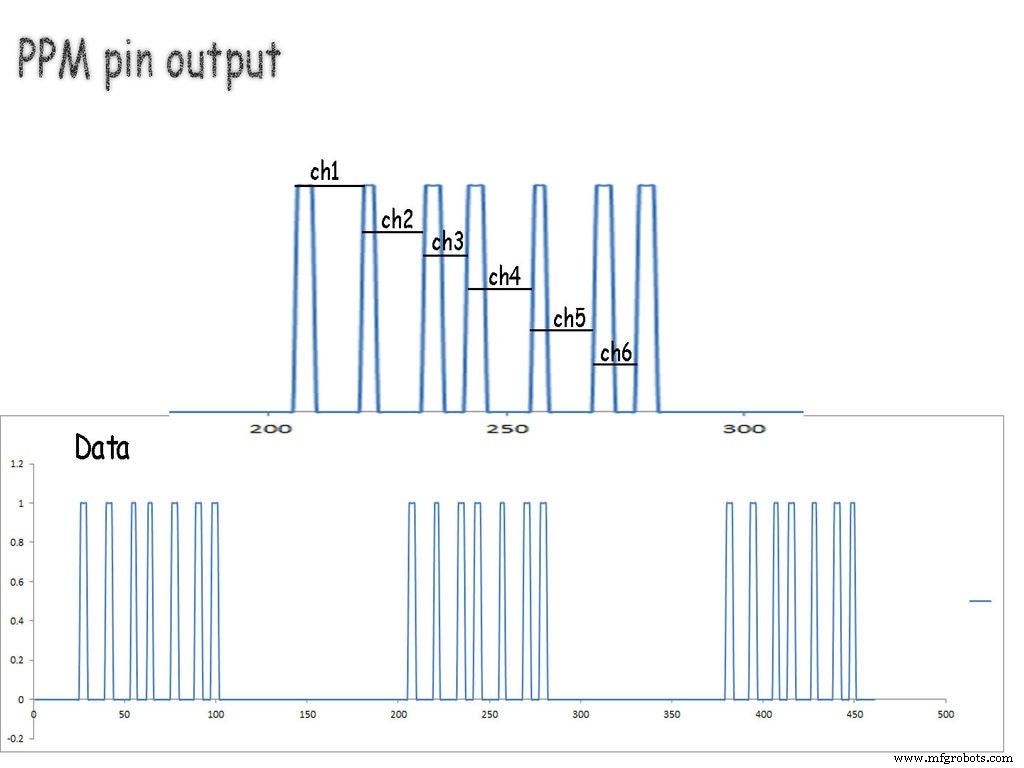
This signal consists of data packets separated by blank space. Here space in between peaks represents the value of the channel. in this case, I have used 6 channel receiver so there are 7 pulses.
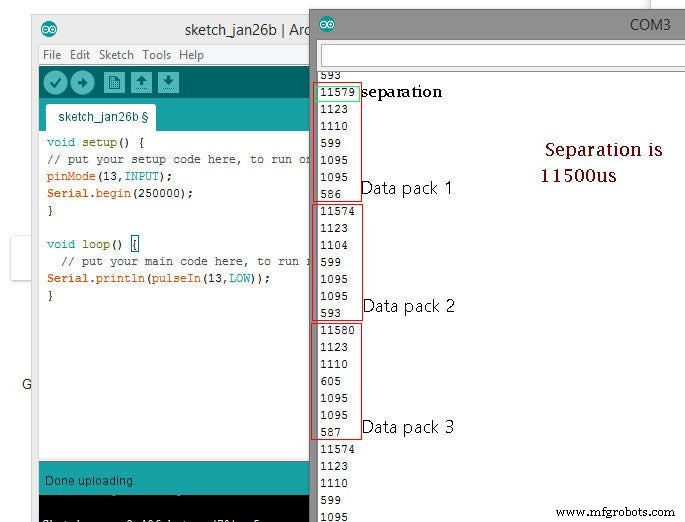
So in our code first, we need to detect separation space and then start recording data from the pulses for each channel.
As can be seen in the second image,
all data is separated with approx 11500 microseconds of time. than 6 values are for each channel.
Using the Code: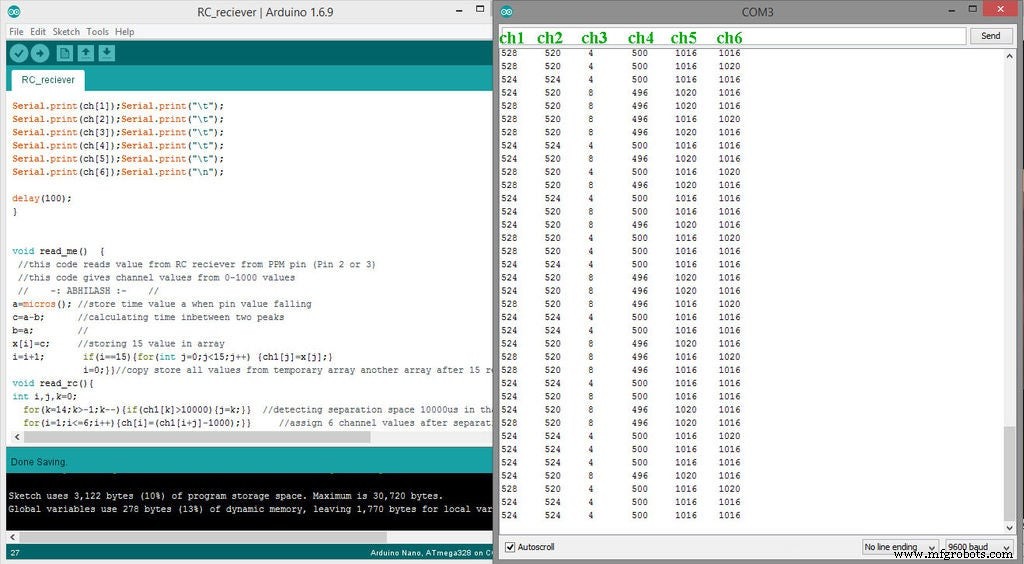
Here read_me() specified as function:
a=micros(); c=a-b; b=a; x[i]=c; i=i+1;
if(i==15){for(int j=0;j<15;j++) {ch1[j]=x[j];}          i=0;  } }
this part runs on interrupt pin and take 15 time values and store it in an array.
another function read_rc()
this part looks for any space which is higher than 10000microsecond, in our case it detects separation space, and as it detects that space code moves to the next section.
after this space next 6 values are for each channel position it is stored in array named ch[ channel no], here ch[1], ch[2], ch[3], ch[4], ch[5], ch[6] represents value of each channel.
Code
- Code for RC receiver channel read
Code for RC receiver channel readArduino
unsigned long int a,b,c;
int x[15],ch1[15],ch[7],i;
//specifing arrays and variables to store values

void setup() {
Serial.begin(9600);
  pinMode(2, INPUT_PULLUP);
  attachInterrupt(digitalPinToInterrupt(2), read_me, FALLING);
  // enabling interrupt at pin 2
}

void loop() {
read_rc();

Serial.print(ch[1]);Serial.print("\t");
Serial.print(ch[2]);Serial.print("\t");
Serial.print(ch[3]);Serial.print("\t");
Serial.print(ch[4]);Serial.print("\t");
Serial.print(ch[5]);Serial.print("\t");
Serial.print(ch[6]);Serial.print("\n");

delay(100);
}


void read_me()  {
 //this code reads value from RC reciever from PPM pin (Pin 2 or 3)
 //this code gives channel values from 0-1000 values
 //    -: ABHILASH :-    //
a=micros(); //store time value a when pin value falling
c=a-b;      //calculating time inbetween two peaks
b=a;        //
x[i]=c;     //storing 15 value in array
i=i+1;       if(i==15){for(int j=0;j<15;j++) {ch1[j]=x[j];}
             i=0;}}//copy store all values from temporary array another array after 15 reading
void read_rc(){
int i,j,k=0;
  for(k=14;k>-1;k--){if(ch1[k]>10000){j=k;}}  //detecting separation space 10000us in that another array
  for(i=1;i<=6;i++){ch[i]=(ch1[i+j]-1000);}}     //assign 6 channel values after separation space
Manufacturing process
- Create a Stunning Monitor Ambilight System with Arduino
- Build a Smart Voltmeter with Arduino & Smartphone – Easy DIY Project
- Real‑Time IoT Heart Rate Monitor with Arduino & MAX30100
- Build a Compact FM Radio with Arduino Nano and RDA8057M
- Build a Powerful FM Radio Receiver with Arduino and TEA5767 Module
- Build an Arduino Calculator with 16x2 LCD and Keypad
- Build a Real-Time Face-Tracking System with Arduino & OpenCV
- Efficiently Control 10 Buttons with a Single Interrupt on Arduino UNO
- Create an AM Music Transmitter Using Arduino Nano
- Connecting an L293D Motor Driver to a DC Motor with Arduino – Step‑by‑Step Guide