Build a Bluetooth‑Controlled Arduino Car: A Complete DIY Guide
Components and supplies
Arduino Nano R3
×
1
Micro Metal Gearmotor - 600RPM 12V
×
2
DRV8833 Motor Driver
×
1
HC-06 Bluetooth Module
×
1
18650 Li-on Battery
×
1
18650 Battery Holder
×
1
11mm x 6mm Slide Switch
×
1
M3 Screw (10mm) and Nut
×
1
Some Cables
×
1
Normal Rubber Bands
×
4
Necessary tools and machines
Soldering iron (generic)
3D Printer (generic)
About this project
Hello friends! My name is Nikolas, I am 15 years old and I live in Athens, Greece. Today I will show you how to make a 2-Wheel Bluetooth Controlled Car using an Arduino Nano, a 3D printer and some simple electronic components! Make sure to watch my YouTube Video to see the car in action and to follow the instructions from there if you prefer!
Story
I got into basic electronics when I was 9 years old when my dad brought me some batteries, a switch and a small light bulb to play with, I was super excited. Around that time with the help of my dad I made my first ever car which was as simple as it could be. It consisted of an old phone's box to which we had attached four dc motors with some wheels from some toy cars we had and they were powered from a few AA batteries, it could only move forwards but 9 year old me was really proud and happy. Over the following years I made quite a handful of creations and MANY toy cars. At some point I set myself the goal to make a remote controlled car that, this might seem quite easy to you, but for my past self it was way out of my league. However when the pandemic broke out last spring and we got into quarantine, I got into more complex electronics and around April I achieved my goal by making a car based on an Arduino Uno that could be controlled via an IR remote! I then put myself the goal to make a car that would be controlled through Bluetooth with my phone. This is where this tutorials comes into place. Enjoy!
Step 1: 3D Printing
I designed the 3D files myself using Onshape. You will need to print the Base and also two Wheels. I printed all the parts in Prusament Gold PETG at 0.2mm layer height and 40% infill on the Creality Ender 3 V2.
You can find the .stl files here: Thingiverse
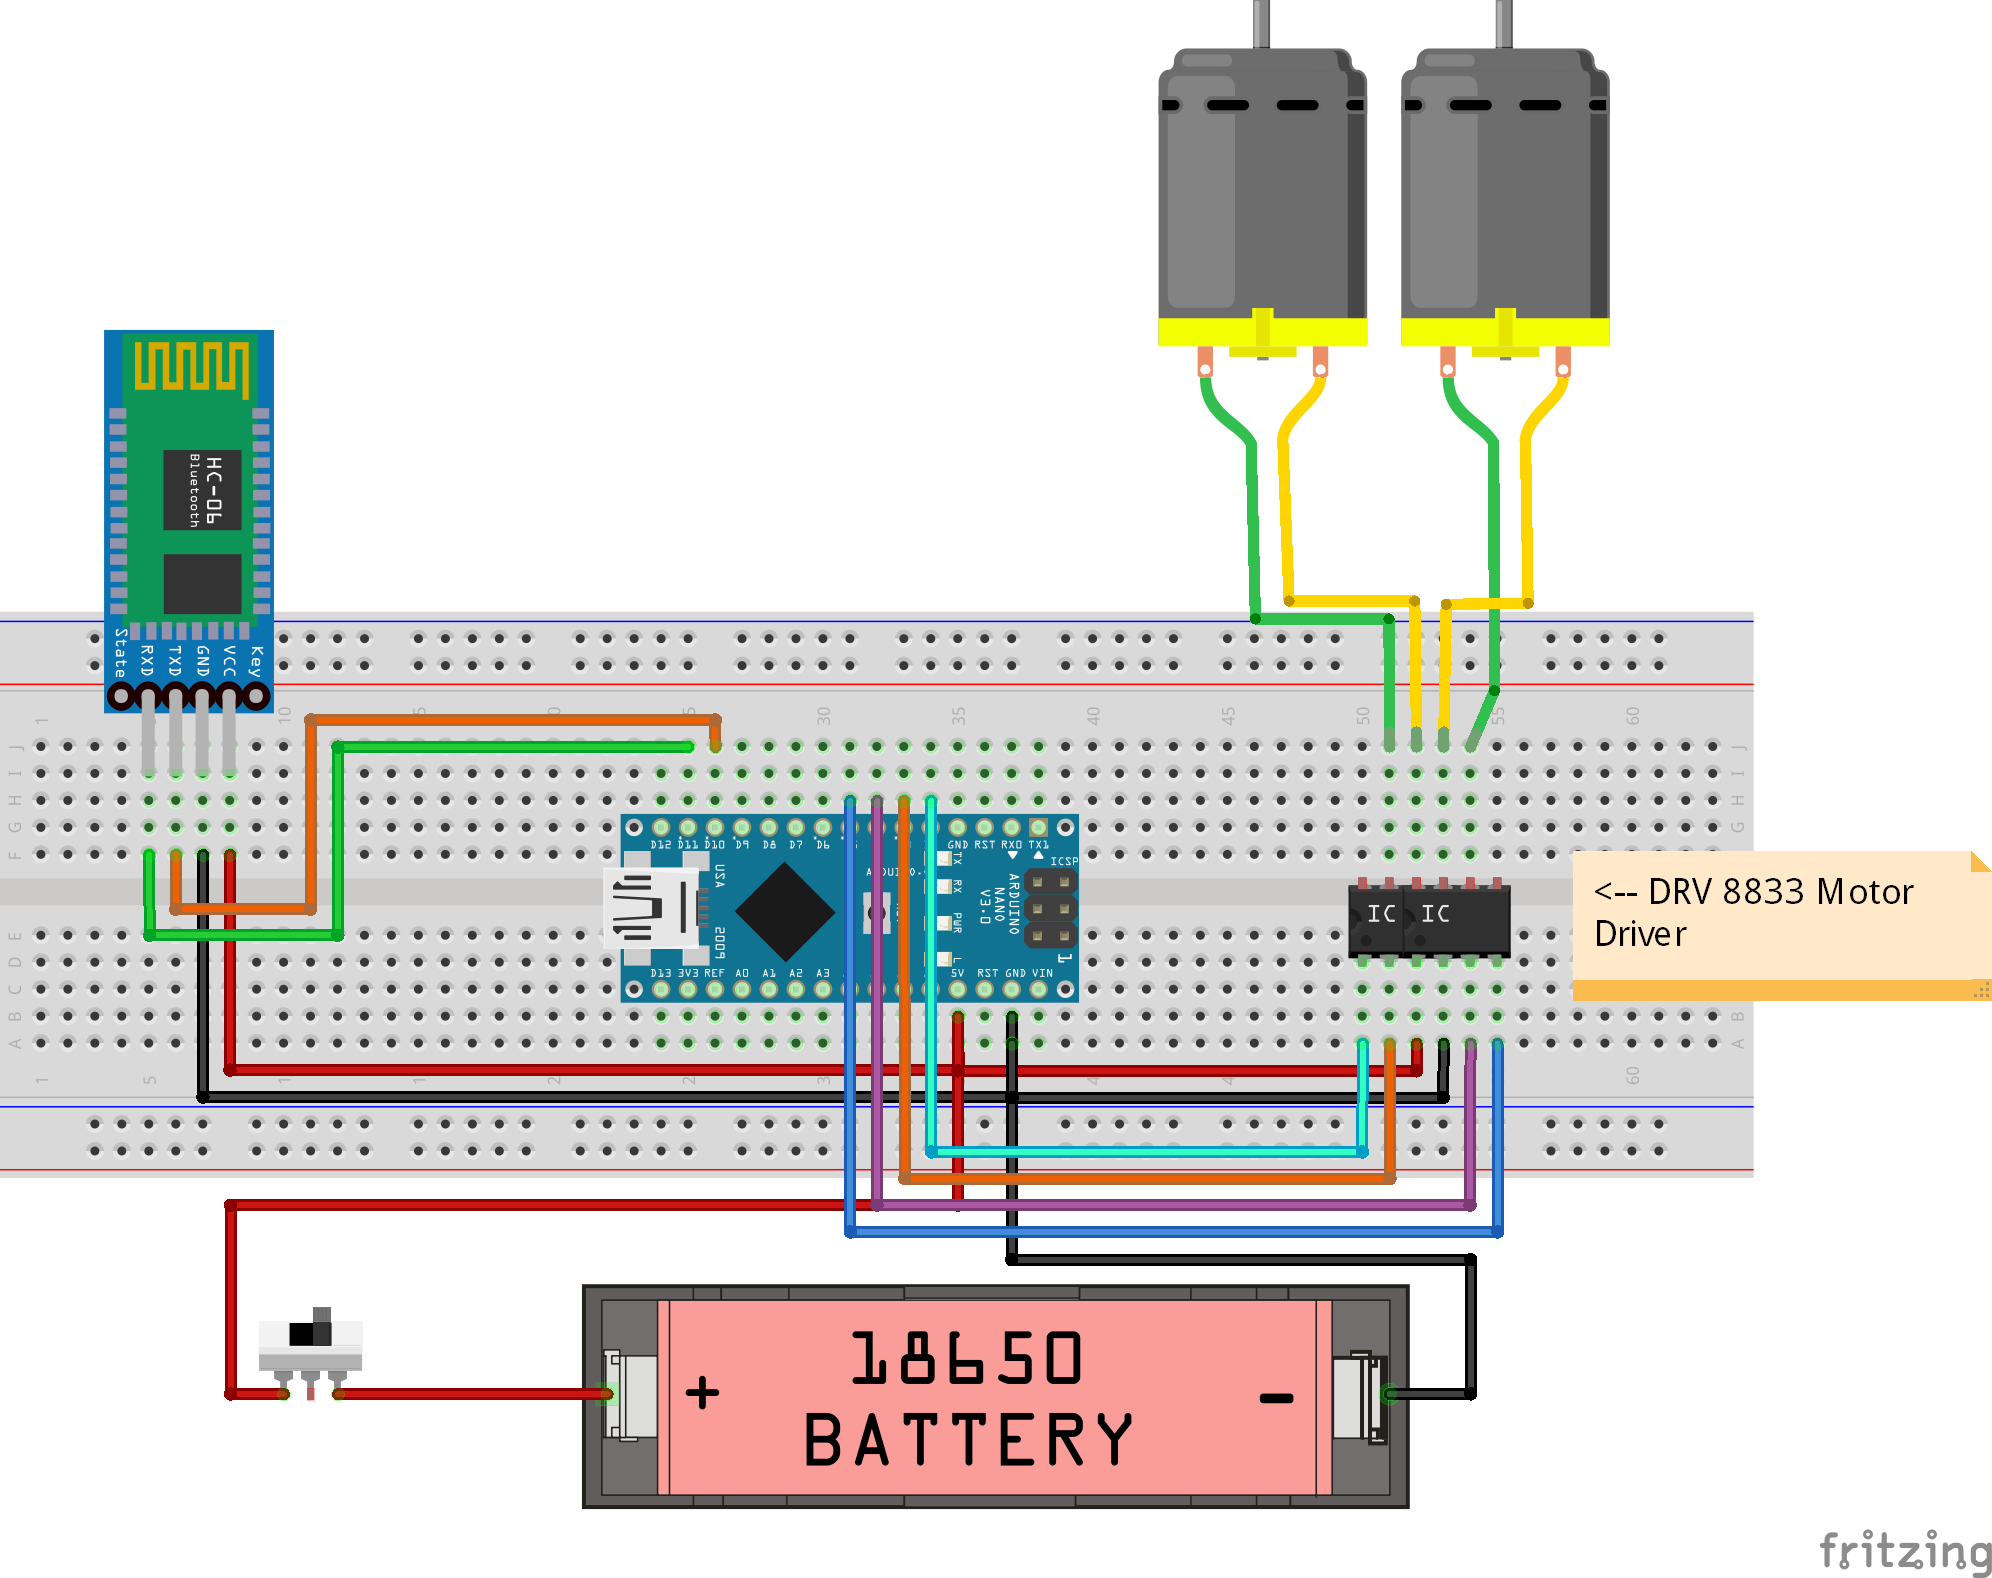
Step 2: Circuit
Time to make the circuit! So now put the Arduino Nano, the DRV8833 and the HC-06 on your breadboard.
Connect the second motor's cables to OUT3 and OUT4
Connect the battery's "" to 5V and the "-" to GND (You can add the slide switch to the "+" now if you want)
Step 3: Programming
Let's upload the code to the Arduino Nano! Simply connect it to your computer with a USB Cable then open the "BluetoothCar.ino" file with Arduino IDE. Make sure that the options at the Tools tab are the same as in the picture above and that you have selected the correct COM port. Click "Upload" and you are good to go!
BluetoothCar.inoStep 4: Bluetooth App
It is time to try if our circuit and program are working as intended. I made my own Android App using MIT App Inventor which is a simple program that allows you to make Android Apps easily! You can install the App on your Android phone by downloading the "BluetoothController.apk" below. There are some alternatives on the Play Store and the App Store if you prefer, but I made this one because the car moves only if your finger is on the button, which is a feature I really like.
When connecting to the Bluetooth module for the very first time you will need to turn on the Bluetooth on your device, then you'll have to find a device named "HC-06" and to connect to it you'll have to put in the password "1234" or "0000". Afterwards go to the app and click the Bluetooth Button and select the HC-06. Now you have successfully connected your car to your smartphone and you can control the motors through the app!
BluetoothController.apkStep 5: Assembly
Now you should solder the electronics and get ready to assemble the car!
Screw the 18650 battery holder to the base and add the nut
Push the two motors into place
Fit the slider switch into place
Fit the DRV8833 Motor Driver into place
Fit the Arduino Nano into place
Slide the HC-06 into place
Add the 18650 battery to its holder
Push the two wheels into the motors' shafts
Last but not least, add 2 rubber bands to each wheel
Step 6: Enjoy Your Creation!
Well done! Now turn it on, connect to it through your Android App and have fun! I hope you enjoyed this tutorial and if you did, consider subscribing to my YouTube channel for more awesome projects, you can also check my Instagram at @n_babetass ! You can leave any questions or recommendations in the comments below! Thank you for your time!
Code
BluetoothCar.ino
BluetoothCar.inoArduino
No preview (download only).
Custom parts and enclosures
Thingiverse
https://www.thingiverse.com/thing:4683747CAD file on thingiverse.com bluetoothcontroller_(1)_Ud3W5pFdl4.apk