


Build a Permanent Capacitor Split-Phase Induction Motor – Step‑by‑Step Guide
Parts & Materials
- AC power source: 120 VAC
- Capacitor, 3.3 µF (or 2.2 µF) 120 VAC / 350 VDC, non‑polarized
- 15–25 W incandescent lamp or 820 Ω, 25 W resistor
- #32 AWG magnet wire
- Wooden board ≈ 5 in. square
- AC line cord with plug
- 1.75‑inch diameter cardboard tube (toilet‑paper roll)
- Lamp socket
- AC power source: 220 VAC
- Capacitor, 1.5 µF 240 VAC / 680 VDC, non‑polarized
- 25–40 W incandescent lamp or 820 Ω, 25 W resistor
- #32 AWG magnet wire
- Wooden board ≈ 15 cm square
- AC line cord with plug
- 4.5–5 cm diameter cardboard tube
- Lamp socket
Cross‑References
See Lessons In Electric Circuits, Volume 2, Chapter 13: “AC motors”, “Single‑Phase induction motors”, and “Permanent split‑capacitor motor.”
Learning Objectives
- Construct an AC permanent capacitor split‑phase induction motor.
- Demonstrate the simplicity and efficiency of the AC induction motor design.
Schematic Diagram
Illustration
Instructions
Choose the parts list that matches the mains voltage in your region. The following steps use the 120 VAC version.
This is a streamlined version of a permanent capacitor split‑phase induction motor. By reducing the coil turns to a few hundred, the winding process becomes manageable while still producing a functional motor.
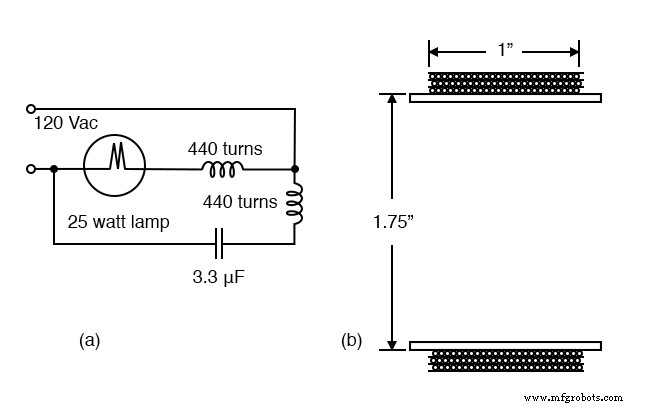
Wind the two stator coils as shown in the illustration. Use approximately 440 turns of #32 AWG magnet wire on a one‑inch section of a slightly longer 1.75‑inch cardboard tube. To keep the winding tight, wrap four layers of wire over a one‑inch width. Secure the first layer with tape or a light adhesive before adding subsequent layers. After the fourth layer, apply glue to lock the windings in place.
If close‑winding proves difficult, you can also scramble 440 turns over the end of the tube, keeping the windings within the one‑inch zone. Trim the finished coil with a razor knife, leaving a small excess of wire for leads.
Strip the enamel from about an inch of each lead, then splice to a heavier‑gauge insulated hookup wire. Solder the connection and cover it with electrical tape or heat‑shrink tubing. Repeat the process for the second coil.
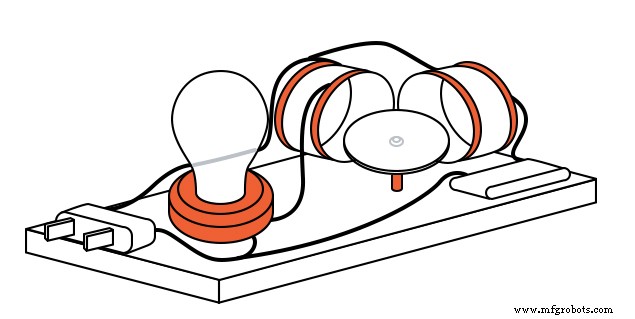
Refer to the schematic and illustration for precise placement. Mount the coils at right angles on an insulating baseboard (wood or acrylic). Wire the 25‑W lamp in series with one coil; this limits current and serves as a resistor. Wire the capacitor in series with the other coil to provide a leading‑phase shift.
The rotor is made from a ferromagnetic piece such as a steel can lid or bottle cap. Dimple the rotor’s center and secure it on a pivot—either a small nail or a ball‑point pen tip—mounted on a wooden pedestal or directly on the baseboard. Balance the rotor by shaving metal from the heavier side if needed.
After assembling the coils and rotor, double‑check all wiring and insulation. The circuit can be powered without the rotor; the lamp should light, and both coils will warm slightly. Excessive heating indicates the need for a lower‑wattage lamp or a lower‑value capacitor.
Place the rotor on the pivot and slide it between the two coils. It should spin, with speed increasing as the rotor approaches the coils. Experiment with different rotor sizes and shapes to observe performance variations.
If #32 AWG wire is unavailable, use a slightly thicker wire—though you may need more than four layers to reach 440 turns. A night‑light fixture can replace the lamp socket, but choose a bulb rated 15 W to match the design.
Related Worksheets
- AC Motor Theory Worksheet
- AC Motor Control Circuits Worksheet
Always work with insulated tools, keep cords away from moisture, and use a fuse or circuit breaker rated for the motor’s current draw. This project follows the proven guidelines from "Lessons In Electric Circuits" and adheres to safety best practices for DIY electrical work.
Industrial Technology
- Hands‑On Electromagnetism Experiment: Build and Test a Simple Electromagnet
- Using a Potentiometer as a Rheostat for Simple Motor Speed Control
- Build a Large-Scale AC Permanent Split‑Capacitor Induction Motor
- Half‑Wave Rectifier Experiment: Build, Measure, and Simulate a Simple AC‑to‑DC Motor Circuit
- Electromagnetic Induction: The Engine of Modern Electricity
- Variable Reluctance Motors: Types, Operation, and Applications
- Tesla Polyphase Induction Motors: Design, Operation, and Applications
- Understanding Single‑Phase Induction Motors: Types, Operation, and Efficiency Improvements
- Induction Furnace Steelmaking: Efficient Electric Melting Technology
- Running a Three‑Phase Induction Motor from a Single‑Phase Power Supply: Proven Methods and Tips