


Adjust Arduino Due Analog Output to Match Input Range
Components and supplies
 |
| × | 1 | |||
| × | 1 | ||||
| × | 2 | ||||
| × | 2 | ||||
| × | 1 | ||||
| × | 1 | ||||
| × | 1 | ||||
| × | 1 |
About this project
This project aims to change the analog output of Arduino Two in order to have a range
equal to the input.
Arduino Due does not have an analog output voltage from 0 V to Vref, but from 1/6 to 5/6 of the reference
voltage, that is, 0.55 V and 2.75V with Vref = 3.3 V. This is also confirmed by the Atmel (see bibliography 1).
The output voltage range of the DAC is only 2.75-0.55 = 2.2 V, with a resolution of 2.2 /4095 = 0.5372 mV.
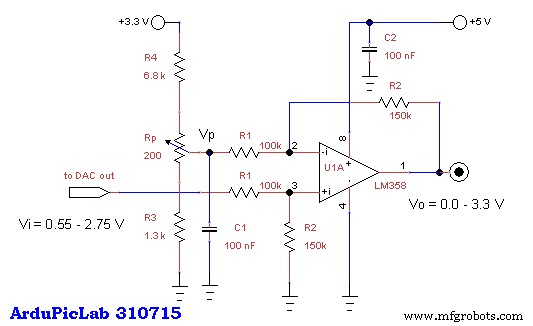
A simple differential amplifier, realized with an op amp, is used to remove the 0.55 V offset and to amplify
the output signal in order to reach the desired value. The figure 1 shows the scheme of this circuit.
To generate the voltage Vp = 0.55 V, that is, the minimum value of the DAC, is used the divider formed by
R3, R4 and Rp. The trimmer pot Rp is used to adjust Vp in order to have an output value close to 0 V in
correspondence with the number 0 sent to the DAC. With a single power supply you can never get exactly
0V but you approach some mV, about 8 in my prototype.
The differential amplifier has the following gain:
Just change the gain, for a different output voltage, but less than 4 V,.
With a gain G = 3.3 /2.2 = 1.5, the output of this circuit has the desired range from 0 to 3.3V.
G = Vo/(Vi-Vp) = R2 / R1
It is recommended to use resistors with a tolerance of 1% or less, particularly for the four resistors of the
amplifier. Don’t use operational amplifier as LM741, LM1458, TL081 and other that are not suitable for
single-supply. If it is required an output maximum voltage above 3.3 V it is essential to use a rail to rail op
amp as TLC2272 or equivalent.
Schematics
Manufacturing process
- Build a Universal IR Remote with Arduino: Step‑by‑Step Guide
- Smart Blinds: Automated Light Control with Arduino & Solar Power
- Using a Thermistor Made Easy: Step‑by‑Step Arduino Guide
- Build an Isolated Analog Input Circuit for Arduino
- Build a TV Output Cable for Arduino UNO with Just Two Resistors
- Arduino Ultrasonic Distance Sensor Project: HC‑SR04 Range Finder
- Hysteresis-Based Arduino Temperature Control System
- Build a Stunning POV Cylinder with Arduino Due – Step‑by‑Step Guide
- Arduino Due Arbitrary Waveform Generator – Powerful, Multi‑Frequency, Linux/Windows Compatible
- Mastering Arduino Analog Inputs: A Step‑by‑Step Video Guide