


Fingerprint Sensor Technology: Working Principles, Applications, and Arduino Integration
Fingerprint recognition has become a cornerstone of modern authentication, offering rapid, cost‑effective, and highly consistent identification. Each individual’s fingerprint is a unique pattern of ridges and valleys, forming whorls, loops, arches, and tented arches that are distinct and difficult to forge. While distinguishing between similar patterns can be challenging, advanced neural‑network algorithms analyze ridge endings and bifurcations—known as minutiae—to achieve reliable matching.
What is a Fingerprint Sensor?
A fingerprint sensor is a specialized device embedded in biometric modules to capture and process fingerprint data. These sensors deliver high accuracy, robust performance, and resilience against environmental factors, making them preferable to traditional password systems. Their biometric approach replaces the need for memorized secrets, dramatically reducing the risk of credential compromise.
Opting for a USB‑based fingerprint reader, coupled with robust biometric software, allows seamless verification, identification, and authentication across devices—without the pitfalls of forgotten or lost passwords.
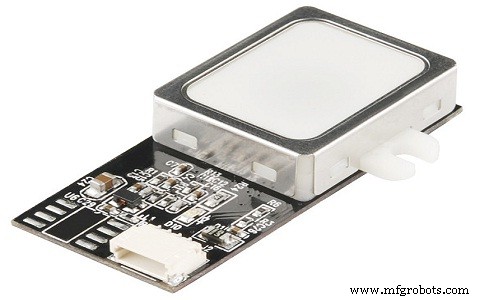
R305 Fingerprint Sensor Module
The R305, along with its sibling R307, is one of the most widely adopted fingerprint modules in the market. It features a high‑performance DSP chip that captures images, extracts features, searches databases, and calculates hash values via TTL serial communication. New enrollments are stored directly in the module’s onboard flash memory, simplifying deployment.
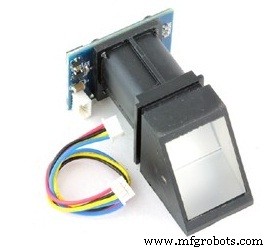
Key Features of the R305 Sensor
- Integrated image capture and proprietary fingerprint algorithm.
- Compact design suitable for a wide range of end products.
- Low power consumption, high performance, and cost‑effective.
- Optical sensing technology ensures precise, reliable capture.
- Supports up to 500 dpi resolution for detailed image quality.
How the Fingerprint Sensor Works
The operation of a fingerprint sensor revolves around two core processes: enrollment and matching. During enrollment, a user places their finger twice; the sensor captures the images, extracts a template, and stores it. When matching, the sensor captures a live image and compares it against stored templates using 1:1 or 1:N algorithms, returning a success or failure result.
Specifications
- Type: Optical
- Interfaces: USB 1.1 / TTL UART
- Scan speed: 0.5 s per fingerprint
- Verification speed: 0.3 s
- Storage capacity: 1,000 templates
- Security level: 5
- UART baud rate: 4,800–115,200 bps
- Current draw: 50 mA typical / 80 mA peak
- Support: 1:N matching
- Backlight: 15 KV bright green
- Lifespan: 100 million scans
- Dimensions: 44.1 × 20 × 23.5 mm
- Character file size: 256 bytes
- Template size: 512 bytes
- False Rejection Rate (FRR): < 1.0 %
- False Acceptance Rate (FAR): 0.001 %
- Operating voltage: 4.2–6.0 VDC
- Temperature range: –20 °C to 40 °C
Integrating the Fingerprint Sensor with Arduino
The following Arduino project demonstrates a practical use case: a fingerprint‑based access system with a TFT display. Required components include an Arduino Nano, the R305 module, a TFT display, a breadboard, jumper wires, and a power bank.
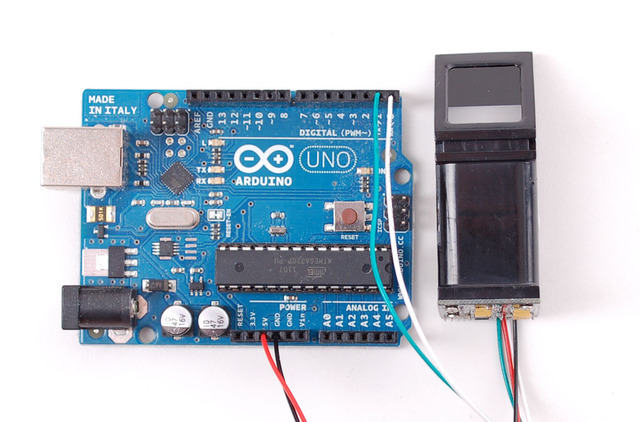
The sensor’s pins are connected as follows:
- DNC – white wire
- VCC – red wire
- TX – blue wire
- RX – green wire
- GND – black wire
Connection to the Arduino:
- Black wire to Arduino GND
- Red wire to Arduino 5 V
- Green wire to Arduino digital pin 2
- White wire to Arduino digital pin 3
Connection of the TFT display:
- VCC to Arduino 5 V
- GND to Arduino GND
- CS to digital pin 10
- RST to digital pin 9
- A0 to digital pin 8
- SDA to digital pin 11
- SCK to digital pin 13
- LED to Arduino 3.3 V
Project Code Overview
Start with the Adafruit Fingerprint Sensor Library and the Adafruit GFX library. Load the “Enroll” example from the library, then upload to the board. The sketch prompts for a finger scan twice to store the template in flash. Sample loop logic checks the fingerprint ID and displays a corresponding welcome screen before automatically locking again.
void loop(){
  fingerprintID = getFingerprintID();
  delay(50);
  if(fingerprintID == 1){
    display.drawBitmap(30,35,icon,60,60,GREEN);
    delay(2000);
    displayUnlockedScreen();
    displayIoanna();
    delay(5000);
    display.fillScreen(BLACK);
    displayLockScreen();
  }
  if(fingerprintID == 2){
    display.drawBitmap(30,35,icon,60,60,GREEN);
    delay(2000);
    displayUnlockedScreen();
    displayNick();
    delay(5000);
    display.fillScreen(BLACK);
    displayLockScreen();
  }
}
With each scan, the module checks if the fingerprint exists in its library and returns a match result, triggering the appropriate display message.
This overview showcases how the R305 sensor’s embedded flash memory enables secure enrollment, collection, search, and comparison—all crucial for applications such as mobile access control, time‑attendance systems, door locks, and secure displays.
Have you considered the cost of adding fingerprint authentication to your next project?
Image Credits: Arduino
Sensor
- Blood Pressure Sensor: How It Works & Key Applications
- Voltage Sensors: How They Work & Key Applications in Modern Power Systems
- RVG Sensor: How It Works and Why It’s Transforming Dental Imaging
- Lambda (Oxygen) Sensor: Function, Operation, and Key Automotive Applications
- Image Sensors: Types, Operation, and Practical Applications
- Color Sensors: How They Work & Key Applications
- Compass Sensors: From Ancient Navigation to Modern Devices
- ACS712 Current Sensor: How It Works and Key Applications
- Vibration Sensors: Principles, Types, and Industrial Applications
- How Oxygen Sensors Work and Their Key Applications in Automotive and Industrial Systems