


Precision 4‑Wire Resistance Measurement: The Kelvin Method
PARTS AND MATERIALS
- 6‑volt lantern battery
- Electromagnet coil or a long spool of wire with accessible ends
- Precision ammeter capable of measuring ≥5 A (recommended)
Ideally, use two meters—a voltmeter and an ammeter. If only one multimeter is available, it can still be used by switching between current and voltage modes, but care must be taken to record the readings promptly to avoid battery discharge.
CROSS-REFERENCES
Lessons In Electric Circuits, Volume 1, Chapter 8: “DC Metering Circuits”
LEARNING OBJECTIVES
- Understand the operating principle of Kelvin (4‑wire) resistance measurement.
- Learn how to accurately measure low resistances with common test equipment.
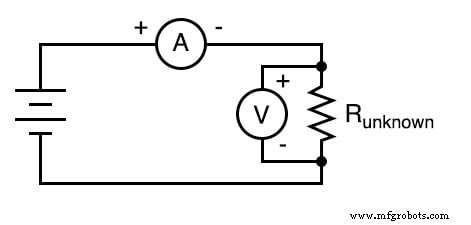
SCHEMATIC DIAGRAM
ILLUSTRATION
INSTRUCTIONS
Most ohmmeters determine resistance by applying a small voltage and measuring the resulting current. For low‑resistance specimens, the meter’s own lead resistance can dominate, leading to large errors. The Kelvin method eliminates this by separating the current‑carrying leads from the voltage‑sensing leads.
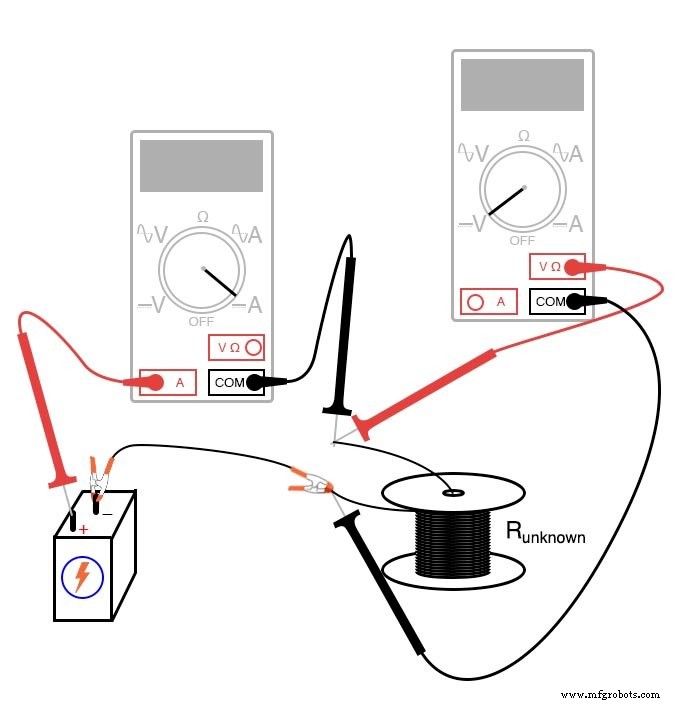
1. Select a low‑resistance specimen—such as the electromagnet coil from the previous chapter or a spool of wire where both ends can be accessed.
2. Connect the 6‑volt battery to the specimen. Insert the ammeter in series with the specimen to measure the current flowing through it. Ensure the ammeter’s range is set to at least 5 A to avoid damage.
3. If you have a second meter, switch it to voltage mode and connect it across the specimen’s terminals. Record both the current and voltage readings simultaneously. If only one meter is available, first record the current, then immediately break the circuit, switch to voltage mode, reconnect the battery, and record the voltage.
4. Calculate the specimen’s resistance using Ohm’s law: R = V / I. Because the voltage is measured only across the specimen, lead resistance is excluded from the calculation.
WARNING
The ammeter must be capable of measuring at least 5 A to withstand the high current that can flow when the specimen is close to a short. Avoid leaving the battery connected longer than necessary to prevent rapid discharge and measurement drift.
RELATED WORKSHEETS
- Basic Ohmmeter Use Worksheet
Industrial Technology
- Hands‑On Guide to Current Dividers: Build, Measure, and Simulate with a 6 V Battery
- Understanding Electrical Resistance and Circuit Safety
- Ohm’s Law Explained: How Voltage, Current, and Resistance Interact in Electrical Circuits
- Resistors: Fundamentals, Types, and Practical Applications
- Understanding Ohm’s Law and the Real Risks of Electrical Shock
- Understanding Conductance: The Inverse of Resistance
- Precision 4‑Wire Kelvin Resistance Measurement: Eliminating Wire‑Resistance Errors
- pH Measurement: Fundamentals, Electrodes, and Best Practices
- Calculating Wire Resistance for Voltage‑Drop‑Critical Circuits
- Understanding Resistance, Reactance, and Impedance in AC Circuits